GATEの使い方 6 ~CASToRによる画像再構成~
How to use GATE 6
今回はPET画像の再構成についてです。
I will talk about reconstruction of PET images this time.
これまでシミュレーションの実行と結果の保存までしてきました。カウントデータさえあれば解析するのに事足りる場合も多いと思います。
I have explained how to execute a simulation and how to save the results. Are you satisfied with just getting the count data?
ですが、画像を再構成してみたいと思って少し調べてみました。忘れない内にメモとして残しておこうと思います。
I wanted to reconstruct the image and looked into it. I will make a note of it before I forget it.
今回はCASToRというソフトを使用します。そんなに難しくないので、是非最後まで読んでいってください。
This time I will use software called CASToR. It’s not difficult to use. Please read this article to the end.
これを読めばGATEから得たROOTファイルを用いてPET画像の再構成ができるようになります!
If you read this, you will be able to reconstruct the PET image using the ROOT file obtained from GATE.
GATEの使い方 6
How to use the GATE
CASToRのインストール
Installation of the CASToR
では、Virtual Boxを起動してUbuntuを起動したあと、インターネットブラウザを開いてください。
Start Virtual Box and start Ubuntu. Then start your internet browser.
CASToRのサイトに行きます。
Virtual Boxなどの準備はこちらの過去記事を参照してください。
Go to the CASToR site.
Please refer to this past article for preparations such as Virtual Box.
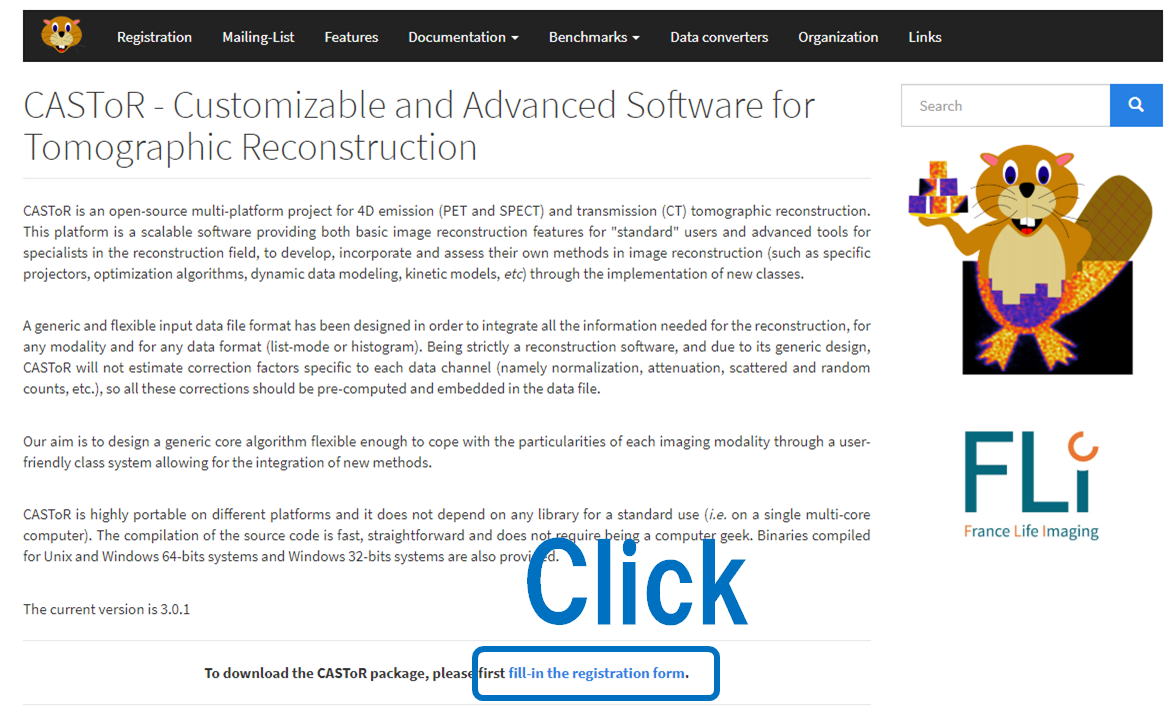
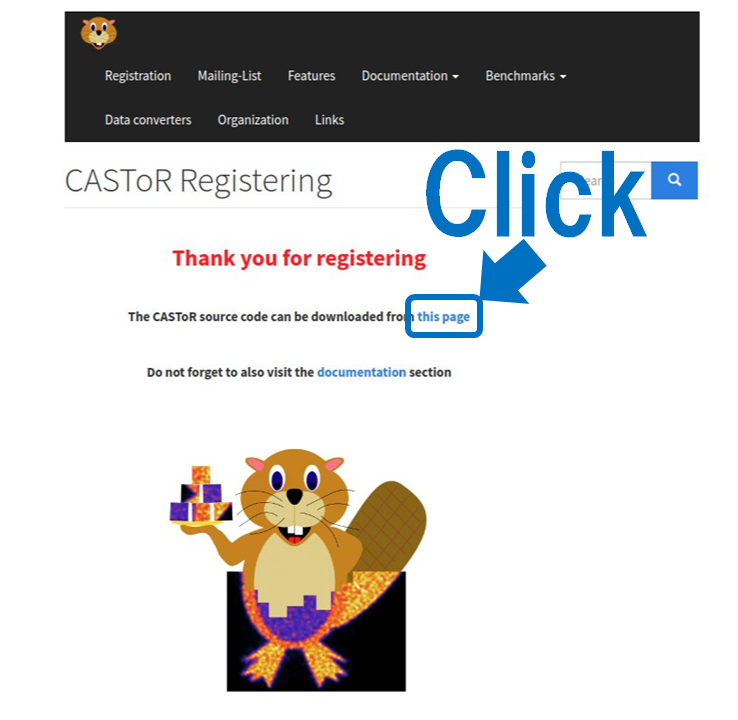
青い四角の所をクリックしてください。
Please click the place surrounded by the blue square.
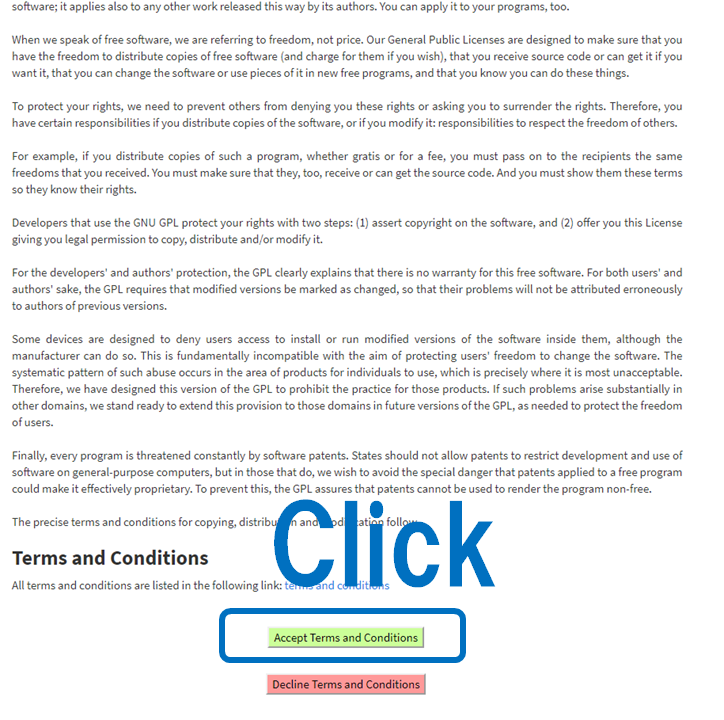
下の方にある「Accept Terms and Conditions」をクリックします。
Click “Accept Terms and Conditions” at the bottom.
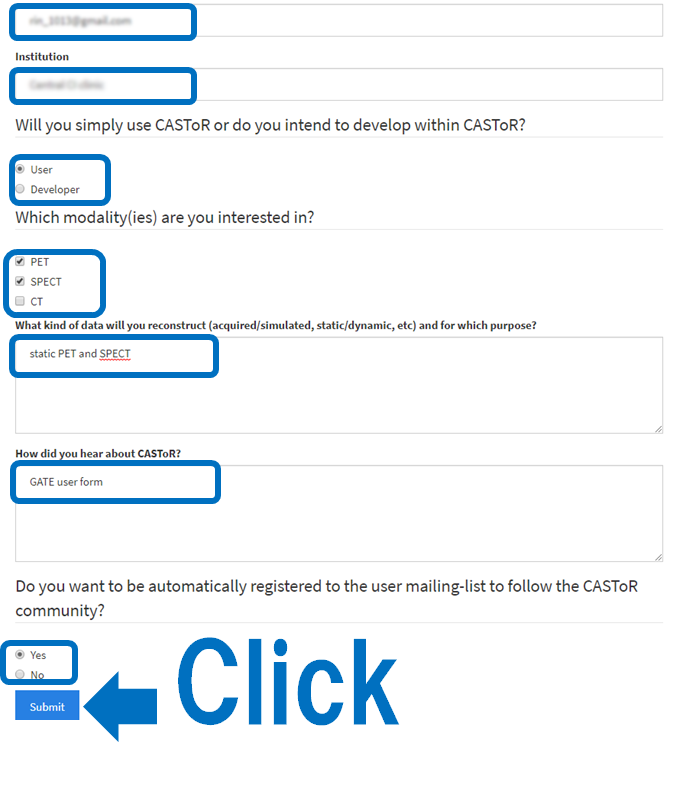
名前や所属施設、使用用途を入力してSubmitを押します。
Enter your name, affiliation and purpose of use and press “Submit”.
そうすると登録ありがとう!みたいな画面になります。
「this page」をクリックします。
Then the screen will display “Thank you for registration!”
Click on “this page”.
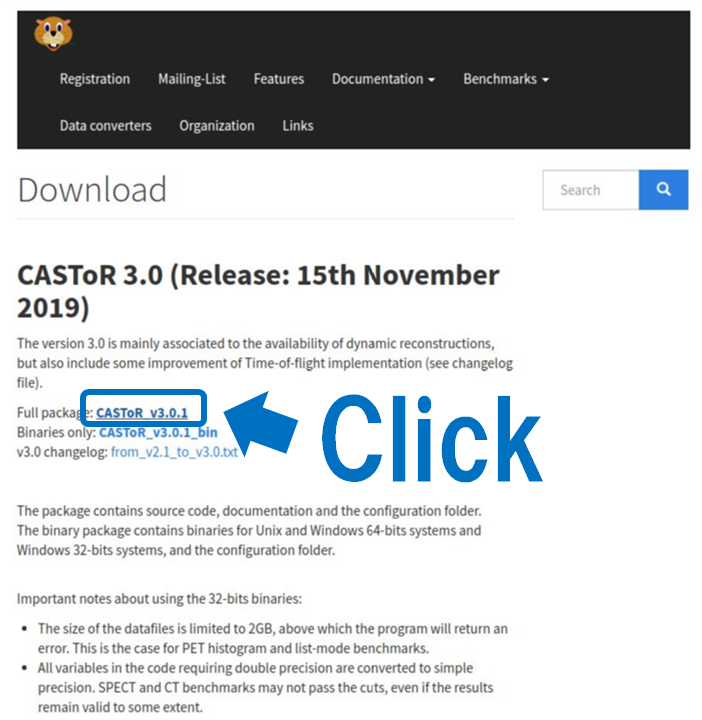
Full packageをダウンロードします。
Download “Full package”.
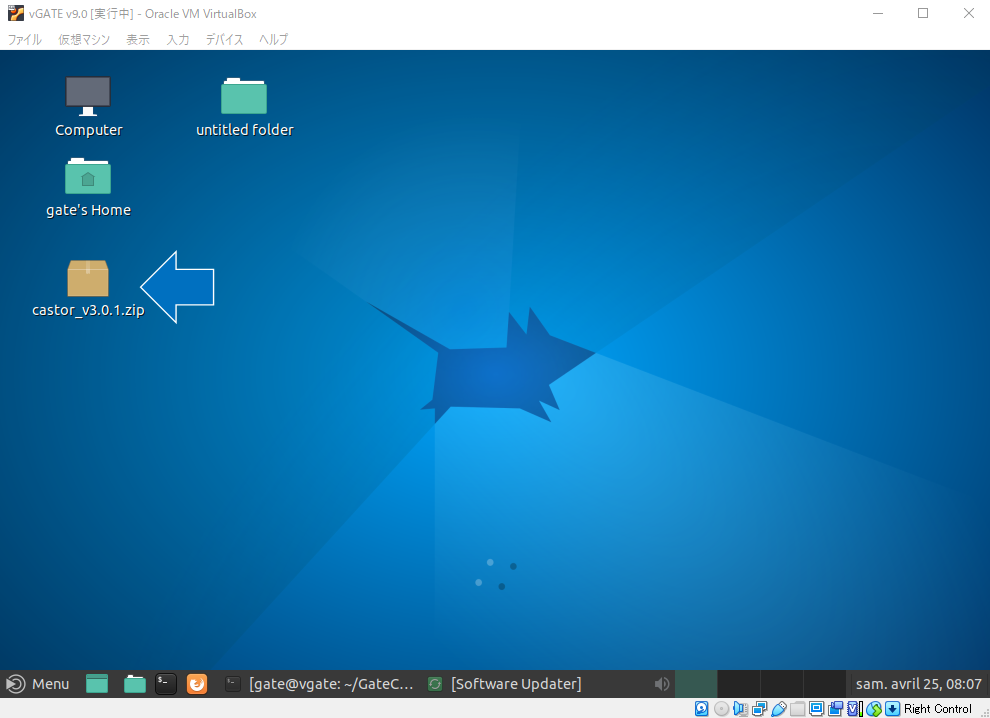
ダウンロードできましたか?以下のように保存できればOKです。今回はデスクトップに保存しました。
Did you download it? It is OK if you can save as follows. This time I saved it on my desktop.
ではTerminalを開いて、以下のようにコマンドを打ちます。
今回は/home/gate/Softwaresというディレクトリの中にcastorディレクトリを作成し、その中でインストール作業をしたいと思います。
Now start “Terminal” and type the following command.
This time, create the CASToR directory in the location “/home/gate/Softwares”. We try to install CASToR in that directory.
vgate:~/Desktop > cd ~
vgate:~ > cd Softwares/
vgate:~/Softwares > ls
vgate:~/Softwares > mkdir castor
vgate:~/Softwares > cd castor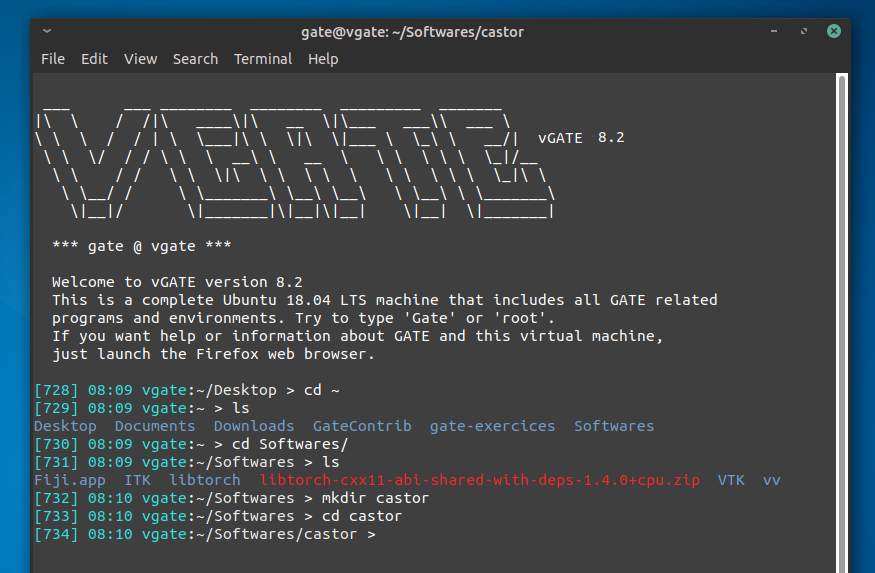
先ほどダウンロードしたcastor_v3.0.1.zipをデスクトップから今いるディレクトリにコピーします。
unzipコマンドで解凍して、できたディレクトリの中に移動します。
Copy “castor_v3.0.1.zip” from your desktop to your current directory.
Unzip it with the “unzip” command and move to the “castor_v3.0.1” directory.
cp '/home/gate/Desktop/castor_v3.0.1.zip' ./
unzip castor_v3.0.1.zip
cd castor_v3.0.1/
ちょっと中を確認してみます。lsコマンドを打ちます。
Let’s check the files inside. Type the “ls” command.
vgate:~/Softwares/castor/castor_v3.0.1 > ls
castor-recon.cc  cmake-modules  COPYRIGHT.TXT  GNU_GPL.TXT  Makefile  toolkits
CMakeLists.txt   config         docs           include      src
ではインストール用のディレクトリを作ります。名前は「bin」としました。
Now create a directory for installation. I named the directory “bin”.
mkdir bin
cd bin/
途中でccmakeを使うと楽なので、以下のコマンドでインストールしておきます。
Using the “ccmake” command will make the work easier. So, install “ccmake” with the following command.
sudo apt-get install cmake-curses-guiパスワードを求められます。「virtual」でしたね。
You will be prompted for a password. The password is “virtual”.
ではcmakeします。
Let’s cmake !
cmake ../次にccmakeします。
Next, run the ccmake.
ccmake ../ウィンドウが立ち上がるので、使うものをOFF→ONにしてください。今回は
・CASToR_BUILD_GATE_UTILITIES
・CASToR_BUILD_SAMPLE_UTILITIES
・CASToR_ROOT
・CASToR_SIMD
をONにしておきました。
The “ccmake” command opens a window. Change what you use from “OFF” to “ON”. Depending on the choices you make, additional work may be required. This time, I turned on the above items.
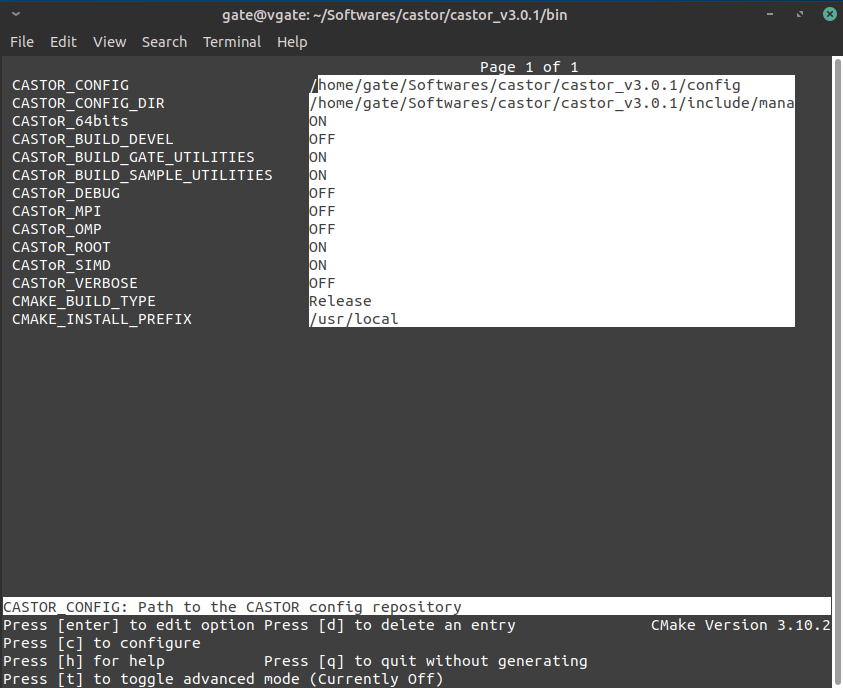
「c」を押してconfigureします。
Press “c” to “configure”.
「e」を押してhelpをexit、「g」を押して終了です。
Press “e” to exit the help screen. Then, press “g” to finish.

cmakeをもう一回して(たぶん必要)
Try cmake again. (Maybe necessary)
cmake ../makeします。例えばCPUコアを2つVirtual Boxに割り当てているなら-j2とします。CPUコア1つなら単純にmakeでいいです。
Run “make”. For example, if you have assigned two CPU cores to Virtual Box, add the option (-j2). If you are only using one CPU core, no options are needed.
make -j2しばらくするとmakeが終わります。
After a while, the “make” process ends.
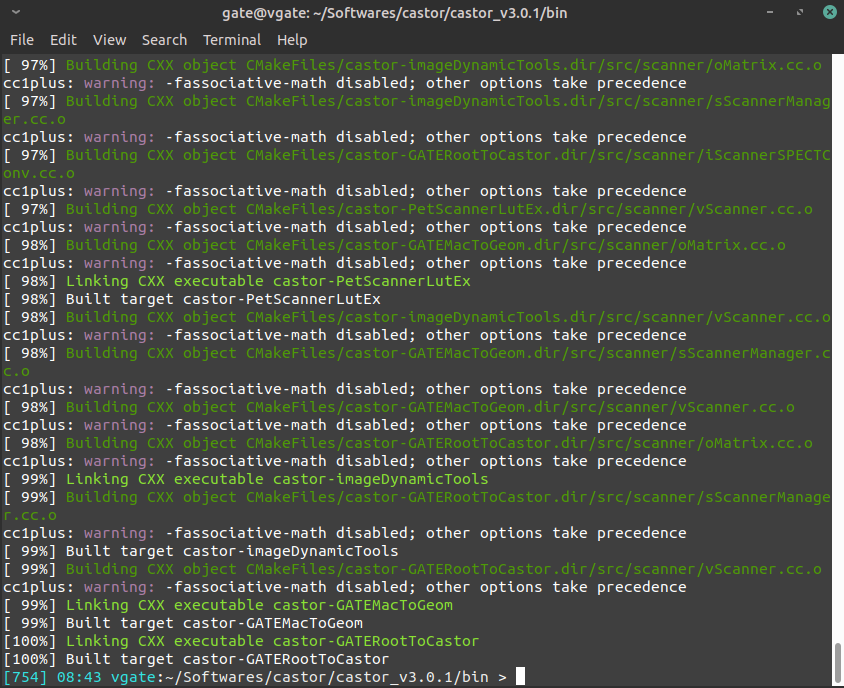
こんな感じになれば、OKです。
It is OK if it becomes the display like the above.
CASToRのPATHを通しましょう。
Let’s set “PATH”.
gedit ~/.bashrc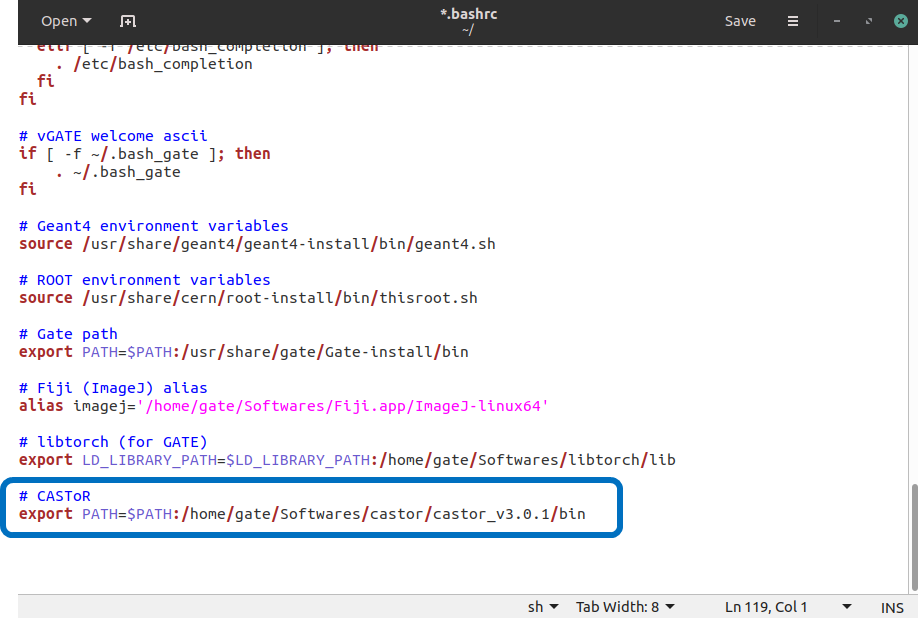
青い四角で囲われた部分を追加して保存します。
一度Terminalを閉じて、もう一度Terminalを起動します。
Add the part surrounded by the blue square and save it.
Close Terminal and start Terminal again.
castor-reconと入力して
When you put above command …
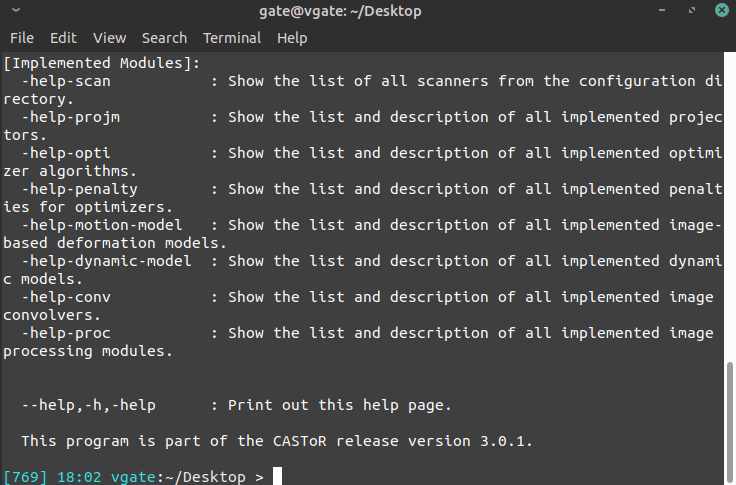
このような結果になればOKです。
It is OK if you get such a result.
ROOTファイルから画像再構成
Reconstruction from ROOT file
今回使用するROOTファイルは以下のマクロファイルから得たものです。
The ROOT file used this time is obtained by executing the following macro file.
[828] 18:45 vgate:~/GateContrib/imaging/myPET > ls
myOUT.root  myPET_DMI.mac
マクロファイル実行後の状態です。
This shows the state after executing the macro file.
ではCASToRを使って再構成を行います。再構成の流れは3段階です。
Now we will use CASToR to reconstruct the PET image. Reconstruction is done in 3 steps.
1.GATEのmacファイルから.geomファイルを作成する。
2.ROOTファイルからCASToR形式ファイルを作成する(root -> Cdh&Cdf)
3.CASToR形式のファイルをもとに再構成する。(Cdf&Cdf -> i33&h33)
1.Create a .geom file from the GATE mac file.
2.Create CASToR format file from ROOT file (root-> Cdh & Cdf)
3.Reconstruct based on the CASToR format file. (Cdf & Cdf-> i33 & h33)
GATEのmacファイルからgeometry情報を取得する
Get geometry information from GATE mac file
vgate:~/GateContrib/imaging/myPET > castor-GATEMacToGeom -m myPET_DMI.mac -o DMIPET-m:macro file
-o:output (geom file name)
これによって
/home/gate/Softwares/castor/castor_v3.0.1/config/scanner/
の下にDMI.geomというファイルが作成されます。lsコマンドで確認すると
By this,
A file called DMI.geom is created under “/home/gate/Softwares/castor/castor_v3.0.1/config/scanner/”.
If you put ls command …
vgate:~/GateContrib/imaging/myPET > ls /home/gate/Softwares/castor/castor_v3.0.1/config/scanner/

CBCT_BENCHMARK_V2.0.geom          PET_GE_SIGNA_PET-MR.hscan
CBCT_VARIAN_TRUEBEAM.geom         PET_GE_SIGNA_PET-MR.lut
DMIPET.geom                          PET_SIEMENS_BIOGRAPH6_TRUEPOINT_TRUEV.hscan
PET_BIOGRAPH6_TRUEPOINT_2D.hscan  PET_SIEMENS_BIOGRAPH6_TRUEPOINT_TRUEV.lut
PET_BIOGRAPH6_TRUEPOINT_2D.lut    PET_SIEMENS_BIOGRAPH_MCT.geom
PET_CASTOR_BENCHMARK.hscan        PET_SIEMENS_MMR.hscan
PET_CASTOR_BENCHMARK.lut          PET_SIEMENS_MMR.lut
PET_GE_GATE.geom                  README
PET_GE_GATE.hscan                 SPECT_CASTOR_BENCHMARK.geom
PET_GE_GATE.lut                   SPECT_SIEMENS_INTEVO.geom
geomファイルの中身を見てみます
Let’s look at the contents of the geom file.
vgate:~/GateContrib/imaging/myPET > gedit /home/gate/Softwares/castor/castor_v3.0.1/config/scanner/DMIPET.geom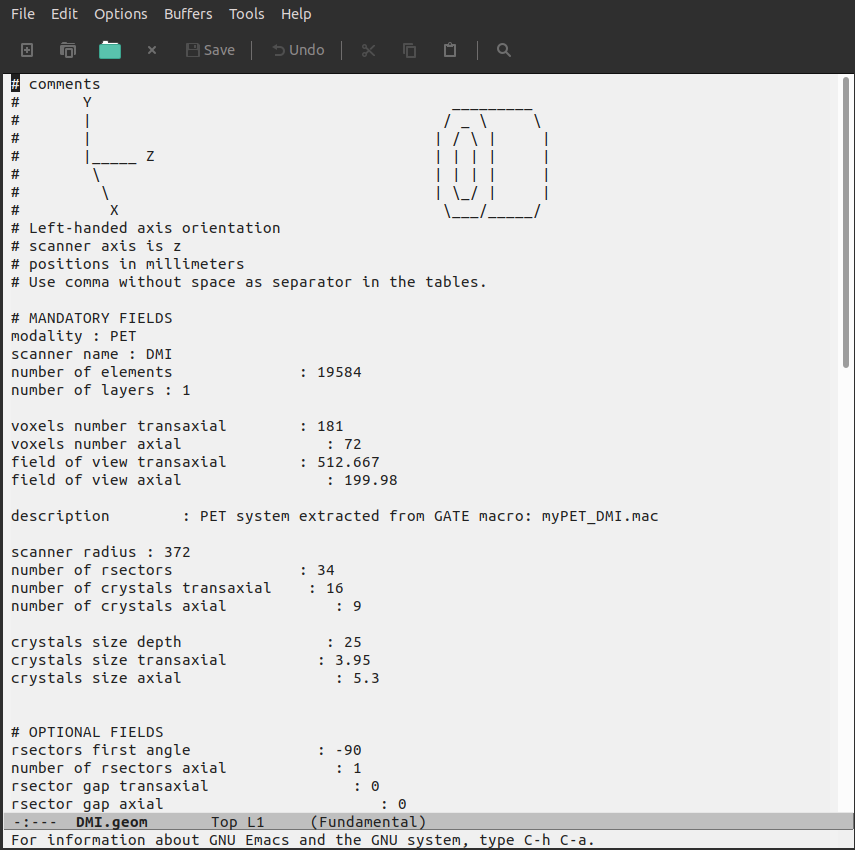
同時計数したクリスタルのIDの組み合わせからLORの傾きや視野内の感度分布を把握するためには、こんなファイルが必要なんでしょう(・・・多分)
In order to grasp the tilt of LOR and the sensitivity distribution in the field of view from the ID of the crystal that detected the radiation, such a file would be necessary (maybe).
ROOTファイルをCASToR形式に変換する
Convert ROOT files to CASToR format
次に、ROOTファイルをCASToRで扱うことができる形式に変換します。
Next, convert the ROOT file into a format that CASToR can handle.
現時点でディレクトリの中は、以下のようになっています。
At the moment, the contents of the directory are as follows.
vgate:~/GateContrib/imaging/myPET > ls
att_map_H2O_intf.h33 att_map_H2O_intf.i33 myOUT.root myPET_DMI.macatt_map_H2O_intf.h33とatt_map_H2O_intf.i33はInterfile形式のμ-mapです。
μ-mapの作り方は別の記事で書きました。
The “att_map_H2O_intf.h33 and .i33” are attenuation map (Interfile format).
How to make attenuation map is explained on another article.
vgate:~/GateContrib/imaging/myPET > castor-GATERootToCastor -i myOUT.root -o DMI0426 -m myPET_DMI.mac -s DMIPET -src -oh -atn att_map_H2O_intf.h33-i:inputのrootファイル
-o:output fileの名前
-m:macro ファイル
-s:castor-GATEMacToGeomで作成した.geomファイルの名前
-src:scatter and random correction
-oh:histogram format
-atn:attenuation map(Interfile)のheader file(*.h33)
減弱マップのピクセル値は線源弱係数[cm-1]とします。
Pixel value of attenuation map are shown in cm-1.
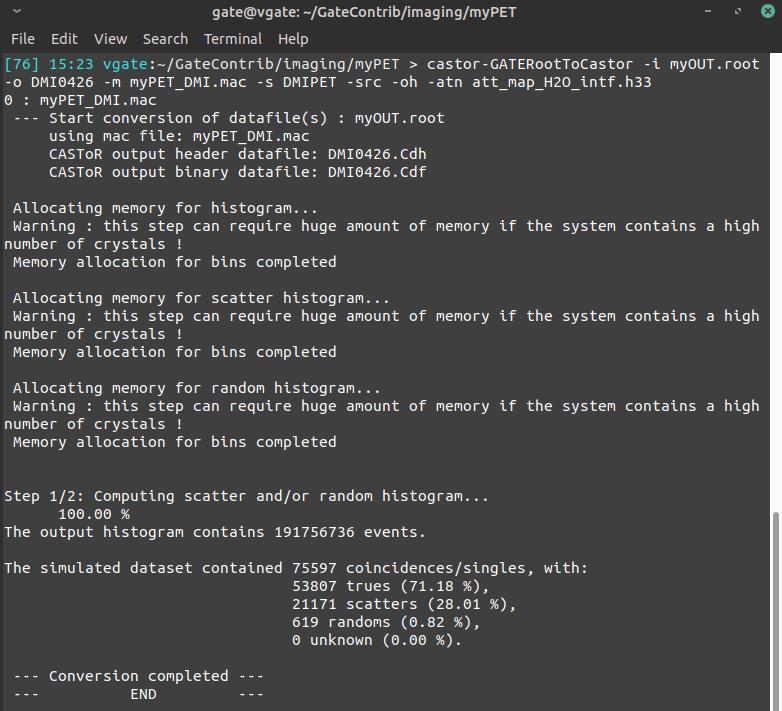
こんな感じでConversion completedと表示されたらOKです。
It is OK when “Conversion completed” is displayed.
・DMI0426_df.Cdh
・DMI0426_df.Cdf
・DMI0426.log
というファイルが出力されます。
Above file will be generated.
CASToR形式のファイルをもとに再構成する
Reconstruct PET image from CASToR format file
では最後に再構成です。
Finally, reconstruction.
vgate:~/Desktop/0426 > castor-recon -df DMI0426_df.Cdh -opti MLEM -it 2:10 -proj joseph -conv gaussian,4.,4.,4.::psf -dim 128,128,64 -vox 3.,3.,3. -dout 0426recon-df:再構成データ(CASToR形式)のヘッダーファイル input data
-opti:再構成アルゴリズム reconstruction algorithm
-it:Iteration&Subset
-proj:投影アルゴリズム projection algorithm
-conv:空間分解能モデリング spacial resolution modeling
gaussian,transaxial(mm),axial(mm),sigma(3~5)::psf
-dim:ボクセルの分割数(X, Y, Z) dimension
-vox:ボクセルのサイズ(X, Y, Z) voxel size
-dout:出力ディレクトリ名 name of output directory

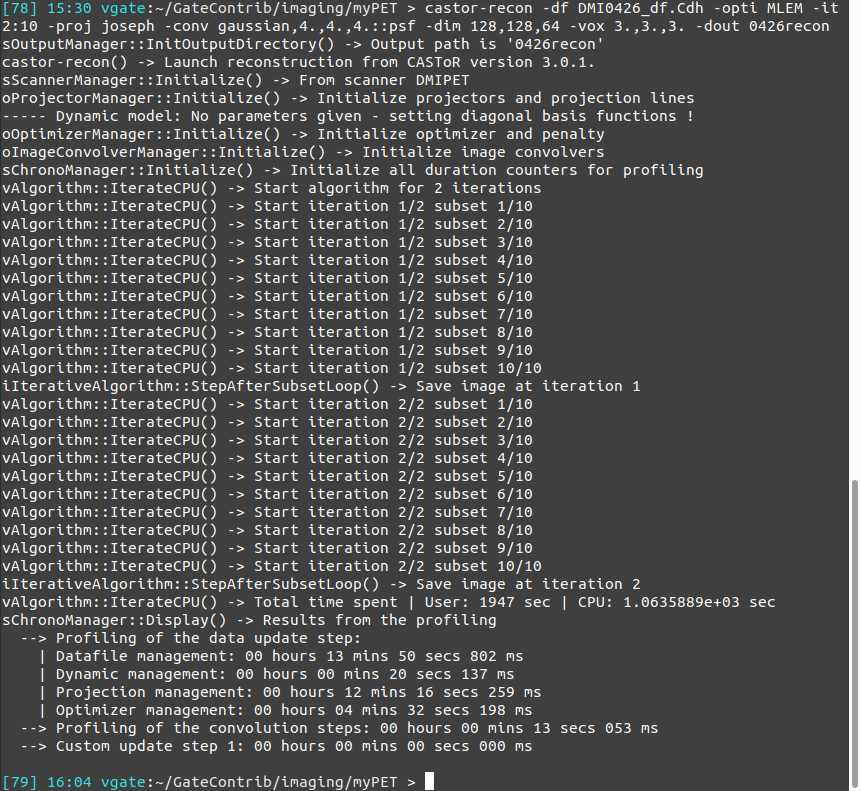
こうなれば再構成は成功です。
If you see a result like this, the reconfiguration is successful.
開いてみましょう。
Let’s open the reconstructed image.
amide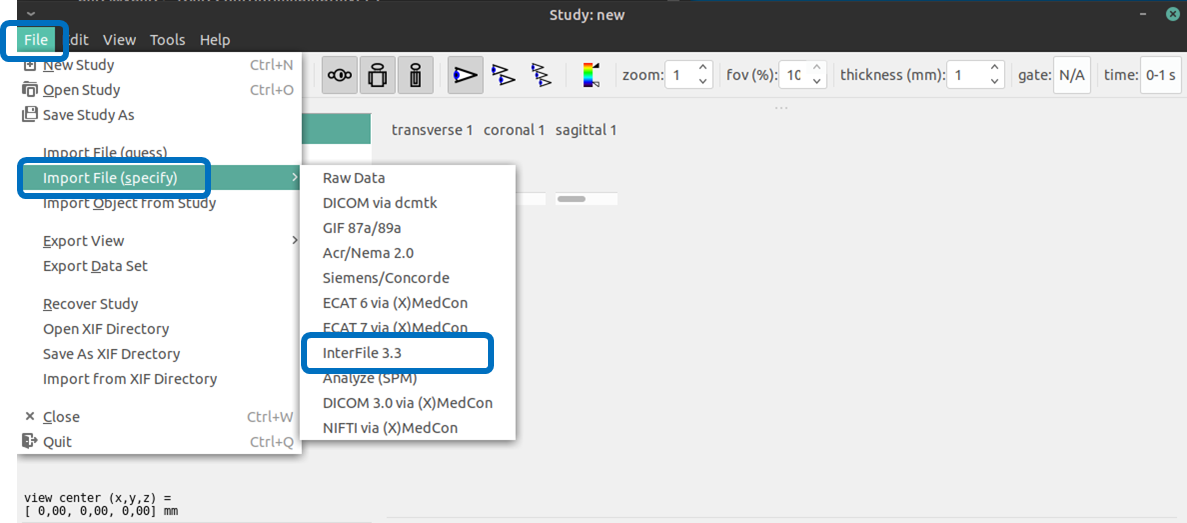
iteration毎に画像が出力されています。
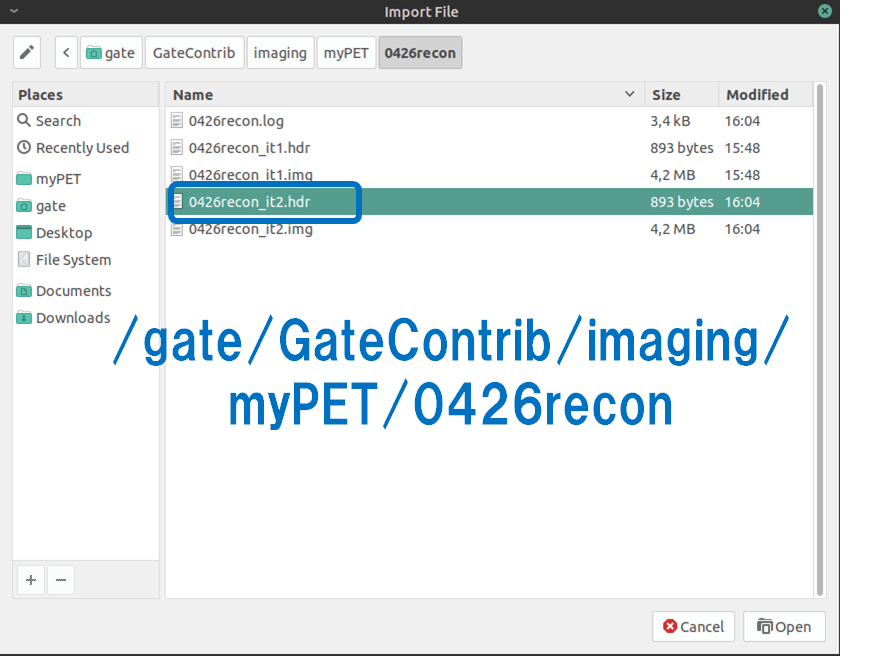
選択するのはhdrファイルです。
The image is output for each teration.
Please select an hdr file.
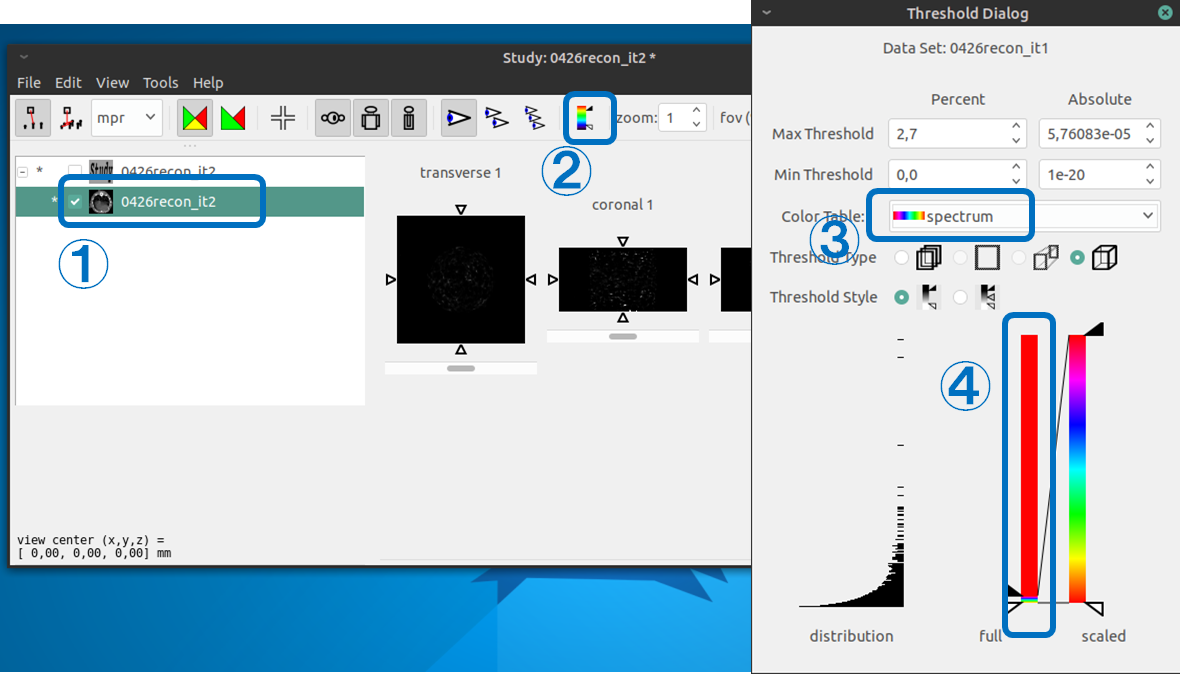
表示を少し調節して
Adjust the display conditions
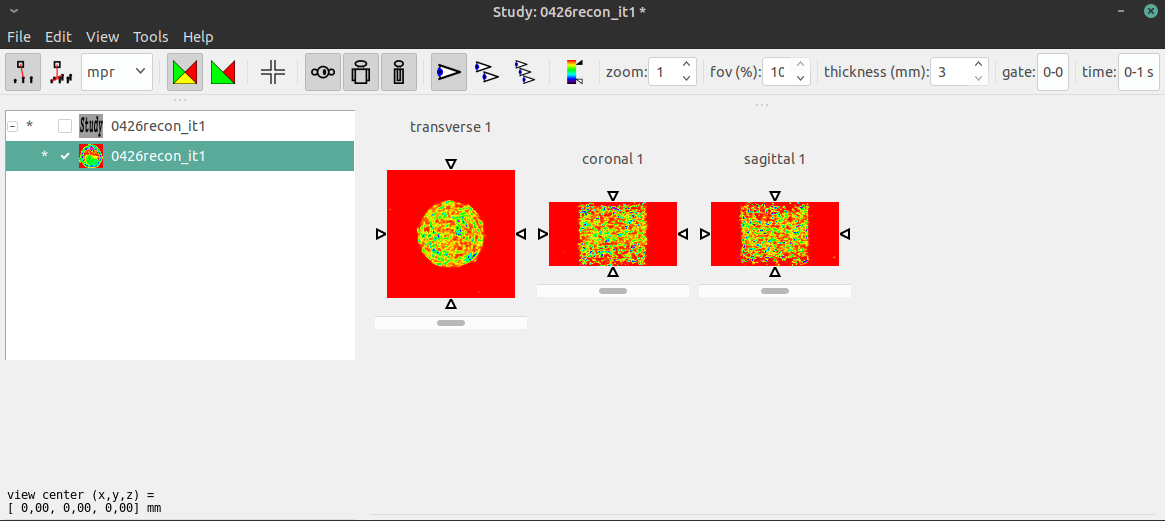
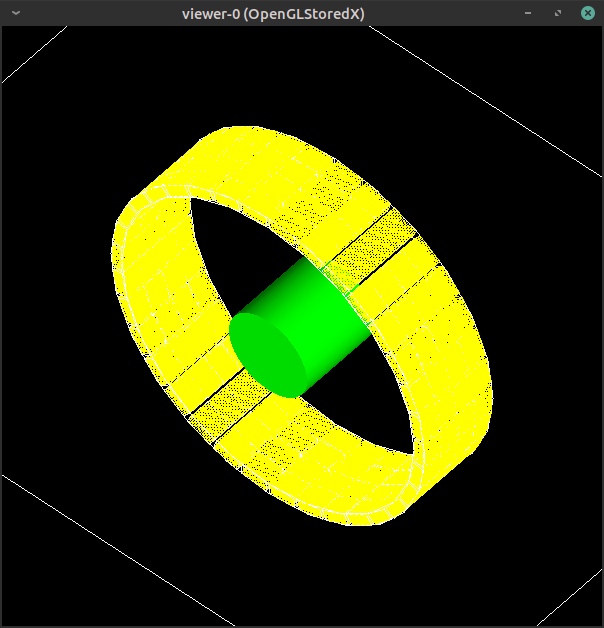
再構成画像が見れました。
カウントが少ないのでざらざらですね。
I could see the reconstructed image.
It is rough because the number of counts is small.
Virtual Boxだと時間がかかる
It takes a lot of time for calculation if we use Virtual Box.