減弱マップの作成方法 1
How to make attenuation map 1
今回はCASToRでPET画像を再構成する際に使用する減弱マップについてです。
This article describes how to create an attenuation map. It is required when reconstructing PET images using CASToR.
PET検査は被写体の減弱を強く受けます。
In PET examination, absorption of photons by the subject occurs.
この影響を補正しなければ、均一に線源が分布していたとしても中心部のカウントが低下してしまいます。
If this effect is not corrected, the count at the center will decrease even if the radiation source is evenly distributed over the subject.
CASToRによる再構成ではピクセル値が線源弱係数(1/cm)の減弱マップを使うことで減弱補正が可能です。
In image reconstruction using CASToR, attenuation correction can be performed by referring to the attenuation map. The pixel value of the attenuation map is the Linear attenuation coefficient (1/cm).
この記事を読めばCASToRによる画像再構成に使用する減弱マップの作成方法が理解できます!
By reading this article, you can understand how to create a attenuation map. It can be used for image reconstruction using CASToR.
減弱マップの作り方 1
今回作成するのは、水の円柱ファントム(直径20cm,長さ20cm)の単純な形の減弱マップです。CT画像からの減弱マップの作成方法は、いつか書きたいと思います。
This time, we will create an attenuation map of a cylindrical phantom (20 cm in diameter, 20 cm in length) filled with water. I will write about how to create an attenuation map from CT images in another article in the future.
まずは511 keVのガンマ線に対する水(H2O)の線源弱係数を求める必要があります。また、この記事はこちらのサイトを参考にしました。
First, it is necessary to investigate the Linear attenuation coefficient of water (H2O) for gamma rays of 511 keV. The content of this article referred to this site.
ではまず、XCOMというサイトに行きましょう。
First, let’s go to the site called XCOM.
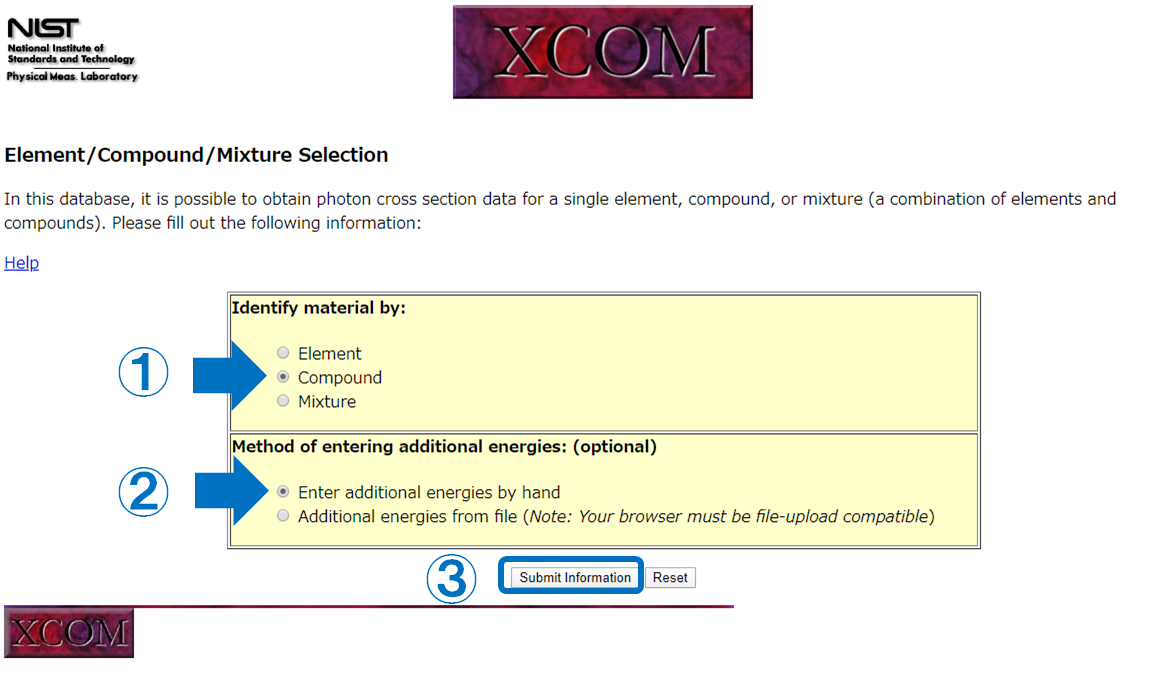
「Compound」と「Enter additional energies by hand」にチェックを入れて「Submit Information」をクリックします。
Check “Compound” and “Enter additional energies by hand” and click “Submit Information”.
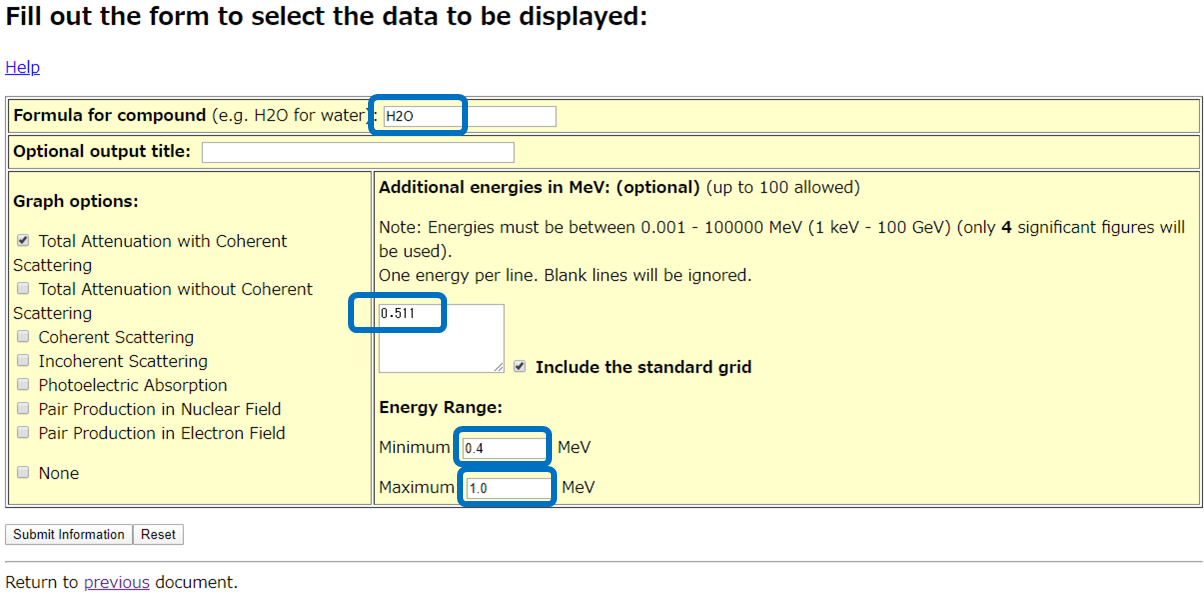
Formula for compound:H2O
中心のボックス:目的とするエネルギー(MeV)を入力します。
Center box:Enter the desired energy (MeV)
Energy Range:エネルギーの範囲は上で指定したエネルギーを含む範囲で適当に設定してください。あんまり範囲が広いと表示される行が長くなります。
Energy Range:Set the energy range appropriately within the range including the energy specified above. If the range is too wide, the displayed lines will be longer.
「Submit Information」をクリックします。
Click “Submit Information”.
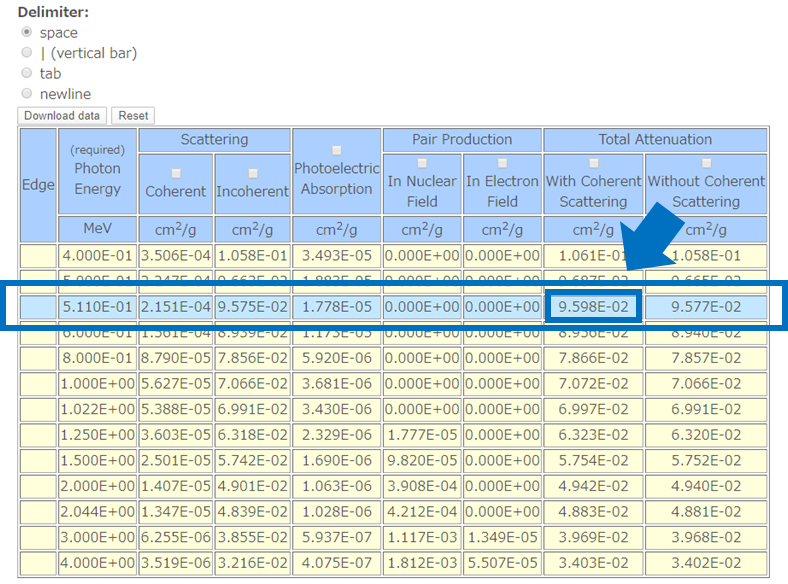
先ほど指定したエネルギーがマークアップされます。
この「With Coherent Scattering」というところが、質量減弱係数(cm2/g)を示しています。
なので、これに密度(g/cm3)をかければ線源弱係数(1/cm)になりますね。
The energy specified above is marked up.
This “With Coherent Scattering” shows the mass attenuation coefficient (cm2/g).
Therefore, multiplying this by the density (g/cm3) gives the Linear attenuation coefficient (1/cm).
20℃の水の密度は0.998203のようなので、
The density of water at 20℃ is 0.998203.
0.09598×0.998203=0.09581
となります。
この画素値の画像を作ればいいわけですね。
では、ImageJを使い画像を作成しましょう。
Create an image with a pixel value of 0.09581.
Let’s create that image using ImageJ.
Teminalを開いてimagejと打つとImageJ(Fiji)が起動します。
Open “Teminal” and type “imagej” to start ImageJ (Fiji).
imagej
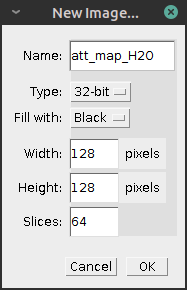
Name: att_map_H2O
Type: 32-bit
Fill with: Black
Width: 128
Height: 128
Slices: 64
としました。
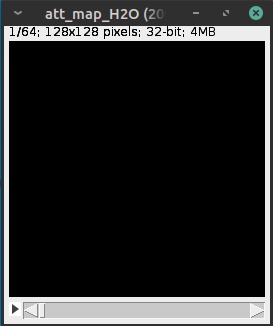
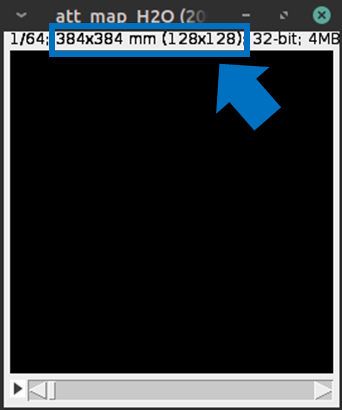
真っ暗なStack画像が開きました。(128×128, 64 slice )
A fresh (black) Stack image is opened.
ではピクセルサイズの設定をしていきます。
Set the pixel size.
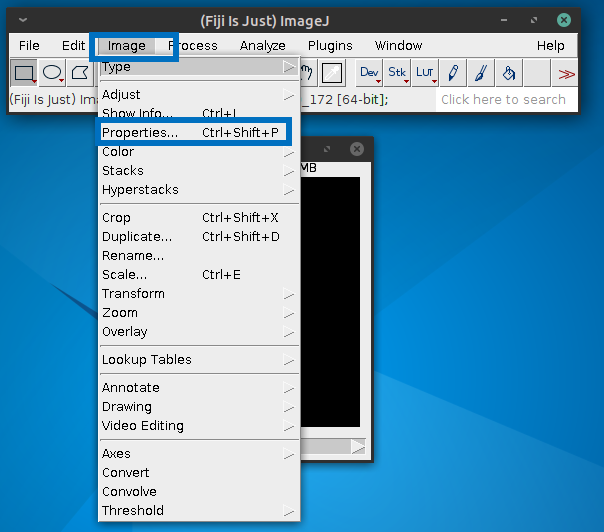
Image -> Properties…
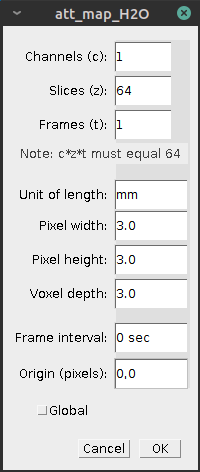
今回は1ボクセルのサイズは(3×3×3 mm)としました。
This time, the size of 1 voxel is (3x3x3 mm).
ウィンドウの上部が変わりましたね。
The display at the top of the window has changed.
ではファントム部分の画素に、さきほどの0.09581を足していきます。
Add 0.09581 to the pixel where the phantom is.
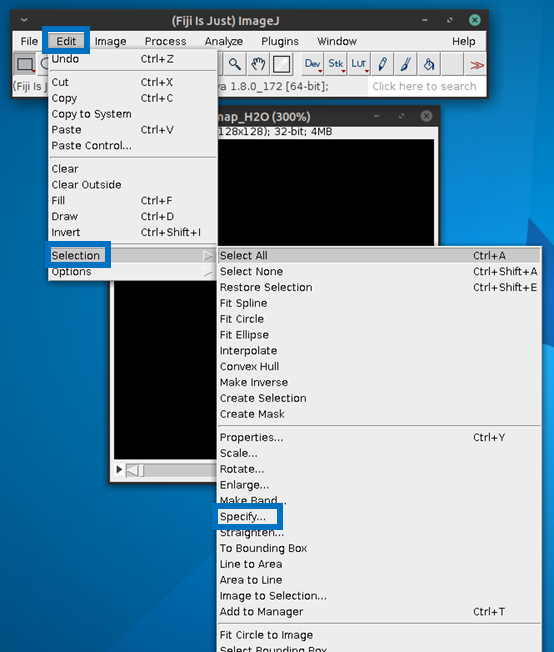
Edit -> Selection -> Specify…
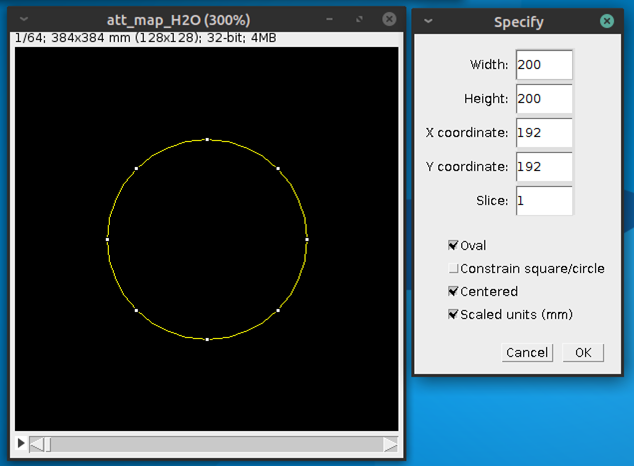
Width: 200
Height: 200
X coordinate: 192
Y coordinate: 192
Slice: (anywhere)
Oval, Centered, Scaled units(mm)にcheckを入れます。
円形のROIが配置されている状態で
With the circular ROIs placed …
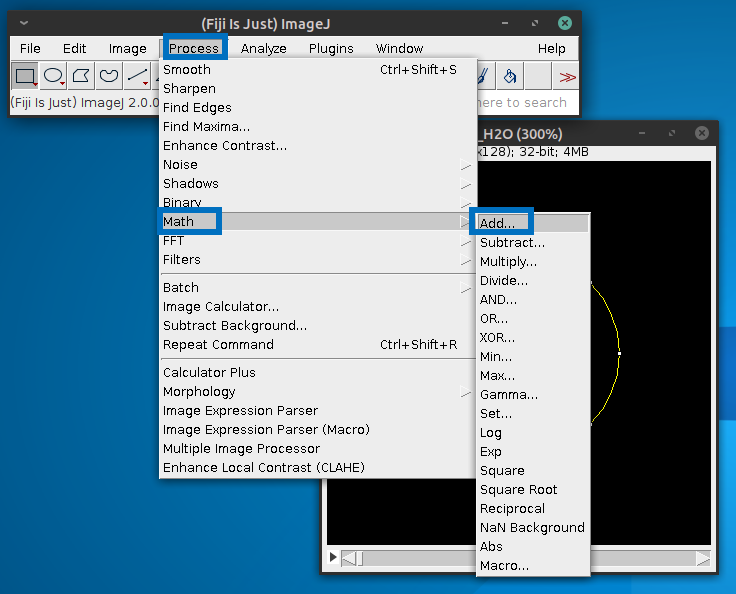
Process -> Math -> Add…
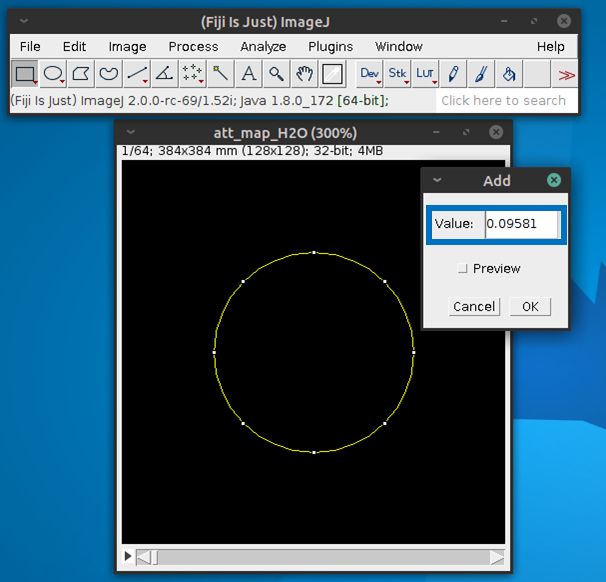
加算する値(0.09581)を入力して「OK」
Enter the value to add (0.09581) and click “OK”.
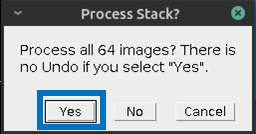
64枚すべてに加算します。64×3mm = 192mmしかありませんね。
ファントムの長さが200mmなのでスライス枚数は67枚にしておくべきでした。
まぁいいか。
Add 0.09581 to all slices. 64×3mm=192mm (Not enough length).
Since the phantom is 200 mm long, we had to prepare 67 slices.
Screw it.
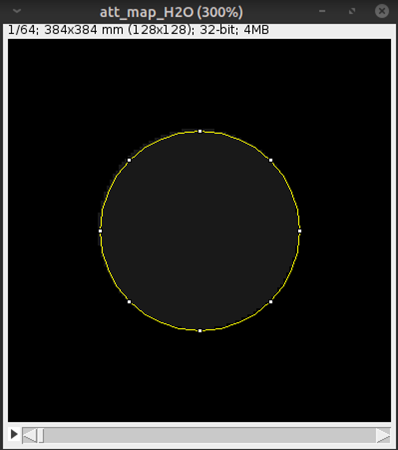
若干、ROIの中が明るくなった。
The inside of the ROI became slightly brighter.
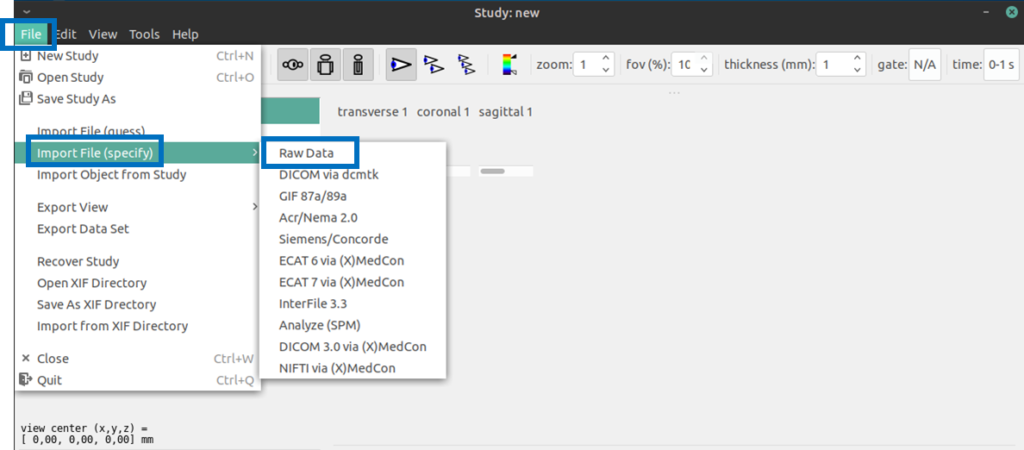
では保存します。本当はInterfile形式で保存したいのですが、ImageJではプラグインなどを追加しないとできなさそうなので(多分ね)
Let’s save. Originally, I would like to save in Interfile format, but it seems that I can not do it without adding a plug-in in ImageJ (maybe).
1クッション挟みましょう。以下のような感じです。
Let’s add one step. The flow is as follows.
ImageJ -> save(raw) -> amide -> save(Interfile)
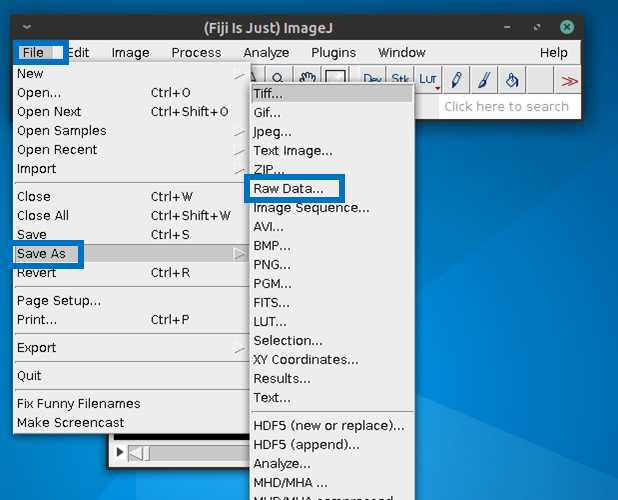
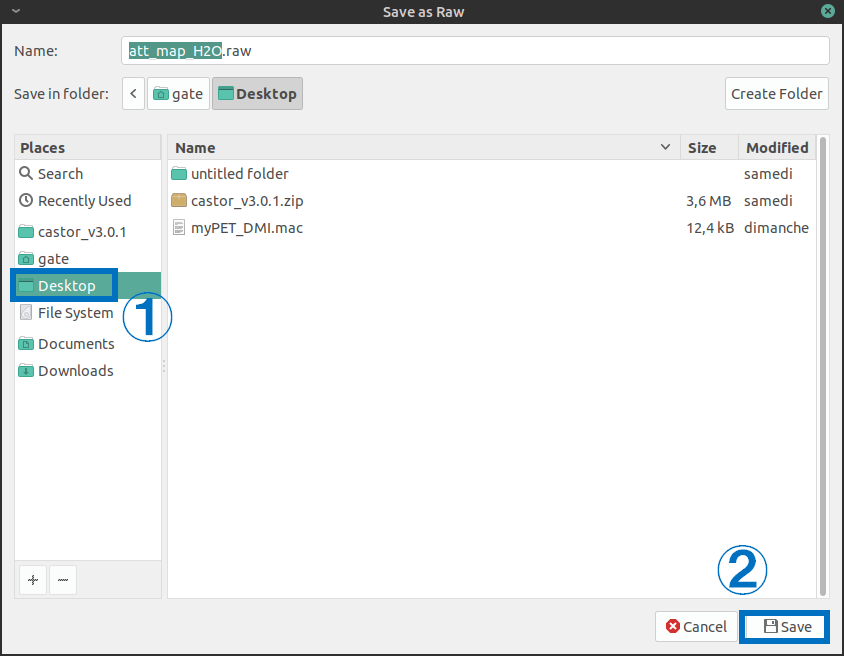
今回はデスクトップに保存しました。
This time I saved the file on my desktop.
AMIDEを起動します。Terminalで以下のコマンドを打ちます。
Start AMIDE. Type the following command in Terminal.
amideRaw Dataを選択します。
Select “Raw Data”.
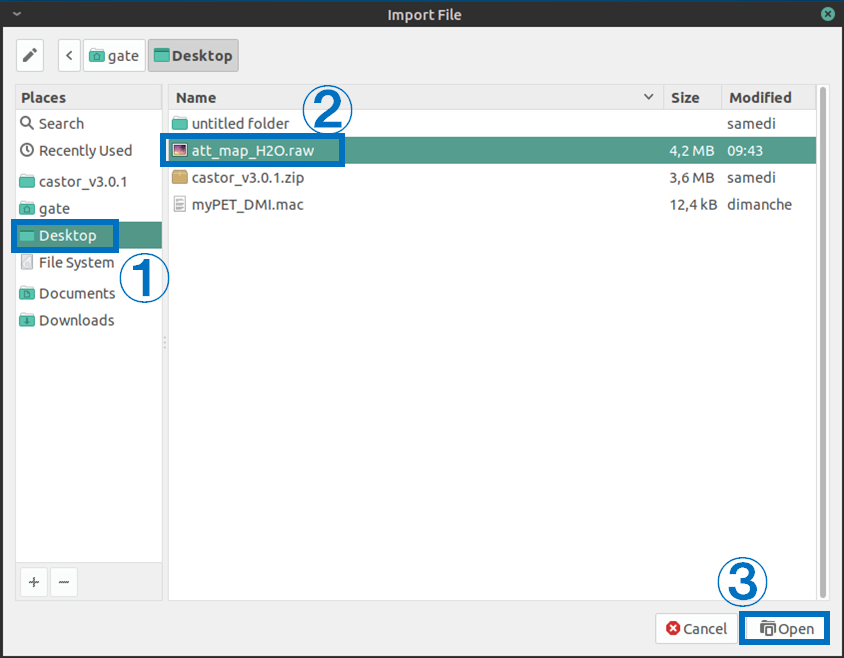
先ほど、Desktopに保存した「att_map_H2O.raw」を開きます。
Open “att_map_H2O.raw” saved in Desktop.
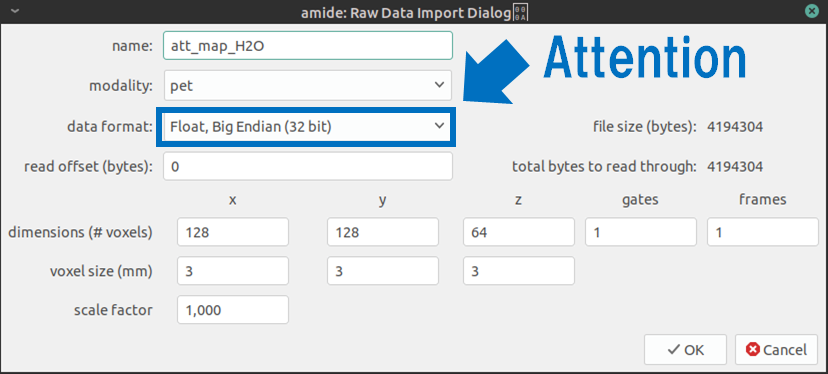
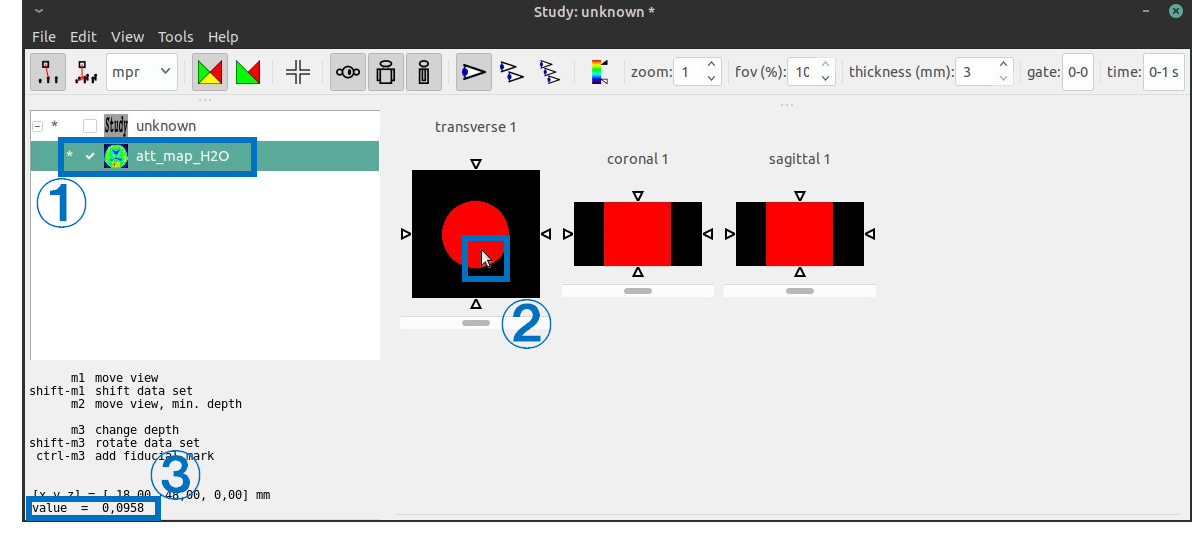
画素値がちゃんと0.0958になっていることを確認してください。もし、明らかに違う値になっていた場合は、Big EndianではなくLittle Endianで保存されていた可能性が高いです。
Make sure that the pixel value is 0.0958. If the values are obviously different, it is likely that the image was saved in Little Endian instead of Big Endian.
ちゃんと開けたら、Interfile形式で保存します。
Save in Interfile format.
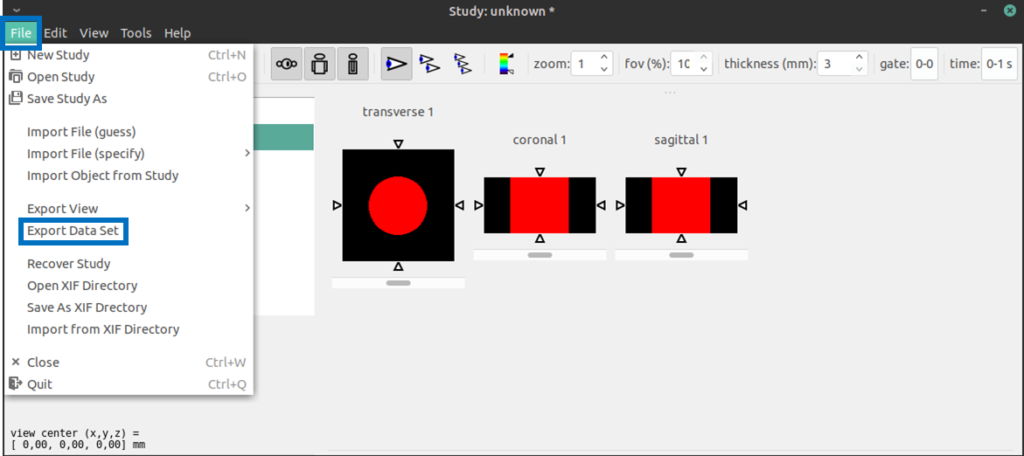
File -> Export Data Set
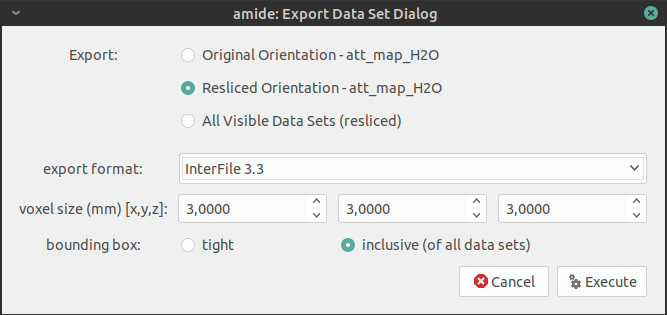
InterFile 3.3を選択して、Execute
Select “Interfile 3.3” and press the “Execute” button.
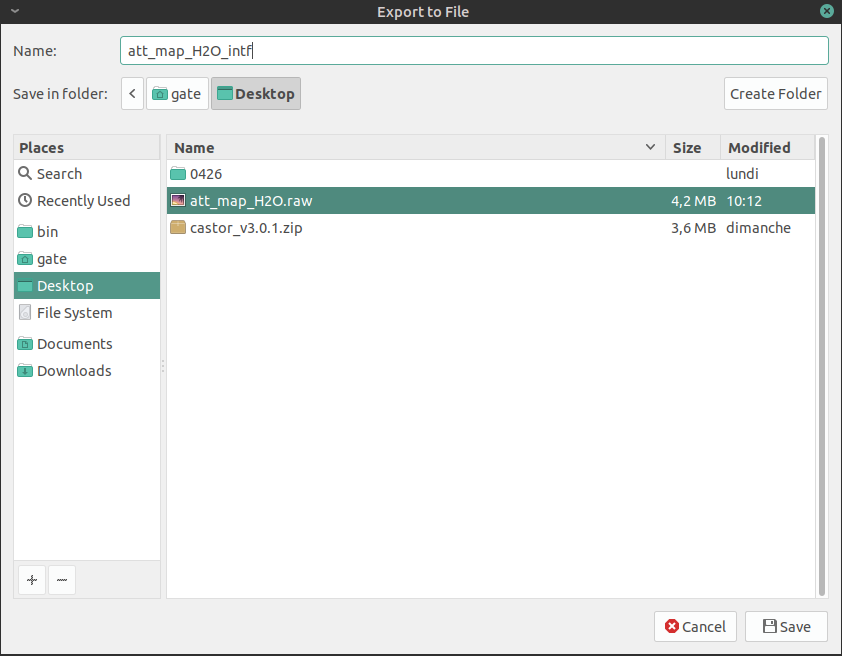
また、Desktopに保存しました。
名前は「att_map_H2O_intf」としました。
I saved it to Desktop as before.
The name is “att_map_H2O_intf”.
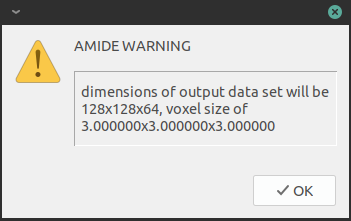
なんか警告がでましたが、大丈夫そうですね。
We got a warning, but it seems to be okay.
保存されたファイルは Saved files are ….
・att_map_H2O_intf.i33 (raw data)
・att_map_H2O_intf.h33 (header file)
です。
header fileはアスキー形式なのでテキストエディタで中を見ることができます。
Since the header file is written in ASCII format, you can see the inside by a text editor.
cd ~/Desktop/
gedit att_map_H2O_intf.h33
デスクトップに移動して、「att_map_H2O_intf.h33」を見てみましょう。
※geditはテキストエディタです
Let’s go to the desktop and see the contents of “att_map_H2O_intf.h33”.
P.S. The “gedit” is a text editor.
importする際にBig Endianになっていてもamideが出力するinterfileはLittle Endianになっていますので、注意です。
Note that the Interfile output by AMIDE is in Little Endian format.
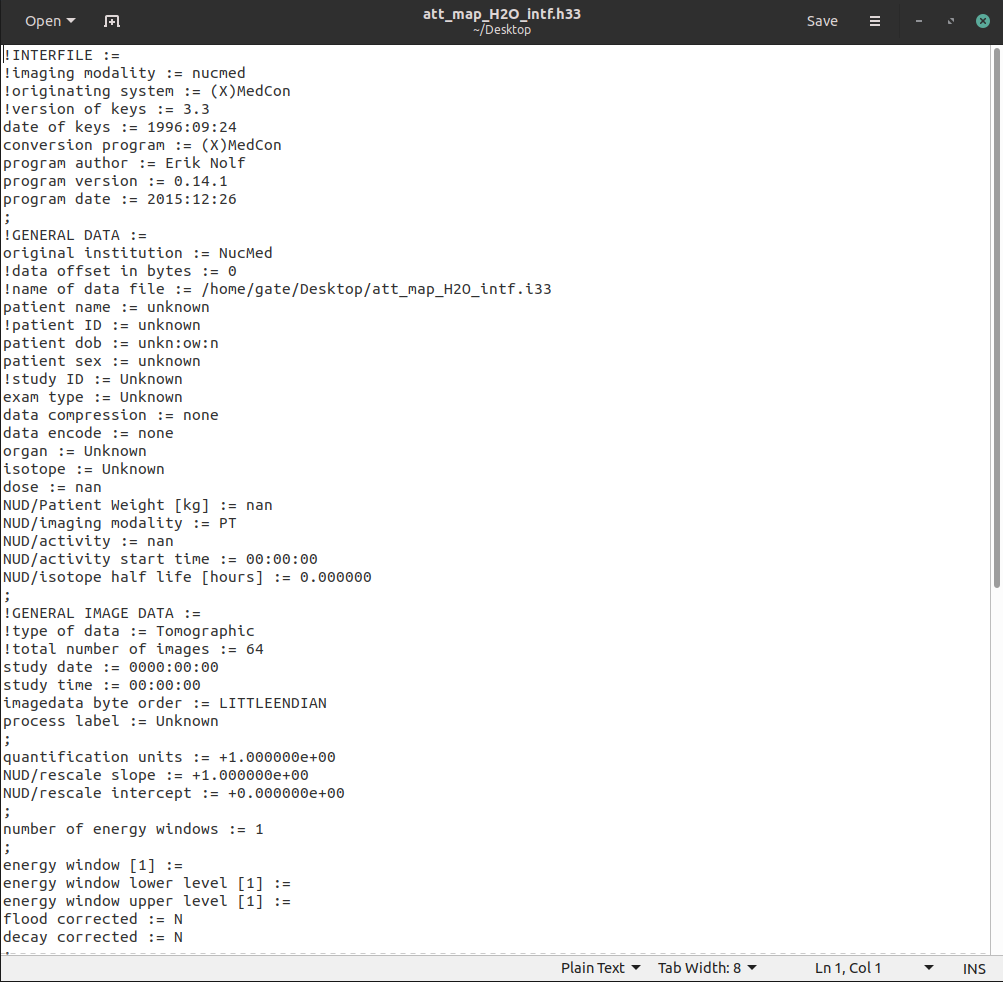
画像に関する情報が書き込まれています。
Contains information about the image.
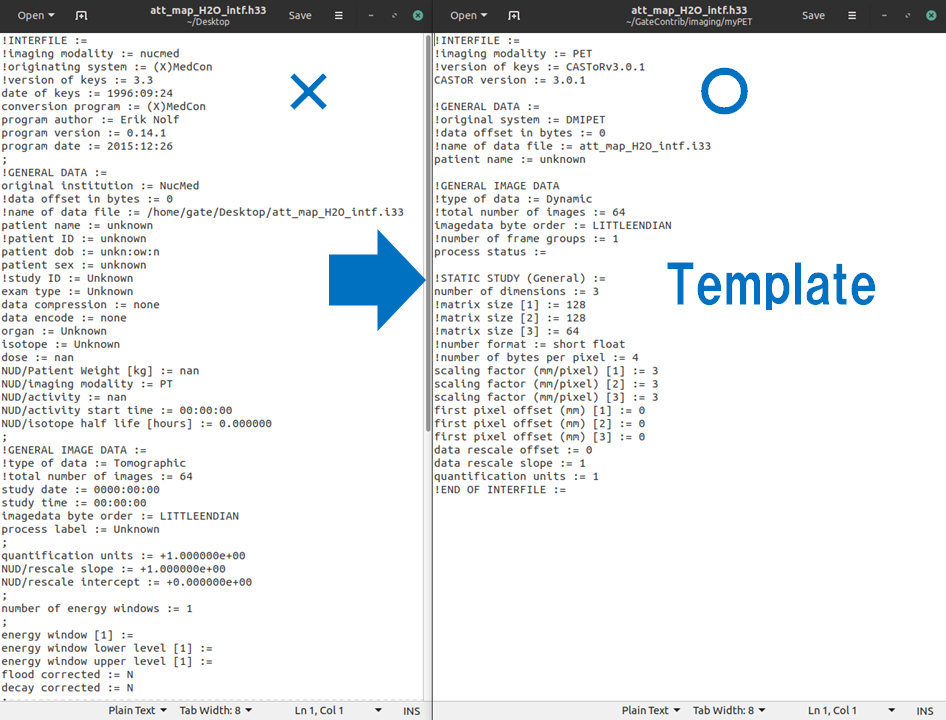
ではこれを使って、CASToRで減弱補正をしたいと思うのですがこのままでは使用できません。
InterfileやAnalyze形式などヘッダーファイルとイメージデータが分かれているファイルの”あるある”ですが、固体差があるようです。
今回もその問題が発生してCASToRがエラーメッセージを出します。
I want to use the saved Interfile to perform attenuation correction. However, it cannot be used as it is.
File-specific problems such as Interfile and Analyze format where the header file and image data are separated occur.
This time the problem also occurs. CASToR gives an error message.
なので、CASToRが読み込める書式に変換します。
So, convert it into a format that CASToR can read.
これで、減弱補正用に使用する減弱マップが作成されました。
You have created a attenuation map that you can use for attenuation correction.
・att_map_H2O_intf.i33
・att_map_H2O_intf.h33
この2つのファイルを再構成するROOTファイルと同じディレクトリに入れて
Put these two files in the same directory as the ROOT file.
castor-GATERootToCastorコマンドを打ってください。
(-atn att_map_H2O_intf.h33)というオプションを付けてください。
Enter the castor-GATERootToCastor command.
Add the option (-atn att_map_H2O_intf.h33).
Interfileは個性があるね
Interfile format has individuality