Docker on AWS
Docker on AWS

今回はAWS上にDockerコンテナ環境を構築する話です。
This time, we are going to build a Docker container environment on AWS.
これまでは自分のPCでモンテカルロ計算をしていました。
I used to calculate Monte Carlo on my PC until now.
しかし、非力な私のPCスペックでは1回のPET検査を模擬するのに2週間くらいかかってしまいます。
However, because my PC has low performance, it takes about two weeks to simulate a single PET examination.
そこで、Amazon Web Services(AWS)を利用して高スペックなサーバーを一時的に借りようと思います。もちろん有料です(無料枠だけでは足りません)。
Therefore, I would like to use Amazon Web Services (AWS) to temporarily rent a high-spec server.Of course it’s charged (not enough for free).
さらに、GATE環境の構築など準備が大変なのでDockerを使用します。Dockerを使用することで、簡単に環境が構築できます。
We can use Docker to save time and effort, such as installing GATE. With Docker, you can easily create a GATE environment.
これを読めばAWS上に構築したDockerコンテナでGATEを実行するまでの流れが理解できます!
If you read this, you will understand the process to execute GATE in the Docker container built on AWS!
How to use Docker & AWS
Dockerのインストール
Installation of Docker
今回はvGATE8.2をVirtualBoxで動かしている環境で進めていきます。
( 今回の目的はAWS上でDocker(GATE8.2コンテナ)を動かしGATEを実行する。vGATEにインストールされているGATEではない。ややこしい。)
This time we assume that you are running vGATE 8.2 on a Virtual Box.
DockerはCE(Community Edition)とEE(Enterprise Edition)がありますので、無料のCEを使用します。ですが、Ubuntuの場合はdocker.ioというものをインストールするみたい。
Docker CE (Community Edition) and EE (Enterprise Edition) are available, but use free CE. However, for Ubuntu, it is common to use “docker.io”.
インストール作業はこのサイトを参考にさせていただきました。
The installation was done using this site as a reference.
$ sudo apt update # password : virtual古いversionが入っている場合は削除します
Remove any previous versions if installed.
$ sudo apt remove docker docker-engine docker.io containerd runc必要なものをあらかじめダウンロードします
Download what you need in advance.
$ sudo apt-get install \
    apt-transport-https \
    ca-certificates \
    curl \
    gnupg-agent \
    software-properties-common
公開鍵
Public key
$ curl -fsSL https://download.docker.com/linux/ubuntu/gpg | sudo apt-key add -$ sudo apt-key fingerprint 0EBFCD88aptリポジトリの設定
apt Repository Settings
$ sudo add-apt-repository \
   "deb [arch=amd64] https://download.docker.com/linux/ubuntu \
   $(lsb_release -cs) \
   stable"
インストール
Install
$ sudo apt update
$ sudo apt install -y docker-ce
ubuntuの場合はdocker.ioというものを使用するらしいのですが、とりあえずdocker-ceを入れました。
If you are using ubuntu, it seems you should install docker.io, but I installed docker-ce for now.
$ docker と打つと
then
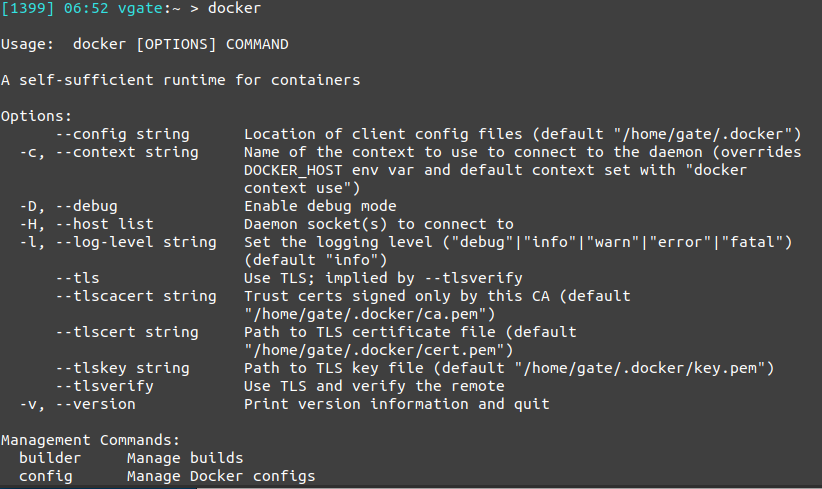
こんな感じで実行できれば、インストールはOKです。
If you get this kind of output, the installation is complete.
Docker on my PC
root(管理者)権限がないとdockerコマンドが使えないので、今現在のユーザー(gate)をdockerグループに追加します。追加したあとはdockerを再起動します。
Add the current user (gate) to the docker group because the docker command cannot be used without root (administrator) privileges. Then restart the docker.
$ sudo gpasswd -a $(whoami) docker
$ sudo chgrp docker /var/run/docker.sock
$ sudo service docker restart
※ $(whoami)のところはgateと書いてもOK
P.S. You can also write gate instead of $(whoami).
「docker ps」とコマンドを打ってみて「Got permission denied while trying to connect to the Docker daemon socket」と出る場合は一旦、ログアウトして再度ログインします。(再起動すれば確実です)
If you see “Got permission denied while trying to connect to the Docker daemon socket” when you type “docker ps”, you should log-out and log-in again (The sure way is to reboot).
docker psと打って、以下のように表示されればOKです。
Make sure you get the following results:

何のimage(テンプレート)でコンテナを作るか決めます。
imageはDocker hubに行って探します。
まず、docker hubのアカウントを作っておきましょう。
Decide what docker image (template) to make the container.
I will go to “Docker hub” and search for the image.
First, let’s create a docker hub account.
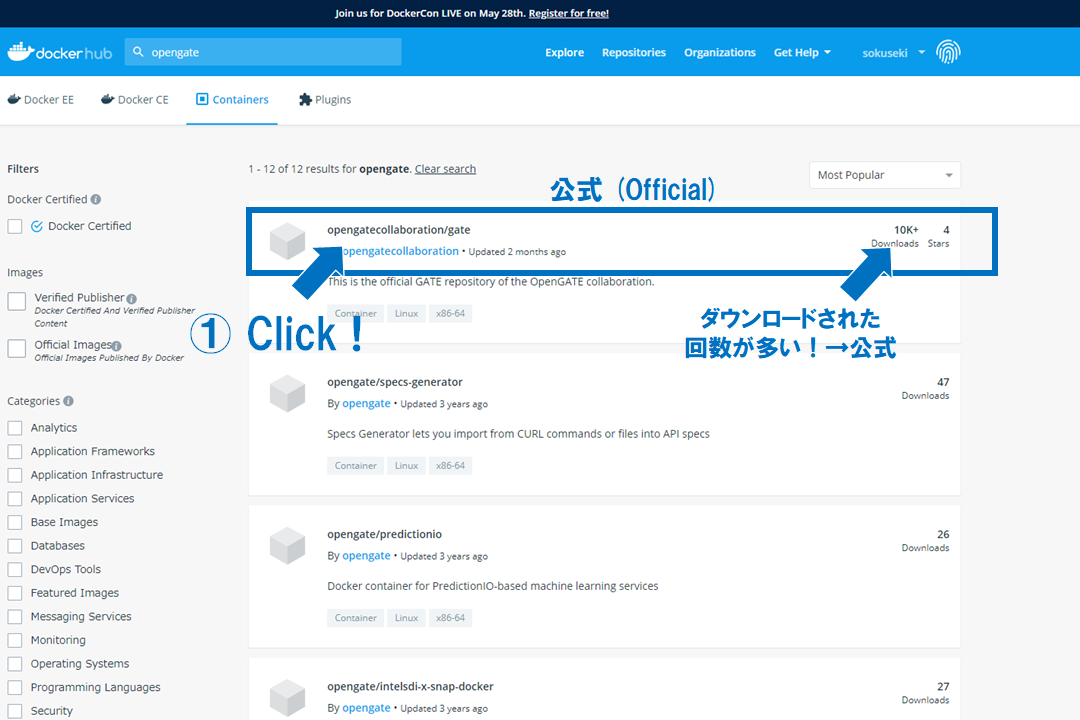
「opengate」と検索すると、一番上に公式のGATEイメージが表示されます。ダウンロードされた回数が少ないものは他のユーザーがアップロードしたもので、最悪の場合、ウィルス仕組まれていることもあり得ますので注意。
If you type “opengate” and search, the official GATE image will be displayed at the top. The ones with relatively few downloads are those uploaded by general users. The docker image may also contain a virus.
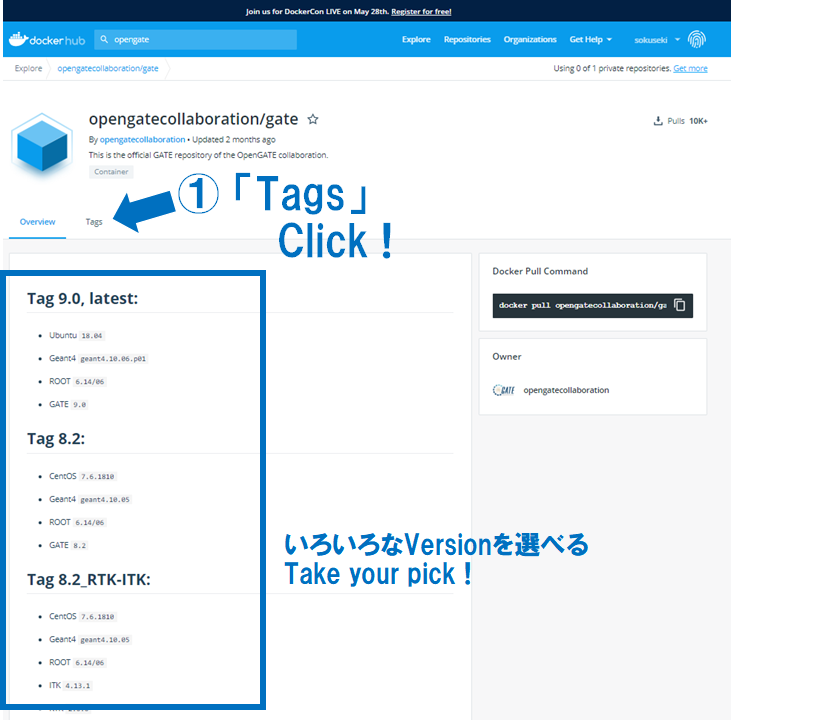
いろいろなversionのイメージがアップロードされているので、使いたいものを探します。今回は8.2_RTK-ITKを使おうと思います。Tagsをクリックしてください。
Various versions of images have been uploaded, so look for what you want to use. This time, I’m going to use 8.2_RTK-ITK. Click on Tags.
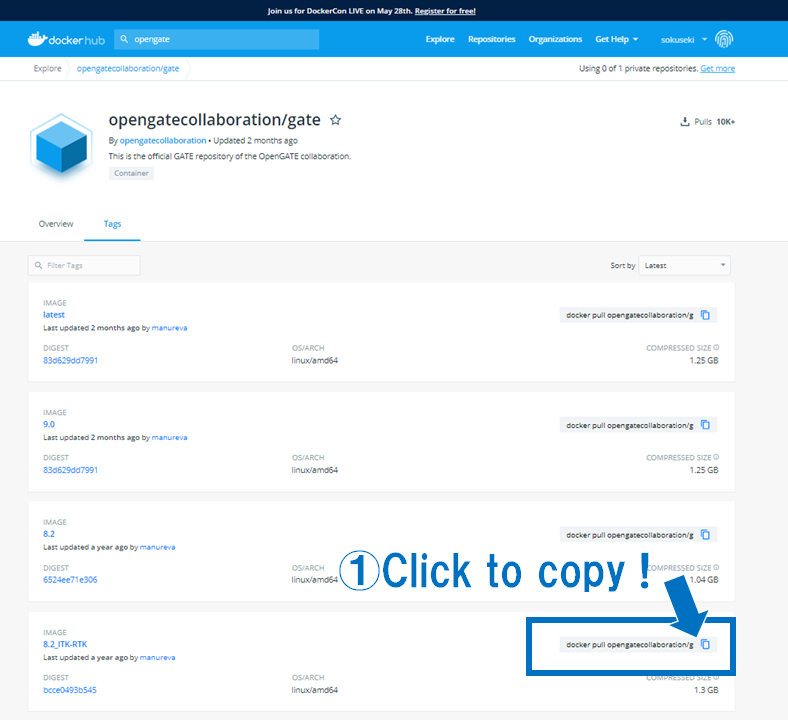
前のページでは「8.2_RTK-ITK」というタグ名でしたが、実際は「8.2_ITK-RTK」のようです。間違っている場合があるので、Tagsのページを見るようにしましょう。
In the previous page, the tag name was “8.2_RTK-ITK”, but it was actually “8.2_ITK-RTK”. It’s sometimes wrong, so be sure to check out the Tags page.
Terminalに戻ります
先ほどコピーした「docker pull opengatecollaboration/gate:8.2_ITK-RTK」を使って以下のようにコマンドを実行します
Return to the “Terminal” window.
Execute the command as follows using “docker pull opengate collaboration / gate: 8.2_ITK-RTK” that you copied.
docker run -it opengatecollaboration/gate:8.2_ITK-RTKdocker run コマンドは3つのコマンドを一度に行う便利なコマンドです。
3つのコマンドとは
・docker pull (イメージを引っ張ってくる)
・docker create(コンテナを作る)
・docker start(コンテナを軌道する)
docker run = docker pull + docker create + docker start
“docker run” is useful !
実際に実行してみると以下のようになります。
In fact, if you run a “docker run”, you get the following results.

色々なものがダウンロードされ、Pull completeとなります。これらはレイヤーと呼ばれており、dockerイメージは複数のレイヤーから構成されます。このレイヤーは特定の機能を含んでおり、使いまわしが可能です。例えばGate:9.0のイメージをpullする場合には多くのレイヤーがスキップされるはずです。これによって無駄を省き容量を小さくすることが可能です。
Various things (it called layer) are downloaded and you will see the “Pull complete” message. A docker image consists of multiple layers. This layer contains specific functionality and can be reused. For example, many layers can be skipped when pulling a Gate: 9.0 image. This increases efficiency and it is possible to reduce the capacity.
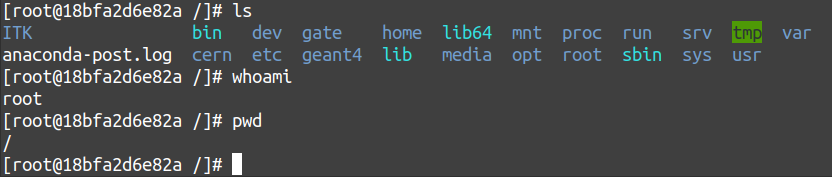
最後の行をみると「 [root@18bfa2d6e82a /] #」となっており、表示が変わっています。すでにコンテナの中にいます。
The last line shows “[root@18bfa2d6e82a /] #”. You are already in the container.
rootディレクトリにいるのが分かります。
You can see that you are in the root directory.
exitとするとコンテナの外にでることができます。
If you type “exit”, you can go out of the container.

exitで抜けると作成したコンテナは停止します
After escape from the container by exit command, the created container is already stopped.
$ docker ps
と打っても表示されません。
That container does not appear.
しかし、-aオプションを付けると停止しているコンテナも表示されます。
However, if you add the -a option, you will also see containers that are stopped.
$ docker ps -a
またpullしたイメージも、当然残っています。
The docker image you pulled is still there.

イメージが必要なくなったら、
if you do not need it,
$ docker rmi a11b7c1439d8 #remove imageで削除できます。
you can remove it.
ただし、コンテナが残っている状態ではエラーが出て消せないのでコンテナを先に消します。
$ docker rm 18bfa2d6e82a #remove container今回はIDを指定しましたが、名前を指定してもOKです。
However, if the container is left, an error is printed and the image cannot be erased, so erase the container first.
これから使うので今回は、image, containerともに削除しません
I do not remove both the image and container because I will use them.
ここまで、イメージできているでしょうか?以下のような感じです。

もう一度、コンテナの中に入りましょう。Gateコマンドを打つと実行できることが確認できます。
Let’s go inside the container again. You can confirm that the GATE can be executed by typing the Gate command.
$ docker run -it opengatecollaboration/gate:8.2_ITK-RTK
$ Gate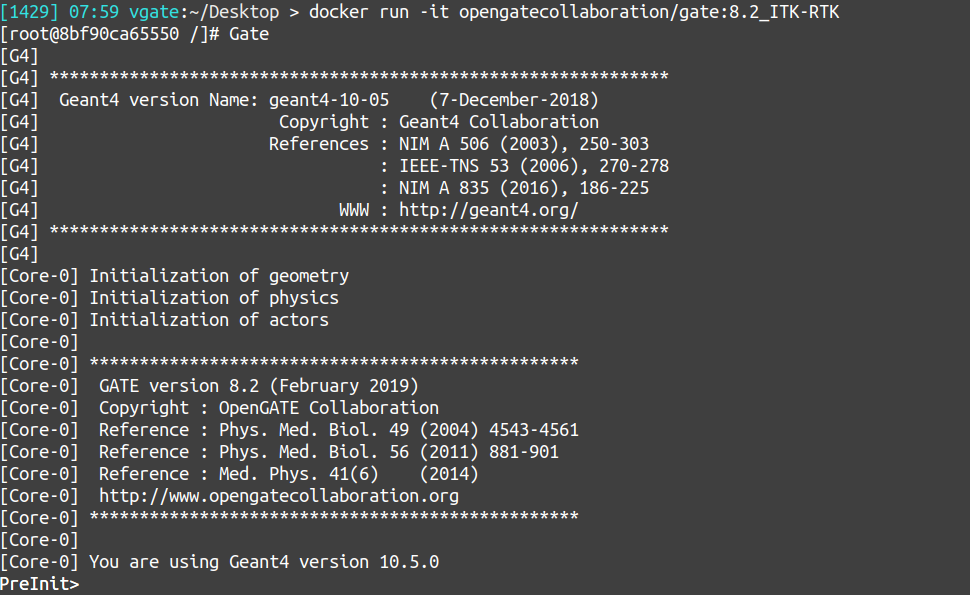
では、Gateを終了して、コンテナから出ましょう。
Now, let’s exit Gate and go out of the container.
PreInit > exit
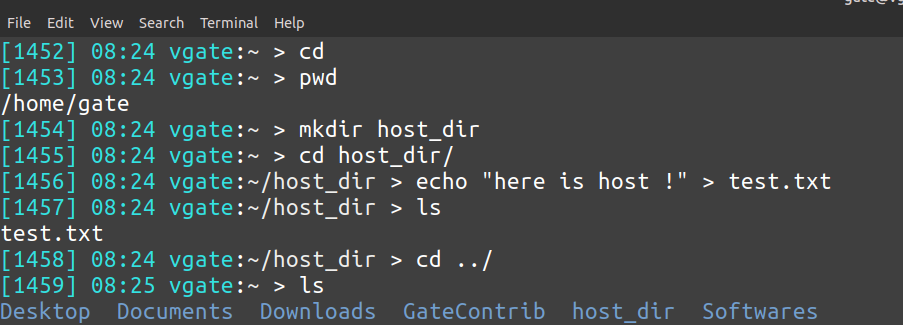
exit次はホスト側とコンテナの間でファイルを共有する方法です。
/home/gate/にhost_dir(任意の場所・名前でOK)というディレクトリを作成して、その中にtest.txtというファイルを保存します。
また、/home/gateに戻ってきます。
Next, share files between the host side and the container.
Create a directory called host_dir (any location and name is OK) in /home/gate/ and save a file called test.txt in it.
It also returns you to /home/gate.
では次は-vオプションを付けて実行します
Now we’re going to do it with the -v option.
$ docker run -it -v /home/gate/host_dir/:/data opengatecollaboration/gate:8.2_ITK-RTK 
/dataディレクトリの中にtest.txtがあるのが確認できます。
You can see that test.txt is in the /data directory.
これによってホスト側の/home/gate/host_dirとコンテナ側の/dataディレクトリが共有されました。ホスト側で操作すればコンテナ側の中身が変わります。(その逆も当然)
In this way, /data directory on the container side was shared with /home/gate/host_dir on the host side. The contents on the container side change if I operate it on the host side. (as for the reverse, natural).
これでGateのマクロファイルをコンテナの中に渡せばOKですね。
With this, you can pass the Gate macro file into the container.
AWSのサーバーをレンタル
Rent AWS Servers
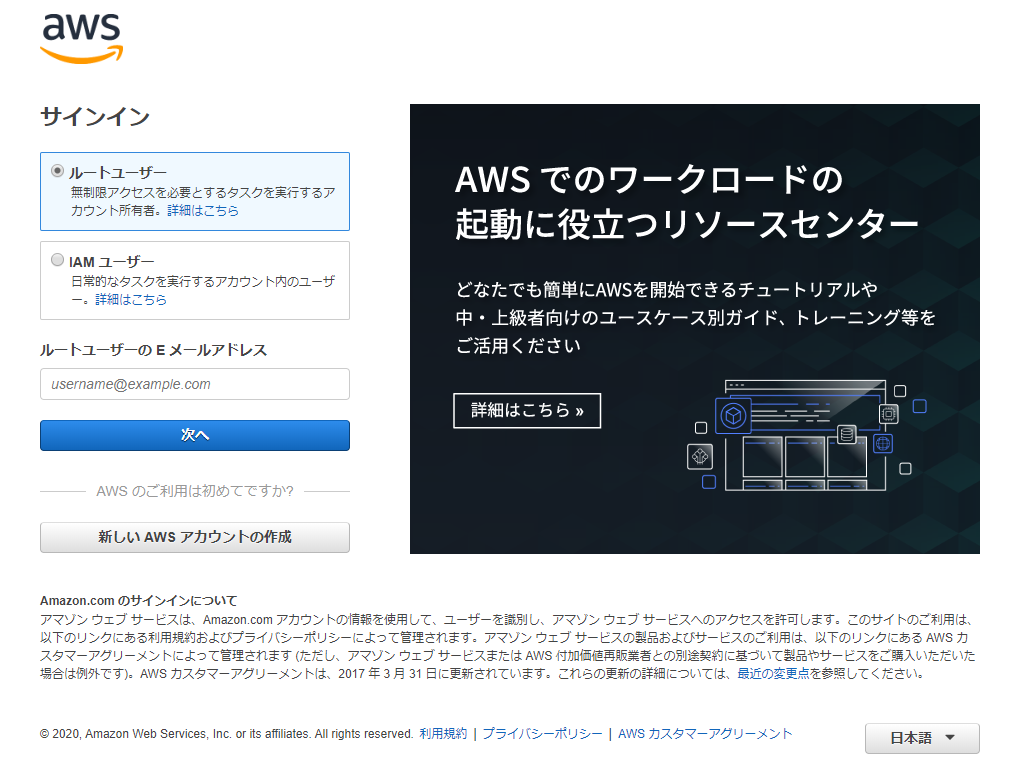
まず、AWSのサイトに行きます。
First, you go to the AWS web site.
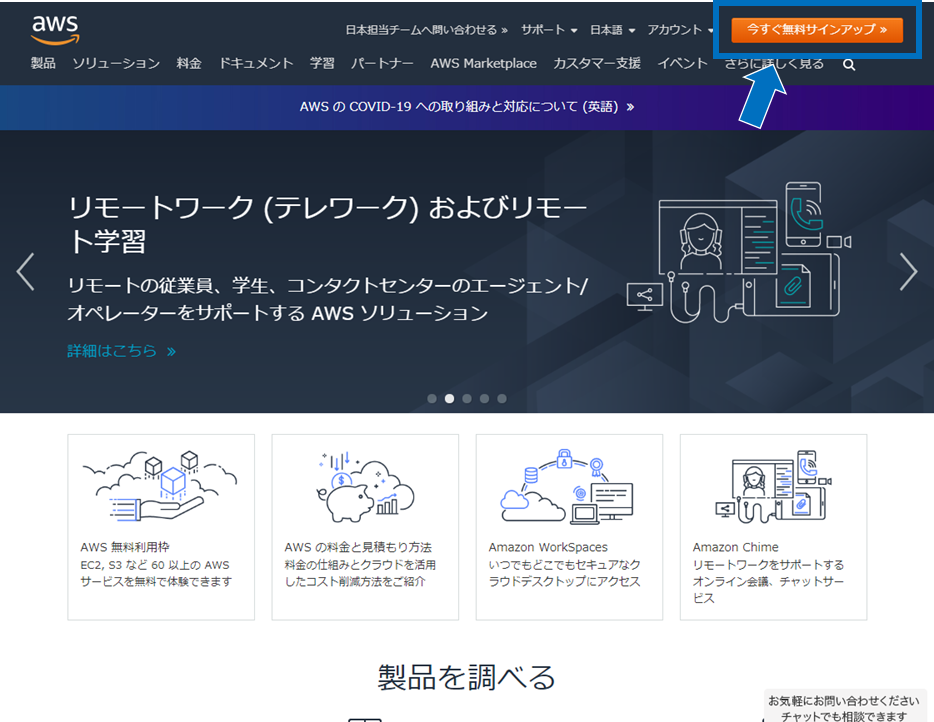
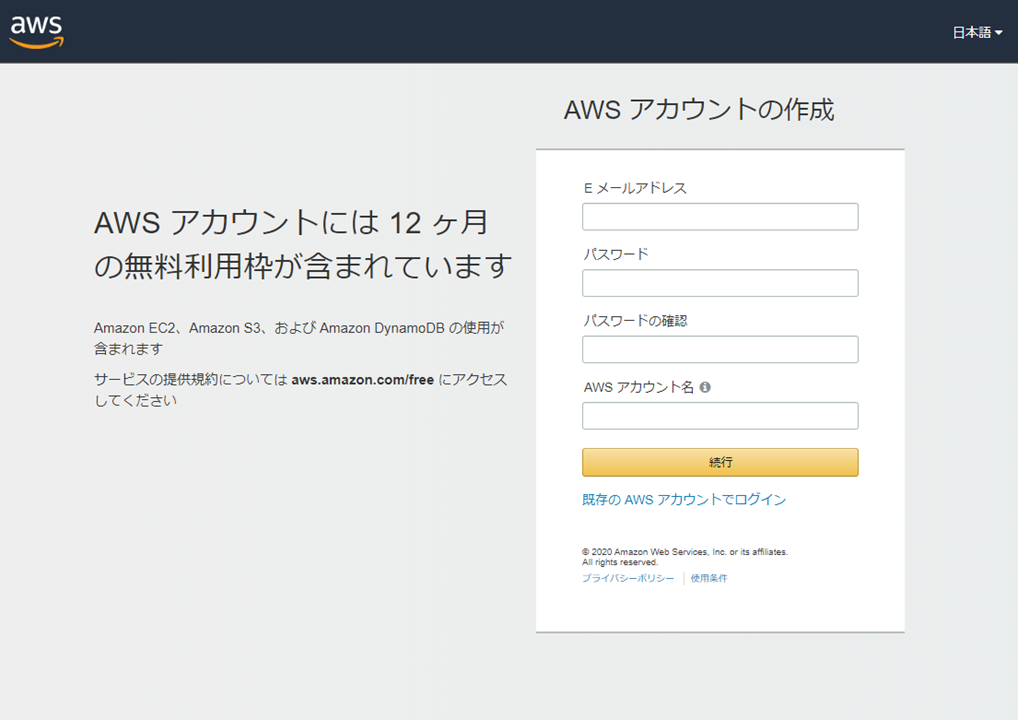
アカウントを作っていない場合は作成します。
If you do not have an account, create one.
ログインしたら「サービス」→「IAM」→「MFA」の設定を済ませておきます。
After logging in, go to “Service” → “IAM” → “MFA”. Make the settings.

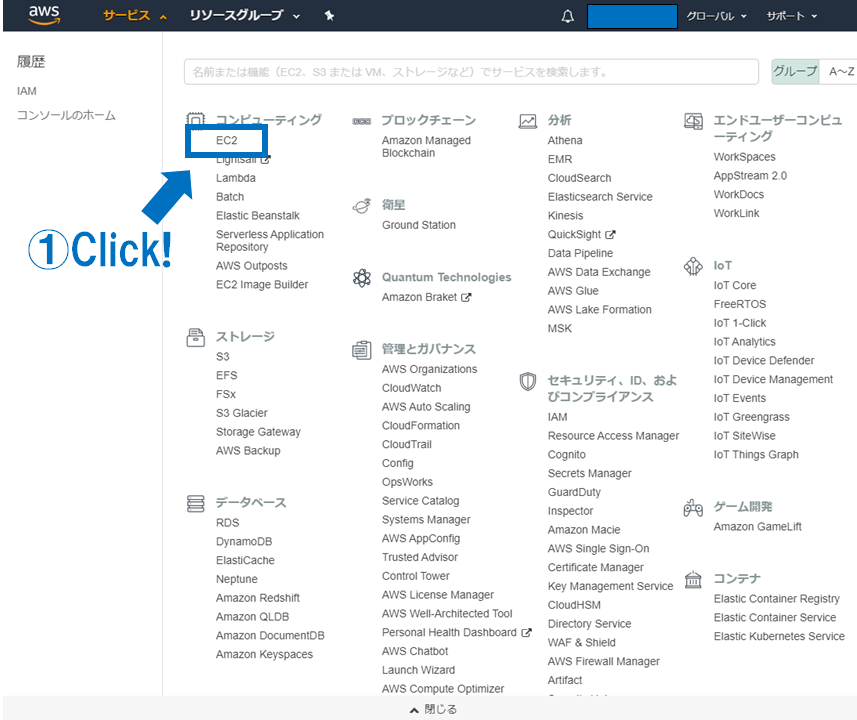
AWSは様々なサービスを提供していますが、今回はAmazon EC2を選択します。
AWS offers various services, but this time we choose Amazon EC2.
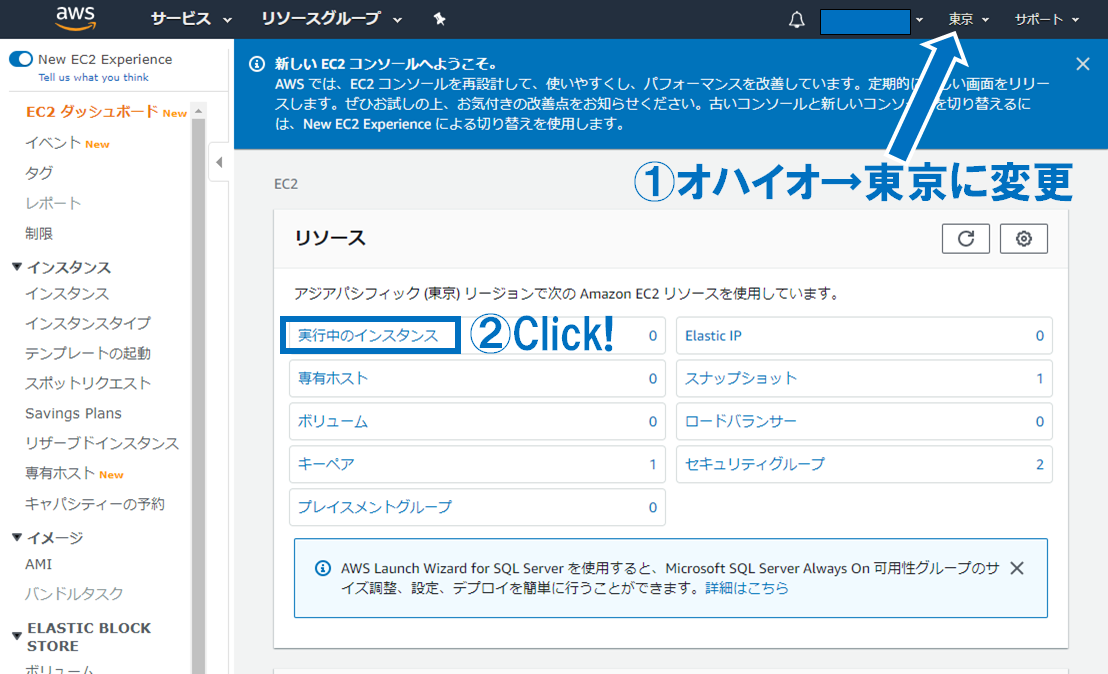
リージョン(地域)は近い場所を選択した方が転送速度が速くなります。
The transfer speed will be faster if you select a closer region.
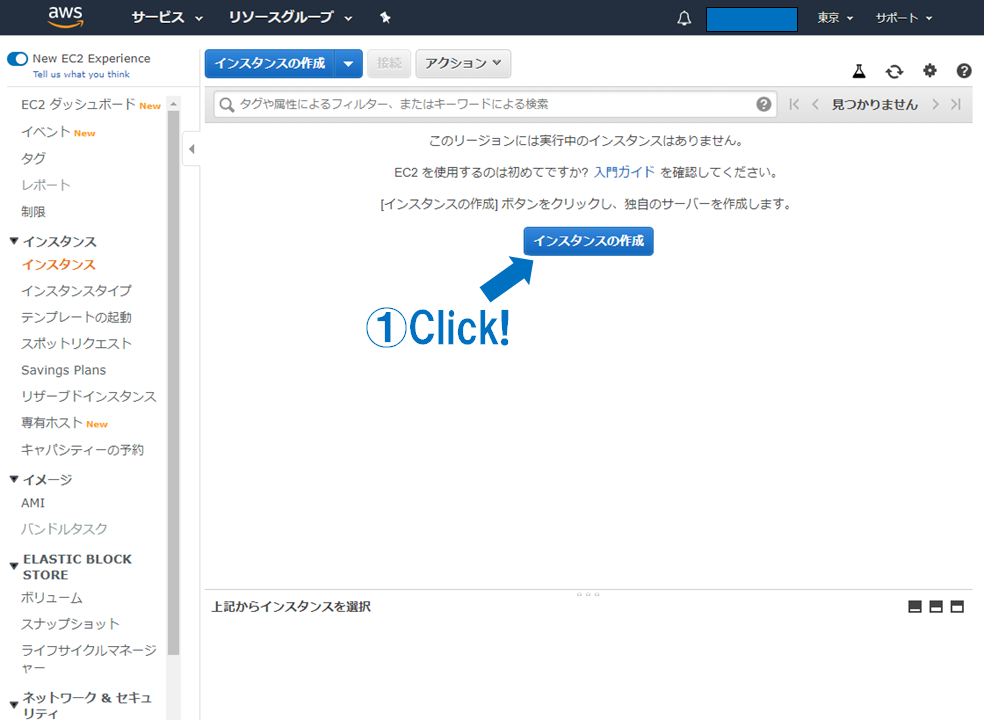
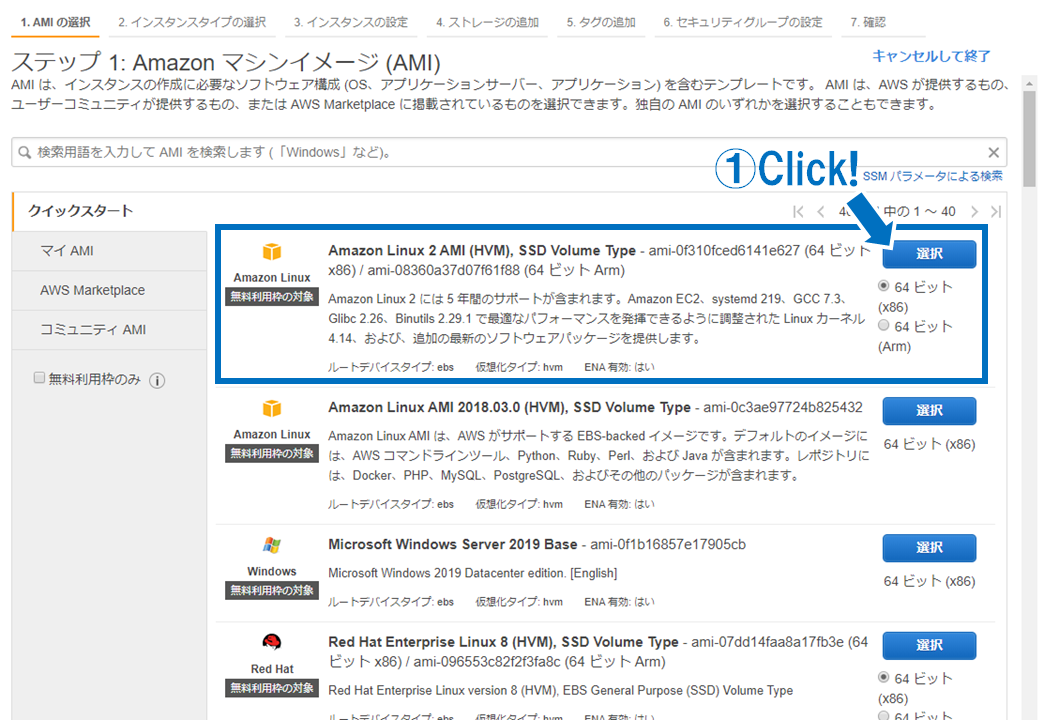
インスタンスを作成する
Create an instance.
今回、OSはAmazon Linux 2を使用します
We select Amazon Linux 2 as an OS.
CPU、メモリ、ストレージ(SSD又はHDD)、転送速度から使用タイプを選択します。今回は試しに低スペックなサーバをレンタルします。
Choose the type of use you want: CPU, Memory, Storage (SSD or Hard Drive), and Transfer Rate. This time, I will rent a low spec server.
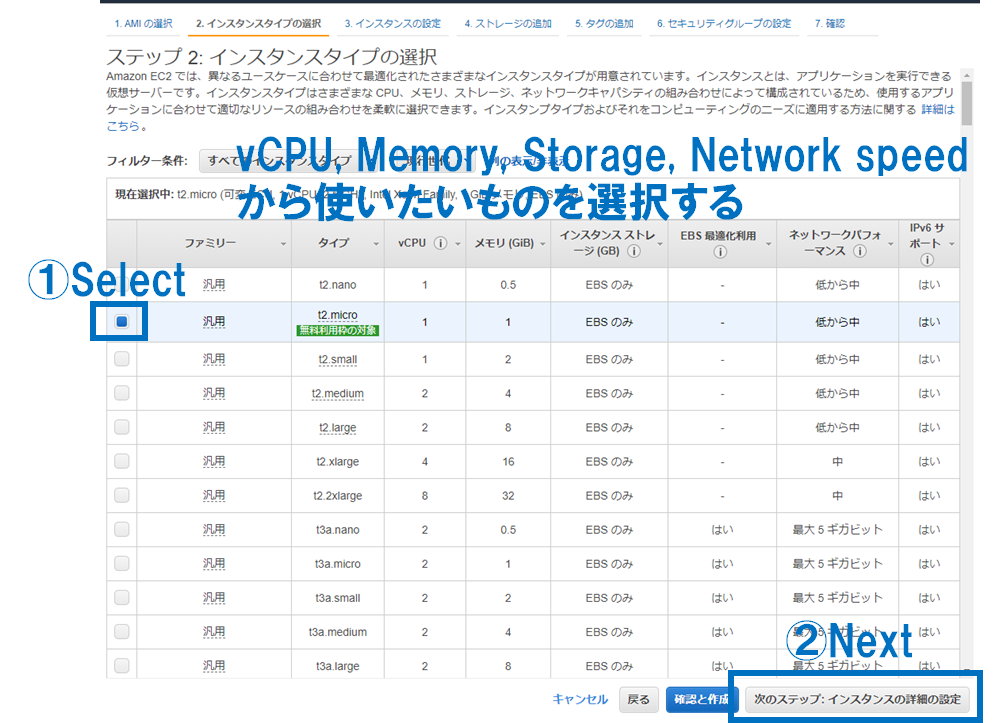
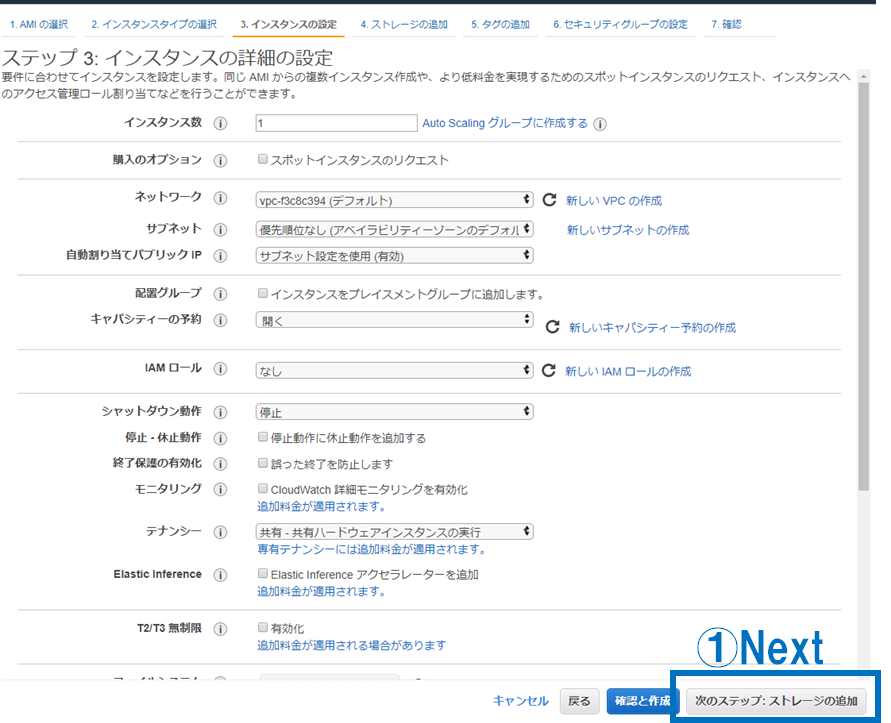
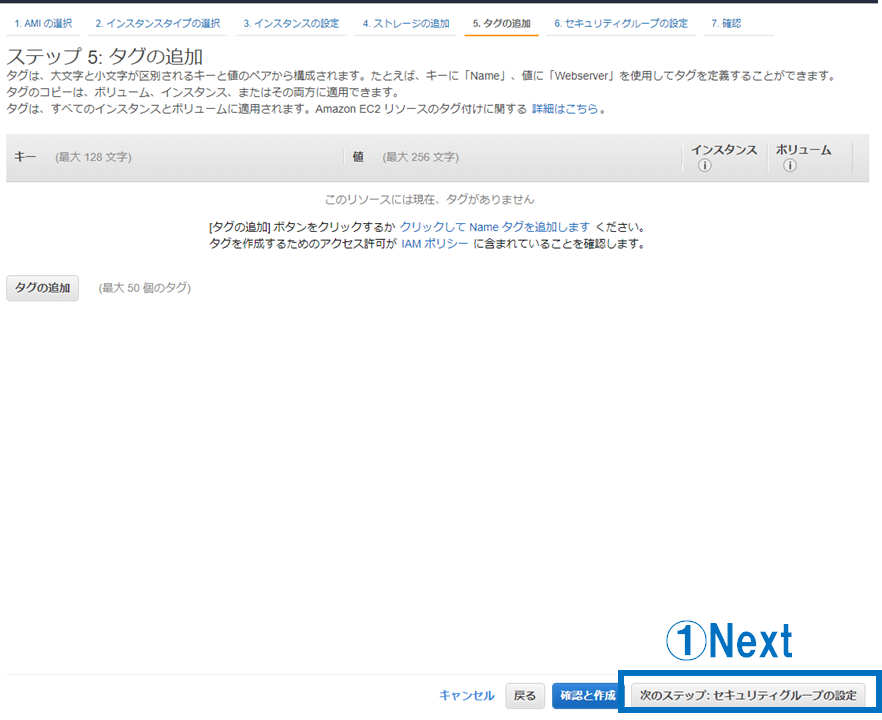
そのまま、「次のステップ」へ
Just go to Next Steps.
使用する分だけ(余裕もって)SSDの容量を変更します。
今回は試しに20GBをレンタルしました。
Change the capacity of the SSD.
I rented 20GB this time as a trial.
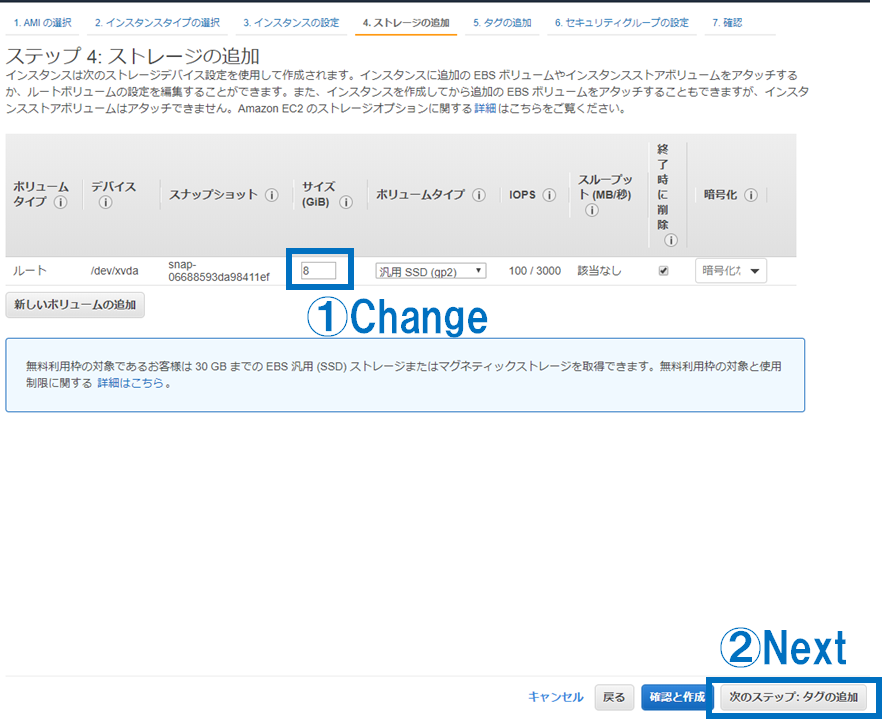
そのまま次へ
Just go to Next Steps.
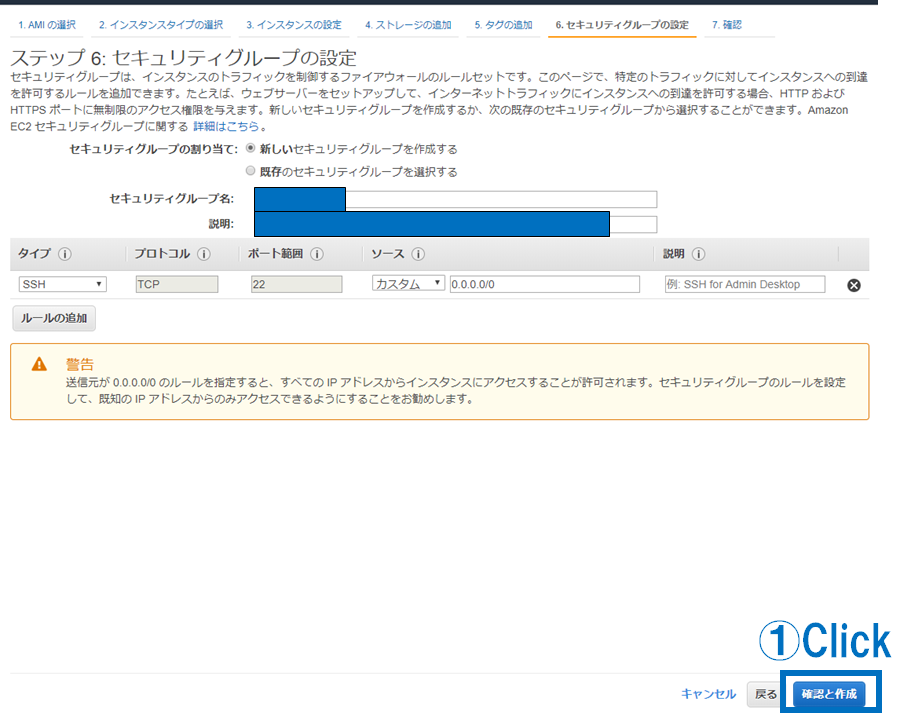
そのまま「確認と作成」へ
Just go to “confirm and create”.
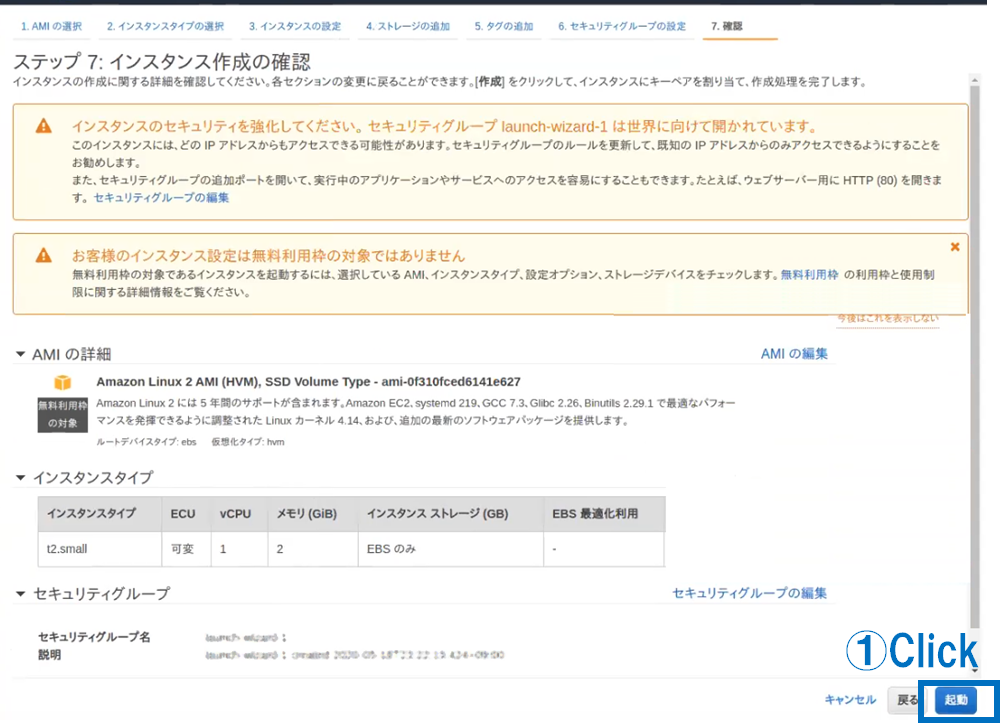
「起動」する
Click run.
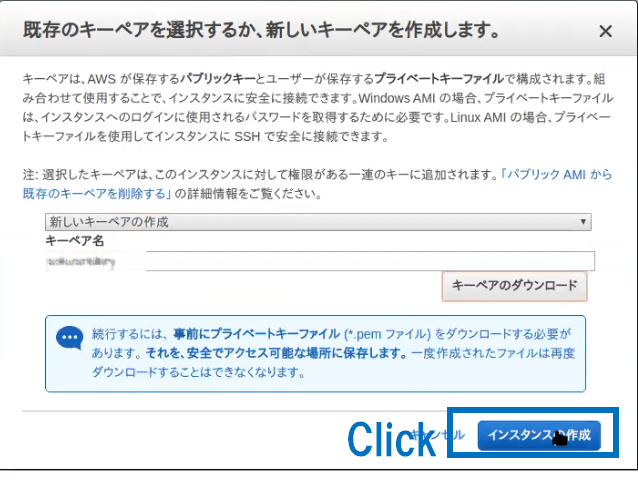
新しいキーペアを作成します
Create new key pair.
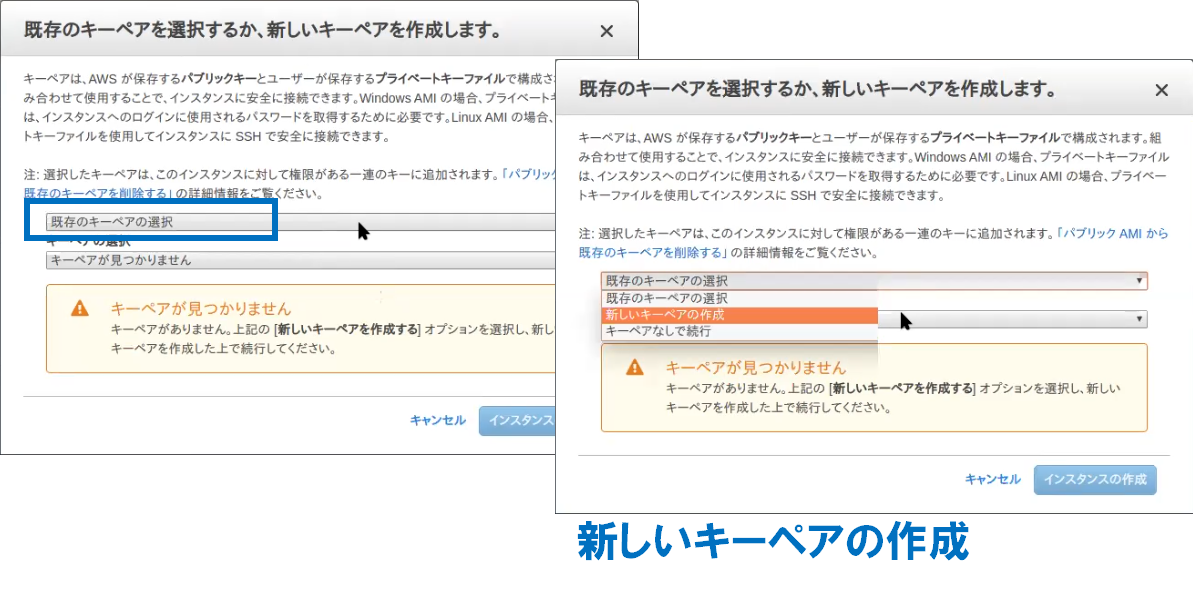
キーペア名を入力して、ダウンロードします。
Input name of key pair, and download it.

ダウンロードしたkeyは大切に保存しておきます。
Save the key carefully.
キーペアをダウンロードしたら、インスタンスを作成します。
After downloading the key pair, create an instance.
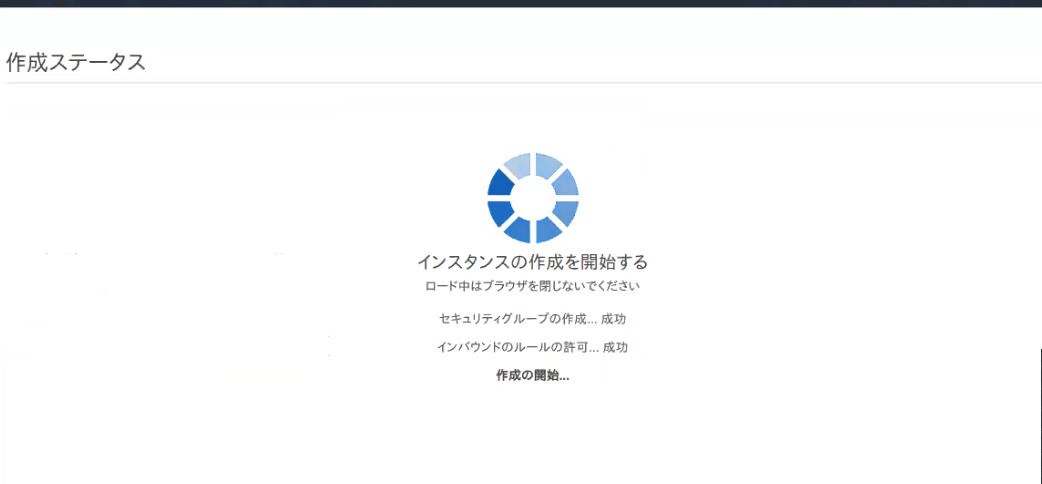
インスタンス作成中です
Creating an instance
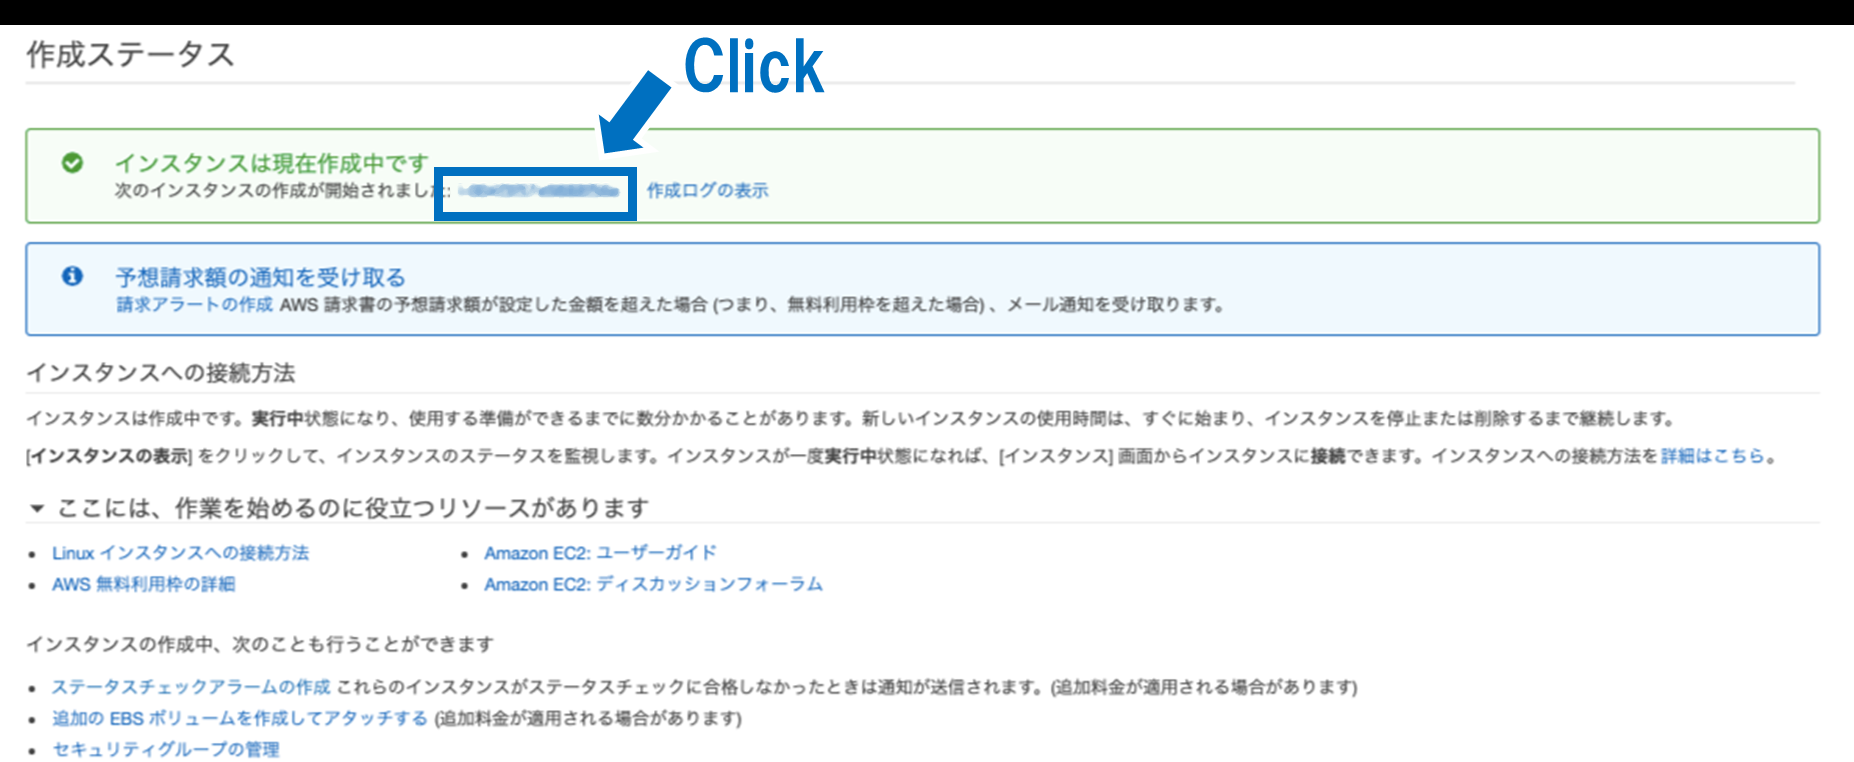
この画面になったら、「インスタンスは現在作成中です」の右下に表示されている「i-」から始まる文字列をクリックします。
When this screen is displayed, click the character string starting with “i-” displayed in the lower right of “Instance is currently being created”.
作成したインスタンスが動いて(running)いることが確認できます
You can confirm that the created instance is running.
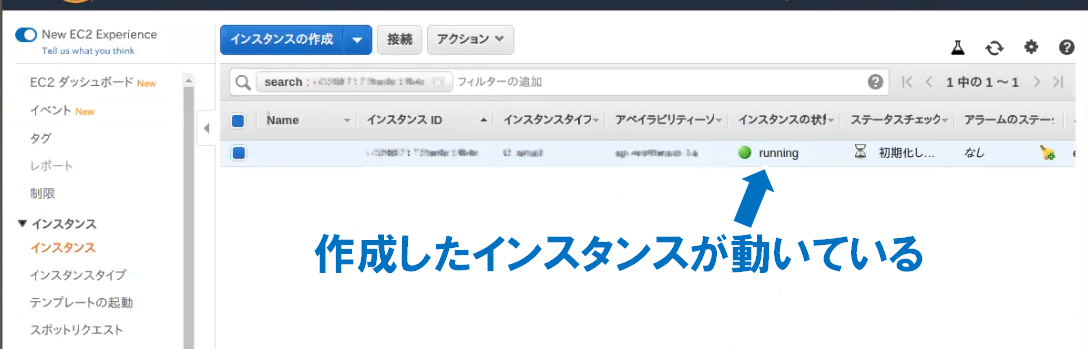
IPアドレス(IPv4)をコピーしておきます。
Copy IP address.
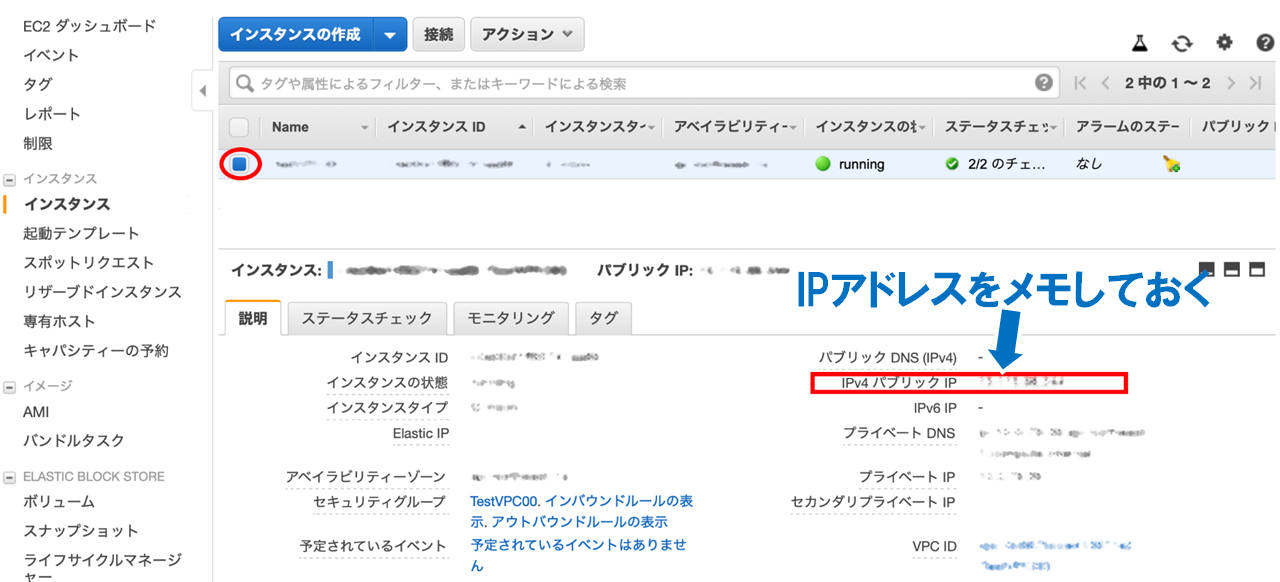
今回は仮に
IPアドレス=123.456.789.123とします。
AWSのページに戻ってきて確認してもいいけど、以下のコマンドですぐに調べることができます。
ec2-user$ curl httpbin.org/ip
We assume IP address is 123.456.789.123 in this time. You can check the IP address on AWS website, but you can immediately check with the following command.
ec2-user$ curl httpbin.org/ip
ではTerminalに戻ります。自分のPCからAWSで作成したインスタンスにアクセスしたいと思います。
Returns to the Terminal. Access the instance created in AWS from your PC.
ホームディレクトリ(/home/gate/)に.sshディレクトリを作成し、アクセス権限を設定します。「.」から始まるディレクトリは隠しディレクトリです。
Create a “.ssh” directory in your home directory (/home/gate/) and set the access permissions. Directories starting with “.” Are hidden directories.
$ cd       # go to HOME
$ mkdir .ssh      # create ".ssh" directory
$ chmod 700 .ssh
先ほどダウンロードしたキー(XXXXXXX.pem)を.sshディレクトリの中に移動します。
Move the key you just downloaded (XXXXXXX.pem) into the “.ssh” directory.
// I'm in the home directory now.
$ mv [path to XXXXXXX.pem] .ssh/
$ chmod 600 ./ssh/XXXXXXX.pem
そのキーを使ってAWSのインスタンスにアクセスします。
先ほどコピーしたアドレスを入力します。
※今回は仮にIPv4が123.456.789.123だとします。
Use the key to access an instance of AWS.
Enter the address you just copied.
This time, IPv4 is assumed to be “123.456.789.123”
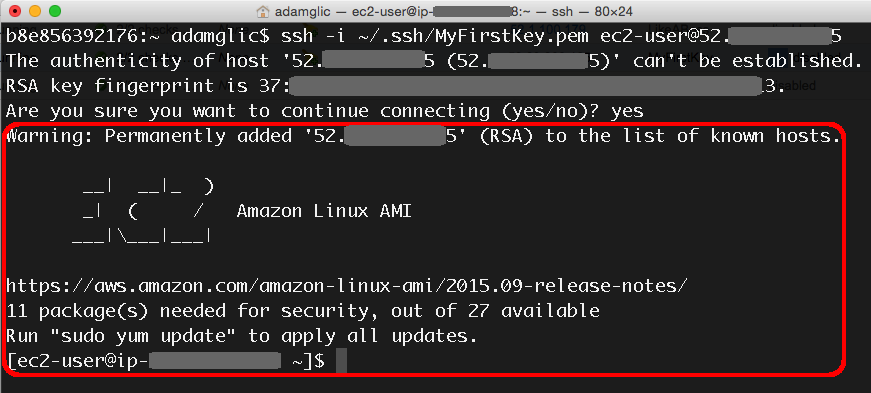
$ ssh -i ~/.ssh/XXXXXXX.pem ec2-user@123.456.789.123ログイン中に何か聞かれるので「yes」を入力してください。
Please enter “yes” as you will be asked during login.
ec2-user@と表示されればOKです。AWSのサーバーの中にいます。
It is OK if it is displayed as above. You are in an AWS server.
これから設定を行います。このままコピペしてもらえばOKです。
ec2はCentOSなので、Ubuntuのコマンドと書き方が少し違います。
We will make the settings. It is OK if you copy and paste as it is.
Since ec2 is CentOS, the commands are slightly different from the Ubuntu command.
sudo su -

# Docker CEのインストール
## リポジトリをセットアップ
### 必要なパッケージのインストール
yum install yum-utils device-mapper-persistent-data lvm2

### dockerパッケージ用のyumリポジトリを追加
yum-config-manager –add-repo https://download.docker.com/linux/centos/docker-ce.repo

## docker ceのインストール
yum update && yum install docker-ce-18.06.2.ce
#yum update && yum install -y docker  # (^w^) < If above command does not pass

## /etc/docker ディレクトリを作成
mkdir /etc/docker

# デーモンをセットアップ
cat > /etc/docker/daemon.json <<EOF
{
"exec-opts": ["native.cgroupdriver=systemd"],
"log-driver": "json-file",
"log-opts": {
"max-size": "100m"
},
"storage-driver": "overlay2",
"storage-opts": [
"overlay2.override_kernel_check=true"
]
}
EOF

mkdir -p /etc/systemd/system/docker.service.d

# dockerを再起動
systemctl daemon-reload
systemctl restart docker
途中で何か聞かれたら「y」を入力してください。
Please enter “yes” as you will be asked something.
エラー出ることなく、全て終わったら以下のpsコマンドを打ってdockerが動いているかを確認します。
If all is done without error, type the following ps command and check if docker is running.
# ps aux | grep dockerdockerに関する行が1,2行表示されたらOKです。
It is OK if one or two lines of docker process.
今度は自分のPC(Local)からAWS(ec2)にファイルを転送してみます。転送するファイルは先ほど作成した/home/gate/host_dir/test.txtです。
AWSを操作しているTerminalとは別に、新しいTerminalを起動してください。
Next, I will transfer the file from my PC (Local) to AWS (ec2). The file to transfer is /home/gate/host_dir/test.txt created earlier.
Launch a new Terminal, separate from the one that is operating AWS.
$ cd /home/gate/host_dir
$ ls      # you can find "test.txt"
ではscpコマンドを使ってファイルを転送します
Let’s transfer that file by using scp command.
$ scp -i ~/.ssh/XXXXXXX.pem ./test.txt ec2-user@123.456.789.123:./ファイルがちゃんと転送されたか確認します。先ほどのec2にログインしているTerminalに戻ってください。また、ファイルを転送したのはec2-userというユーザです(rootではありません)
なので、まずrootからec2-userに切り替えます。
Make sure the file was transferred successfully. Go back to the Terminal where you logged in to ec2. Also, the file was transferred to the user ec2-user (not root).
So, first switch from root to ec2-user.
# exit                 // root -> ec2-user
$ ls
test.txtがあるのを確認できました
We could see that test.txt is in current directory.
では次はec2でdockerコマンドが使えるようにします。
Next, enable docker command in ec2.
$ sudo su -
# usermod -a -G docker ec2-user
# exit
$ exit         // escape from ssh
上のコマンドを打つと自分のPC(Local)まで戻ってきます。もう一度sshでec2に入り直します。
Entering the above command will return you to your PC (local). Go to ec2 by entering the following command:
$ ssh -i ~/.ssh/XXXXXXX.pem ec2-user@123.456.789.123docker runを行い、ec2側の/home/ec2-user/とコンテナ側の/dataを共有します。
Run docker run. Share /home/ec2-user/ on the ec2 side and /data on the container side.
$ docker run -t -v /home/ec2-user/:/data opengatecollaboration/gate:8.2_ITK-RTK/home/ec2-user/の中には先ほどtest.txtを転送していますので、コンテナ側の/dataディレクトリを見るとtest.txtがあることを確認できます。
Since test.txt has been transferred to /home/ec2-user/, you can confirm that test.txt exists by looking at the /data directory on the container side.
//#########     inside of container     #########
# cd /data
# ls
以上で、自分のPCからec2にファイル(Gateのマクロ)を転送し、それをec2からコンテナに渡す(共有する)ことが可能になります。自分の作成したマクロファイルを使ってAWS上のdockerでGateが実行可能となりました。
I transferred the file (the Gate macro) from my PC to ec2. I was able to pass (share) it to the container made on the ec2 side. Gate is now ready to run in docker on AWS using the macro file you created.
もし、AWS→Localにファイルを転送したい
(/home/ec2-user/test.txt をLocalの/home/gate/に)
のであれば・・・
If you want to move the file (test.txt) from /home/ec2-user/ to /home/gate/;
vgate$ scp -r -i ~/.ssh/XXXXXXX.pem ec2-user@123.456.789.123:./test.txt /home/gate/結果のファイルをLocalに持ってくる他の方法として、フォルダの同期をする方法もあります。容量が大きい場合はこちらの方が高速でよいです。セキュリティ的にも良いらしいです。
Another way to bring the resulting files to Local is to sync folders. If the capacity is large, this is faster and better. It seems to be good for security.
LocalPCのターミナルから
You put the command from the local PC (terminal).
$ rsync -av -P -e "ssh -i ~/.ssh/XXXXXXX.pem" ec2-user@123.456.789.123:/home/ec2-user/ /home/gate/ホストPCをシャットダウンしてもAWS上のDockerを動かし続けるには Continue running Docker on AWS even if you shut down the host PC
AWS上で何日も計算をするなら、自分のPCをシャットダウンしても動いてもらわないと困ります。
その場合はdockerでデタッチモードで起動しておく必要があります。
(-itにdをつけるだけです)
If you do calculations on AWS for many days, it will be a problem if you do not get it working even if you shut down your PC.
In that case, you need to start it in detach mode with docker.
(just add d to -it)
$ docker run -itd -v /home/gate/host_dir/:/data opengatecollaboration/gate:8.2_ITK-RTK 上のコマンドを打つとコンテナが動くのですが、自分はコンテナの中には移動しません。
If you type the above command, the container will start, but you will not move into the container.
以下のコマンドでコンテナのIDを確認します。
You can check the container ID by following command.
docker ps
docker psの結果の一番左の列にコンテナのIDが表示されます(例:a8d5bcab7c74)
The container ID is displayed in the leftmost column of the docker ps result (e.g. a8d5bcab7c74)
そのコンテナをdocker execコマンドで操作します。<コンテナID>のところは他のコンテナと区別がつけばOKです。今回の例ならa8とかa8dとだけ打っておけばOKです。
Operate the container with the docker exec command. It is OK if is distinguished from other containers. In this example, you can just type a8 or a8d.
docker exec -it a8d /bin/bashそうするとコンテナの中を操作可能です。
Then you can operate inside the container.
Gate DMI.macコンテナから出るには Cntl+P, Cntl+Q を押します。
Press Ctrl+P, Ctrl+Q to escape from the container.
このコマンドを忘れないようにしてください
Please remember it.
これで、ホストのPCをシャットダウンしても計算は継続します。
docker psと打っても表示されれば起動していることになります。
※もし止まっていたらdocker psで表示されない。docker ps -aなら停止していても表示される。
The calculation will continue even if the host PC is shut down.
If docker container is displayed even if you type docker ps, it means that it is running.
P.S. If it is stopped, it will not be displayed by docker ps. If docker ps -a is displayed, it will be displayed even if it is stopped.
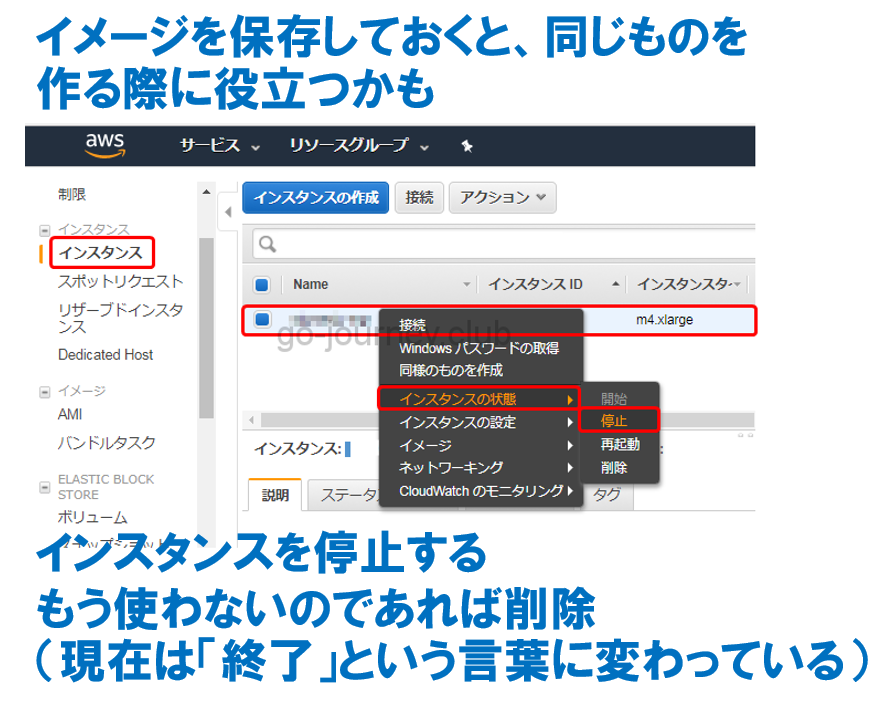
AWSのインスタンスを停止する Stop the AWS instance
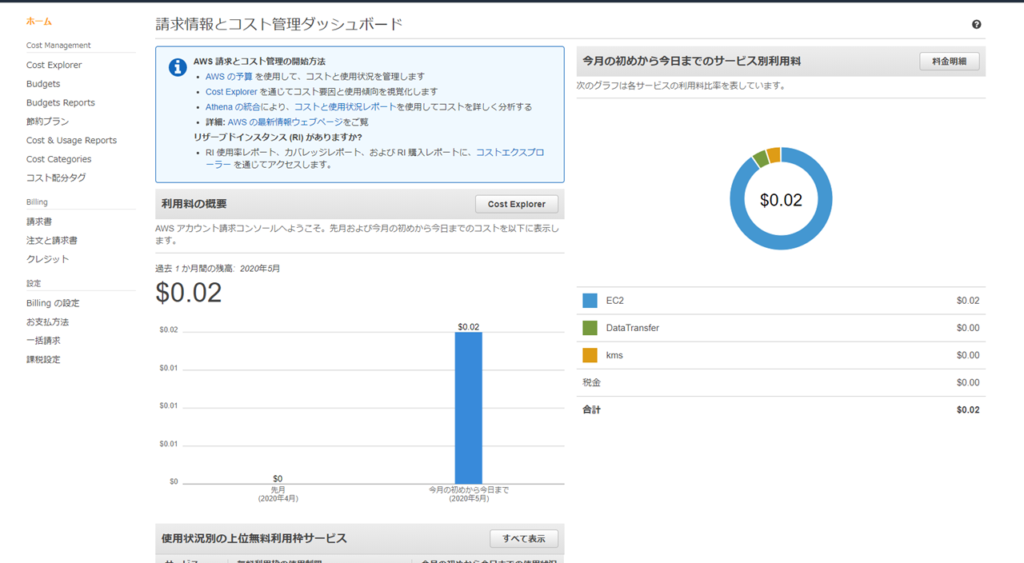
では、AWSのレンタルサーバーを止めたいと思います。動いている限り料金がかかります。先ほどのAWSのダッシュボードの画面に行きます。
So, I would like to stop the AWS rental server.There is a fee as long as it works. Go to the screen on the dashboard of AWS.
今回は低スペックのサーバーを30分くらい借りました。料金はいくらかかったのでしょうか?
This time I rented a low spec server for about 30 minutes. How much did it cost?
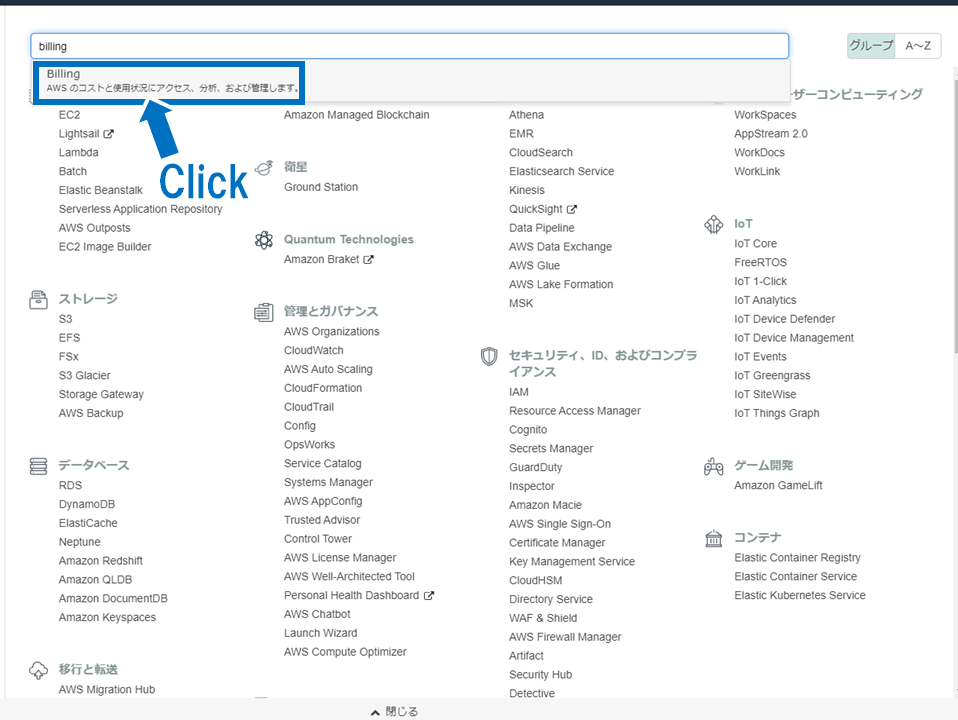
ログインして最初の画面(AWSマネジメントコンソール)でbillingと検索します。
Log-in and search for billing on the first screen (AWS Management Console).
今回は低スペックで短時間なので安いですね。
This time it’s low spec and short time, so it’s cheap.
0.02USD×107(yen/USD) = 2.14 yen
(1$=107yen, 2020.5.22)
料金の概算はここから可能です。
Estimate charges are available here.
Amazon EC2 -> Configure
料金は大まかにCPU+ストレージ+ネットワーク通信(AWS→Local)で決まります。料金を左右する比重はCPUが一番大きいです。
The price is roughly determined by CPU + storage + network communication (AWS → Local). The CPU has the largest specific gravity that affects the price.
(大体64コアのCPUを借りて8,000円弱/dayくらいかな)
Rent a CPU with about 64 cores and it’s about 8,000 yen / day.
結構高いから、マクロファイルの動作を検証してから本番の計算をやってください。
Since it costs a lot of money, please verify the operation of the macro file before performing the actual calculation.