GATEの使い方 9 ~doseByRegions~

How to use GATE 9

今回はサンプルコードを紹介します。
This time I will introduce the contents of the sample code.
GATEにはサンプルコードがいくつも含まれています。
There are several sample codes available in GATE.
自分がやりたいシミュレーションに最も近いサンプルコードを選び編集するのが一般的です。
Choose the sample code that most closely resembles what you want to do. The general procedure is to edit it.
マニュアルに書いてある機能をどうやって実装するかを知るにはサンプルコードを読むことが一番です。
If you want to know how to implement the available methods (introduced in the manual) in your code, the best way is to read the sample code.
これを読めばサンプルコードdoseByRegionsの中身が理解できます!
If you read this article, you can understand the contents of the sample code (doseByRegions)!
GATEの使い方 9
How to use the GATE
概要
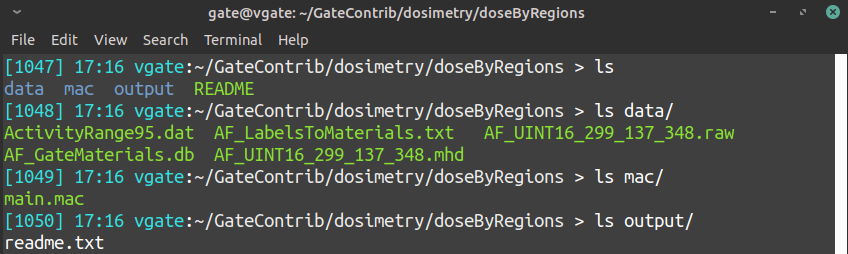
本サンプルコードはdosimetryディレクトリの下にあります。
This sample code is in the dosimetry directory.
/home/gate/GateContrib/dosimetry/doseByRegions構成は以下の通りです。
The configuration is as follows.
このサンプルコードの目的は入力画像の指定した領域ごとの線量(Dose)を取得することです。
The purpose of this sample code is to get the “Dose” for each area within input image.
ファイルの中身
the contents of a file
では入力に使用する画像を見てみましょう。MetaImageはヘッダーファイル(.mhd)とrawデータ(.raw)の2つで構成されます。読み込む際には必要な情報が記載されている.mhdを指定します。
Now let’s look at the image used for input. MetaImage consists of two files, header file (.mhd) and raw data (.raw). When reading, specify .mhd that contains the necessary information.
cd /home/gate/GateContrib/dosimetry/doseByRegionsvv data/AF_UINT16_299_137_348.mhd※vvがインストールされていればvvを使いましょう。されていない場合はインストールするか、他のソフト(Fiji)などを使用して開きます。
画像のX方向は299,Y方向は137,スライス枚数は348です。
P.S. If you have vv installed, use vv. If not, install it or open it using another software (Fiji).
The X direction of the image is 299, the Y direction is 137 and the number of slices is 348.
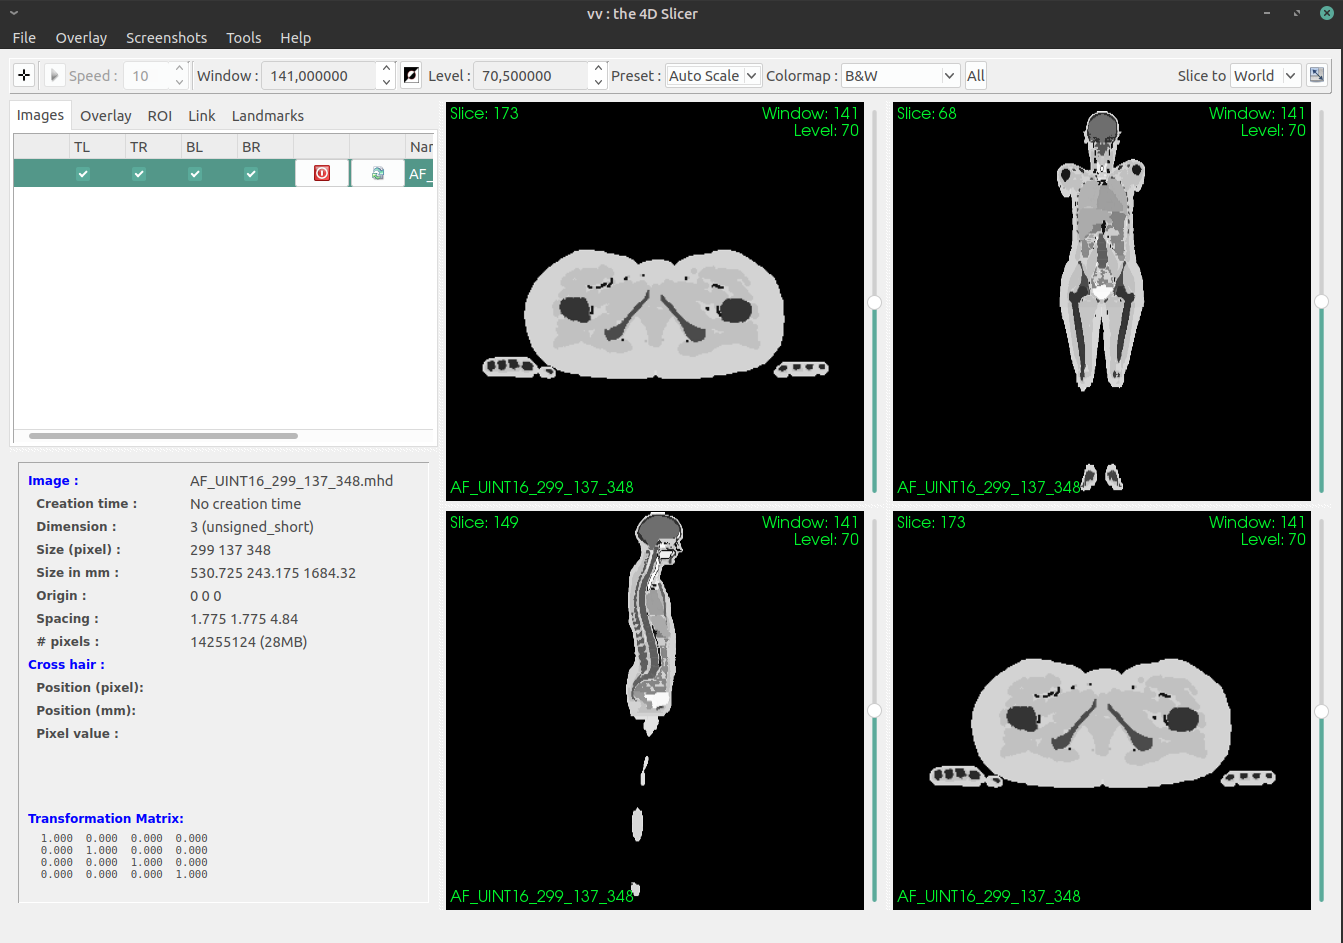
左下のウィンドウを見ると、どうやらピクセルサイズは1.775 × 1.775 × 4.84 mmのようです。
As you can see in the lower left window above image, the pixel size seems to be 1.775 x 1.775 x 4.84 mm.
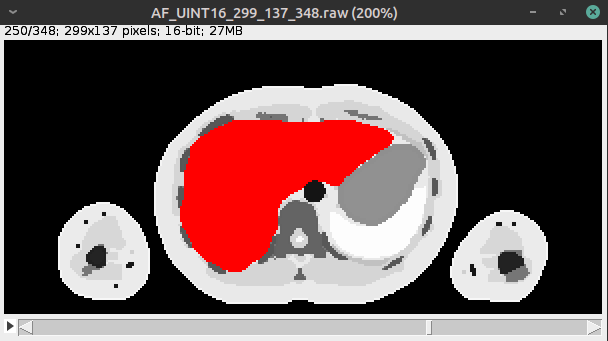
それぞれの領域は整数の値(0~141)を持っています。
例えば肝臓は「95」です。
Each area has an integer value (0 to 141).
For example, the liver value is “95”.
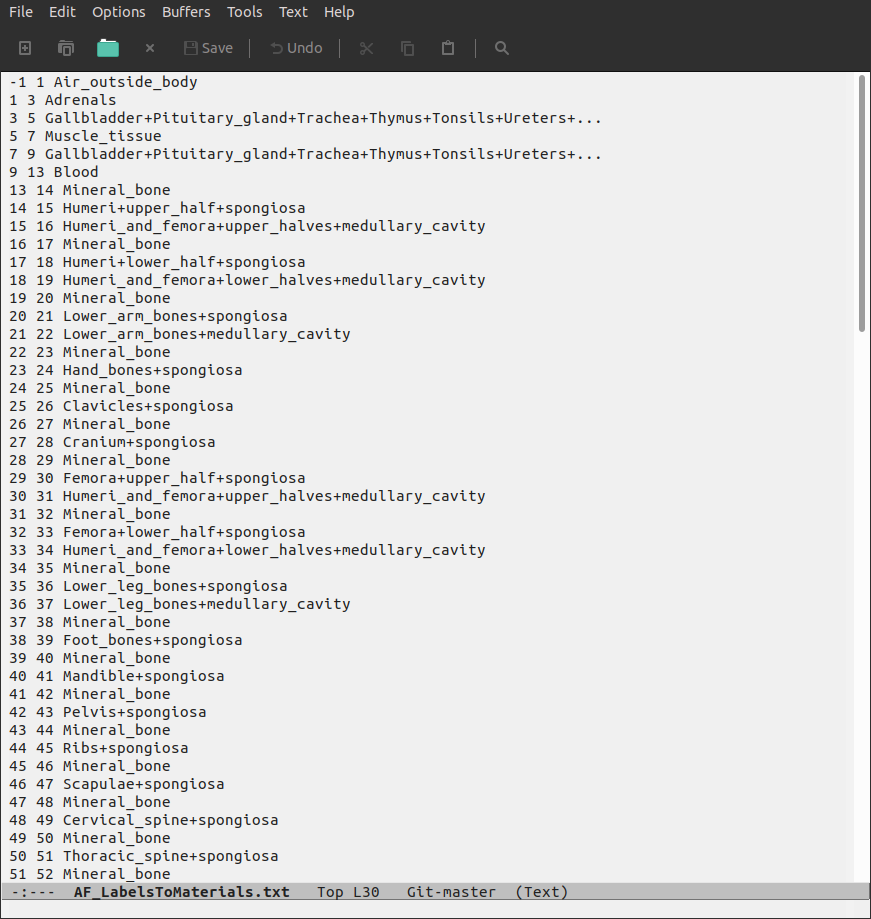
それら、領域に割り当てられた数値と臓器の名称をつなぐのが
data/AF_LabelsToMaterials.txt です。
3列で構成され、「画素値(以上) 画素値(未満) 物質名」 です。
It is “data / AF_LabelsToMaterials.txt” that associates the number assigned to the region with the name of the organ.
It consists of 3 columns and is “Pixel value (greater than or equal to) Pixel value (less than) substance name”.
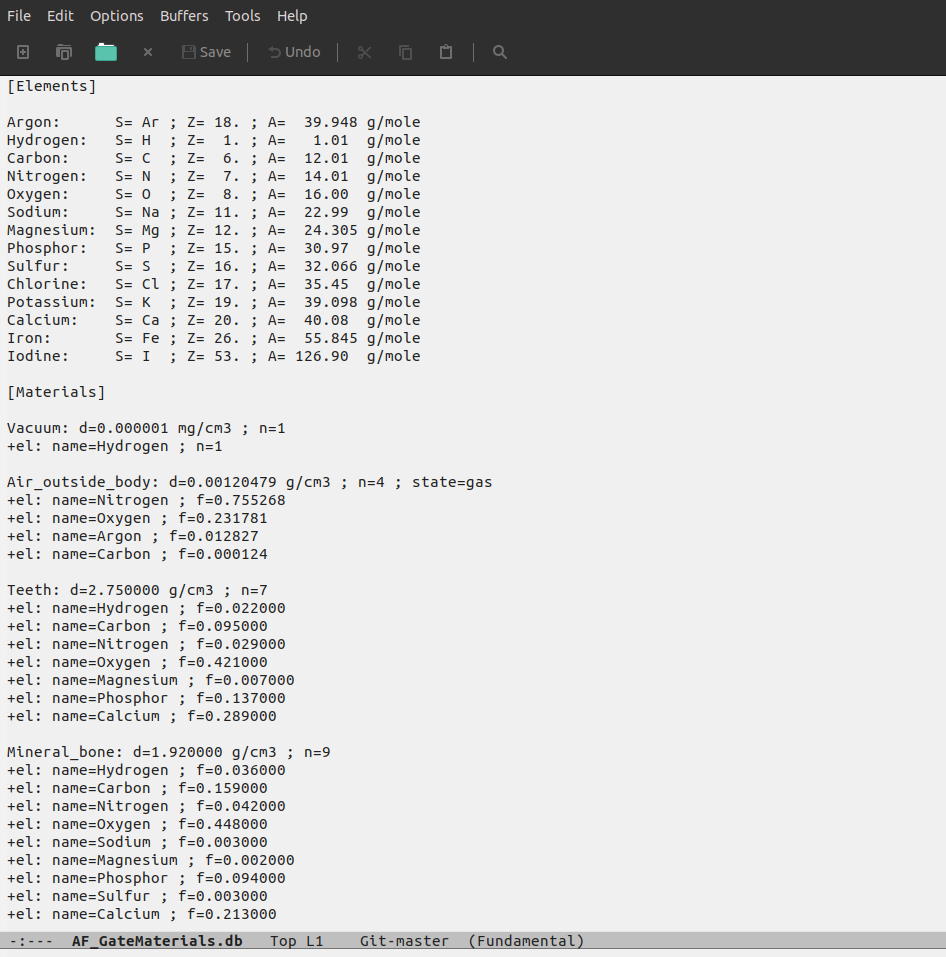
さらにその臓器を構成する物質を割り当てます。
それは data/AF_GateMaterials.db に記載されています。
Assign substances to organs.
It is listed in data/AF_GateMaterials.db.
このサンプルコードでは肝臓に線源を分布させ、各領域の線量を求めます。
線源分布の指定に使うファイル(ActivityRange95.dat)には、以下の2行が書かれています。
This sample code distributes the radiation source to the liver. Calculate the absorbed dose of radiation emitted from the liver for each region.
The following two lines are written in the file (ActivityRange95.dat) used to specify the source distribution.

最初の1は以下に何行記載するかを意味します。
画素値が95以上~95未満(矛盾しますが、この場合は画素値95のみ)の領域に線源を分布させます。割合は1.0(100%)です。
The first 1 means the number of lines below that.
The radiation source is distributed in the area where the pixel value is 95 or more and less than 95 (inconsistent, but in this case only the pixel value 95). The ratio is 1.0 (100%).
メインコード
main code
それでは、メインコードの中身を読んでいきます。
このコードはmac, data, outputディレクトリの一つ上の階層で実行することを想定して書かれています。
Let’s read the contents of the main code!
This code is written to run one level above the mac, data, and output directories.
もとのコードはこちらを参照してください。
See here for the original code.
では、最初から順番に見ていきましょう。
Let’s look at the main code in order from the beginning.
Geometry
#=======================================
# GEOMETRY
#=======================================
/gate/geometry/setMaterialDatabase           data/AF_GateMaterials.db

# world
/gate/world/setMaterial           Air_outside_body
/gate/world/geometry/setXLength          1000 mm
/gate/world/geometry/setYLength          1000 mm
/gate/world/geometry/setZLength          2000 mm

# Voxel phantom
/gate/world/daughters/name          patient
/gate/world/daughters/insert         ImageNestedParametrisedVolume
/gate/patient/geometry/setHUToMaterialFile     data/AF_LabelsToMaterials.txt
/gate/patient/geometry/setImage       data/AF_UINT16_299_137_348.mhd
まず使用する物質の情報が記載されているデータベースを読み込みます。
これまでは「../../misc/GateMaterials.db」のようなテンプレを使用していましたが、このサンプルコードでは個別に用意されています。dataディレクトリの中に保存されているのでそれを指定します。
First, load the database that contains information on the substances used.
Previously, I used a template like “../../misc/GateMaterials.db”, but this sample code specifies a file stored in the data directory.
Worldは1000×1000×2000mmの大きさで空気で構成されています。
The size of World is 1000 × 1000 × 2000mm. World is made up of air.
次は、まだこのサイトでは説明していない「ボクセルファントムの作り方」になります。
ボクセルファントムの作成方法は3つあります。
Next is “How to make a voxel phantom” which has not been explained on this site yet.
There are three ways to create a voxel phantom.
・ImageRegularParametrisedVolume
・ImageNestedParametrisedVolume
・ImageRegionalizedVolume
が使用可能ですが、ImageNestedParametrisedVolumeを使っておけばOKです。
The above three methods can be used, but it is OK if you use ImageNestedParametrisedVolume.
volume名はなんでもいいですが「patient」としています。
The name of volume can be anything. It is named “patient” in the sample code.
「setHUToMaterialFile」では画素値と領域(臓器)名の関係を書いたAF_LabelsToMaterials.txtの場所を教えます。
The “setHUToMaterialFile” command tells the GATE the location of AF_LabelsToMaterials.txt that describes the relationship between pixel values and area (organ) names.
「setImage」は使用する画像の場所を記載します。.mhdのファイルを指定します。
“SetImage” describes the location of the image to use. Specify the .mhd file.
何も難しいことはないですね。では次に進みます。
It’s easy. Let’s move on.
Physics
#==========================================
# PHYSICS
#==========================================
/gate/physics/addPhysicsList          emlivermore

/gate/physics/Gamma/SetCutInRegion         world 10.0 mm
/gate/physics/Electron/SetCutInRegion         world 10.0 mm
/gate/physics/Positron/SetCutInRegion         world 10.0 mm

/gate/physics/Gamma/SetCutInRegion         patient 0.1 mm
/gate/physics/Electron/SetCutInRegion         patient 0.1 mm
/gate/physics/Positron/SetCutInRegion         patient 0.1 mm
physicsリスト(physicsの詰め合わせ)はemlivemoreを使用しています。これは比較的、低エネルギーのシミュレーションをする場合に使います。低エネルギー用としては、その他にもemstandard_opt3(または opt4)などがあります。
※精度は高くなりますが、計算時間が延びるので時間との兼ね合いが必要です。
The physics list (pack of physics packs) uses emlivemore. This is used for relatively low energy simulations. Others such as emstandard_opt3 (or opt4) are also used for low energy radiation simulation.
P.S. Although the accuracy will be higher, the calculation time will be longer, so it is necessary to balance with the time.
あまりにも低いエネルギーの粒子(光子)の挙動を追っていると、時間がかかるためCutを指定します。Cutは領域ごとに違う値を指定することができます。上の場合はWorldでは10mm以下,patientの中では0.1mm以下の飛程しかない二次?粒子は放出しないようになります。
If you follow the behavior of particles (photons) with too low energy, the calculation time will be long. Use Cut to avoid that. Cut can specify different values for each area. In the above case, secondary particles with a range of 10 mm or less in the world and 0.1 mm or less in the patient will not be emitted.
Actor
#========================================
# DETECTORS
#========================================
/gate/actor/addActor         DoseActor  dose3D
/gate/actor/dose3D/attachTo        patient
/gate/actor/dose3D/stepHitType         random
/gate/actor/dose3D/setResolution          299 137 348
/gate/actor/dose3D/enableDose        true
/gate/actor/dose3D/save        output/output.mhd
/gate/actor/dose3D/inputDoseByRegions                             data/AF_UINT16_299_137_348.mhd
/gate/actor/dose3D/outputDoseByRegions                            output/DoseByRegions.txt
/gate/actor/dose3D/addRegion        1000: 89, 90, 91
/gate/actor/dose3D/addRegion        1001: 92, 93, 94
このセクションはデータの収集に関してです。
以前、Outputに関する記事を書きましたが、今回はそれとは違う書き方です。これはActorと呼ばれる方法になります。ROOTのように多次元でデータを収集するわけではないので後から処理することはできませんが、取得したい情報や形式(サイズ、マトリックスなど)が決まっているのであれば便利です。
This section is about data collection.
I wrote an article about Output before, but this time it’s a different way. This will be the method called Actor. Unlike ROOT, it does not collect data in multiple dimensions, so it cannot be processed later, but it is convenient if the information and the format (size, matrix, etc.) you want to obtain are predetermined.
Actorに関しては別記事で書きますので、ここでは詳しく書きません。
I will write about Actor in an other article, so I will not describe it in detail here.
このサンプルコードではDoseActorと呼ばれるものを使用しています。吸収線量の分布を3次元画像として出力します。
This sample code uses an Actor called DoseActor. Outputs the distribution of absorbed dose as a three-dimensional image.
名前はdose3Dとしていますが、これは任意です。patientに取り付けて(attachTo)いますので、patientの中のHitsから情報を取得します。
The name of the actor is “dose3D”, but this can be changed arbitrarily. Since we are attaching to “patient” (attachTo), I get information from Hits in “patient”.
「stepHitType」に「random」を指定していますが、この他にも「pre」だったり「post」といったものがあります。stepはpre-step-pointとpost-step-pointの2つから成ります。「random」が推奨されていますので、randomを使います。
Although “random” is specified for “stepHitType”, there are other things such as “pre” and “post”. step consists of pre-step-point and post-step-point. The manual recommends using “random”.
次に、「setResolution」です。Doseの情報を3次元画像で取得しますが、そのマトリクスを決めます。今回は入力に使った画像と同じ299x137x348としています。ボクセルサイズを指定する方法もありますが、setResolutionを使うのが楽だと思います。
Next is “setResolution”. Get Dose information as a 3D image. It is necessary to decide the number of divisions of the 3D image. This time, it is 299x137x348 with the same number of divisions as the image used for input. There is a way to specify the voxel size, but I think it’s easier to use setResolution.
「enableDose」のところは、以下のような記述で他にも情報を出力可能です。
In “enableDose”, other information can be output by the following description.
/gate/actor/dose3D/enableEdep true
/gate/actor/dose3D/enableUncertaintyEdep true
/gate/actor/dose3D/enableSquaredEdep true
/gate/actor/dose3D/enableDose true
/gate/actor/dose3D/enableUncertaintyDose true
/gate/actor/dose3D/enableSquaredDose true
/gate/actor/dose3D/enableNumberOfHits true
outputは「output」ディレクトリの中に「output.mhd」という名前で保存するように指定しています。画像はMetaImage形式ですね。
The result is saved in the “output” directory as “output.mhd”. The image format is MetaImage format.
入力画像は人体を模擬した数値ファントムです。その中で、特定の臓器の吸収線量を知りたい場合には、データを収集する領域(region)の分け方をGateに教える必要があります。その場合には、入力画像がそのまま使用できます。なので、inputDoseByRegionsにはAF_UINT16_299_137_348.mhdを指定します。
The input image is a numerical phantom simulating the human body. If you want to know the absorbed dose of a particular organ, you need to tell Gate how to separate the collected data. In this case, you can use the input image as is.Therefore, for inputDoseByRegions, specify AF_UINT16_299_137_348.mhd.
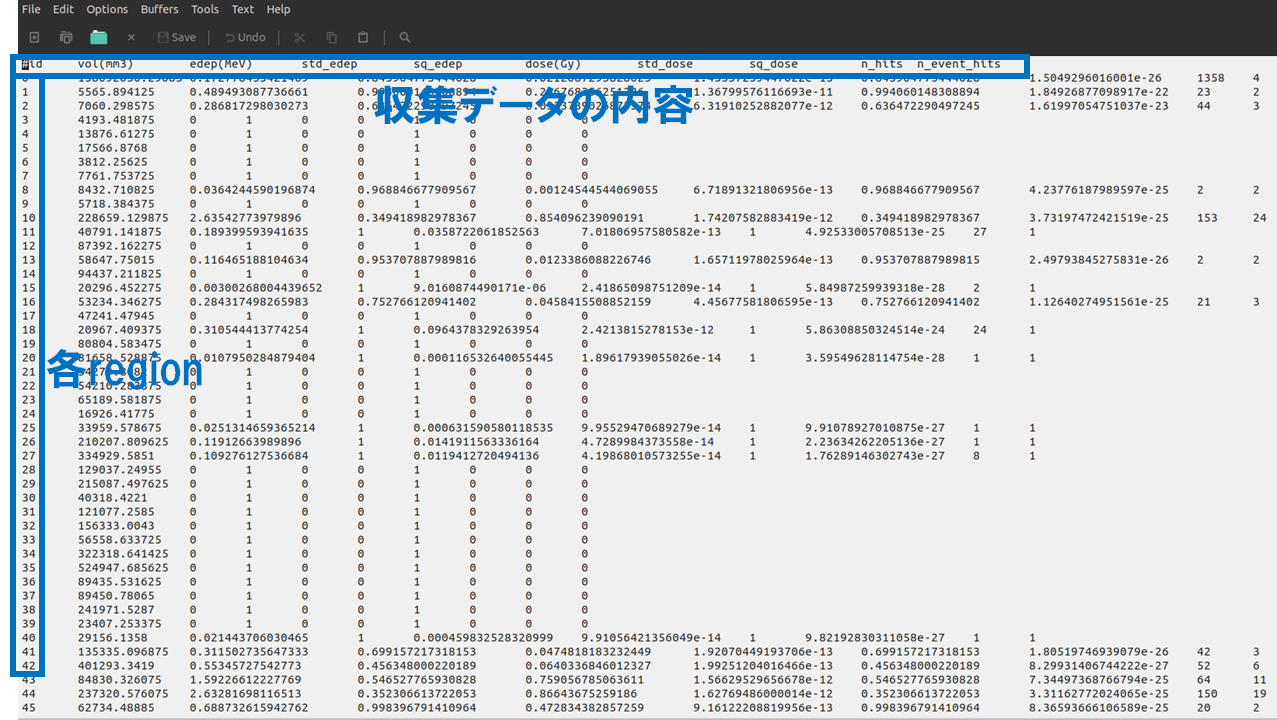
そして、各regionの結果はDoseByRegions.txtというファイルに書き込まれて出力されます。ちなみに計算後にDoseByRegions.txtの中身を見てみると、以下のような内容であることが確認できます。
Then, the result of each region is written and output to a file called DoseByRegions.txt. If you look at the contents of DoseByRegions.txt after the calculation, you can confirm that the contents are as follows.
画像中の複数の領域(画素値)を合算して、1つの領域として扱いたい(吸収線量を求めたい)場合にはaddRegionを使用します。先ほどの例では画素値が89,90,91の所をregion:1000、92,93,94をregion:1001としています。
Use addRegion when you want to combine multiple areas (pixel values) in the image and treat them as one area (to obtain the absorbed dose). In the example above, the pixel value 89,90,91 are region: 1000, 92,93,94 are region: 1001.
run initialize
次に初期化(initialize)します。
乱数の種(seed)を設定すると毎回同じ結果が得られるので、同じ条件で検討したい場合は有効です。
Then initialize it.
The same result can be obtained every time when the seed of random numbers is set, so it is useful if you want to consider the same conditions.
#=====================================
# INITIALISATION
#=====================================
/gate/run/initialize
/gate/random/setEngineSeed                                        1337
Source
次は線源に関するセクションです。
initializeよりも後に書く必要があります。
Next is the section on radiation sources.
Must be written after initialize.
#============================================
# SOURCE
#============================================
# Source from ICRP voxel model
/gate/source/addSource     ActivityImage voxel
/gate/source/ActivityImage/reader/insert      image
/gate/source/ActivityImage/imageReader/translator/insert     range
/gate/source/ActivityImage/imageReader/rangeTranslator/readTable  data/ActivityRange95.dat
/gate/source/ActivityImage/imageReader/readFile        data/AF_UINT16_299_137_348.mhd
/gate/source/ActivityImage/setPosition        -265.3625 -121.5875 -842.16 mm

/gate/source/ActivityImage/gps/particle        gamma
/gate/source/ActivityImage/gps/energytype       Mono
/gate/source/ActivityImage/gps/monoenergy       1 MeV
/gate/source/ActivityImage/gps/angtype        iso
画像の画素値をもとに線源を配置しています(Voxelized source)。
前述の通り、ActivityRange95.datには画素値と線源分布割合が記載されています。いろいろ書かなければならない行が多いですが、このサンプルをコピペして使えばOKです。
The source is arranged based on the pixel value of the image (Voxelized source).
As mentioned above, the relationship between the pixel value and the radiation source distribution ratio is described in ActivityRange95.dat. There are many commands to write, but it’s OK if you copy and paste this sample.
一つ注意しなければならないのは線源の位置はx,y,z方向の始点を指定する必要があることです。
stack画像の中心座標からx方向に-265.3625 mm、y方向に-121,5875 mm、z方向に-842.16 mm移動させた点が開始位置です。
One thing to keep in mind is that the source position must specify the starting point in the x, y, z directions.
The starting position is the point moved by -265.3625 mm in the x direction, -121,5875 mm in the y direction, and -842.16 mm in the z direction from the center coordinates of the stack image.
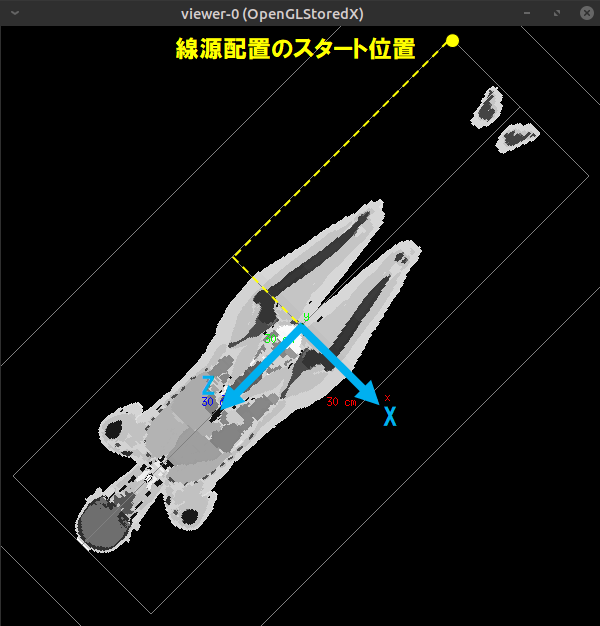
画像は299x137x348であり、ピクセルサイズは1.775×1.775×4.84mmであるため、画像サイズは530.725×243.175×1684.32mmとなります。それぞれ半分の値は265.3625、121.5875、842.16mmです。
The image matrix is 299 x 137 x 348, and the pixel size is 1.775 x 1.775 x 4.84 mm, so the image size is 530.725 x 243.175 x 1684.32 mm. The half values are 265.3625, 121.5875, and 842.16 mm, respectively.
粒子はガンマ線、単一エネルギー(1MeV)で4π方向に放出するようになっています。
The types of particles are gamma rays, and the energy is a mono spectrum (1 MeV) and is emitted in the 4π direction.
Number of primaries
最後に、発生させる粒子の数を指定します。
Finally, specify the number of particles to generate.
#=========================================
# APPLICATION
#=========================================
/gate/application/setTotalNumberOfPrimaries         1e5
/gate/application/start
これまでは撮像時間を指定するような方法でしたが(下のように)、setTotalNumberOfPrimariesを使うと発生させる粒子の数を指定することができます。「start」コマンドで計算が実行されます。
So far, it was a method to specify the imaging time (as below), but you can specify the number of particles to generate using setTotalNumberOfPrimaries. The calculation is executed with the “start” command.
今まで紹介してきた実行開始コマンド(startDAQ)は以下の通りです。
The execution start command (startDAQ) introduced so far is as follows.
#SPECT PET example
/gate/application/setTimeSlice      1  s
/gate/application/setTimeStart      0.    s
/gate/application/setTimeStop      2.  s

/gate/application/startDAQ
以下はこのサンプルコードの試行回数を1e5(100000)回にして計算した結果です。
The figure below shows the result of calculation with 1e5 (100000) times in this sample code.
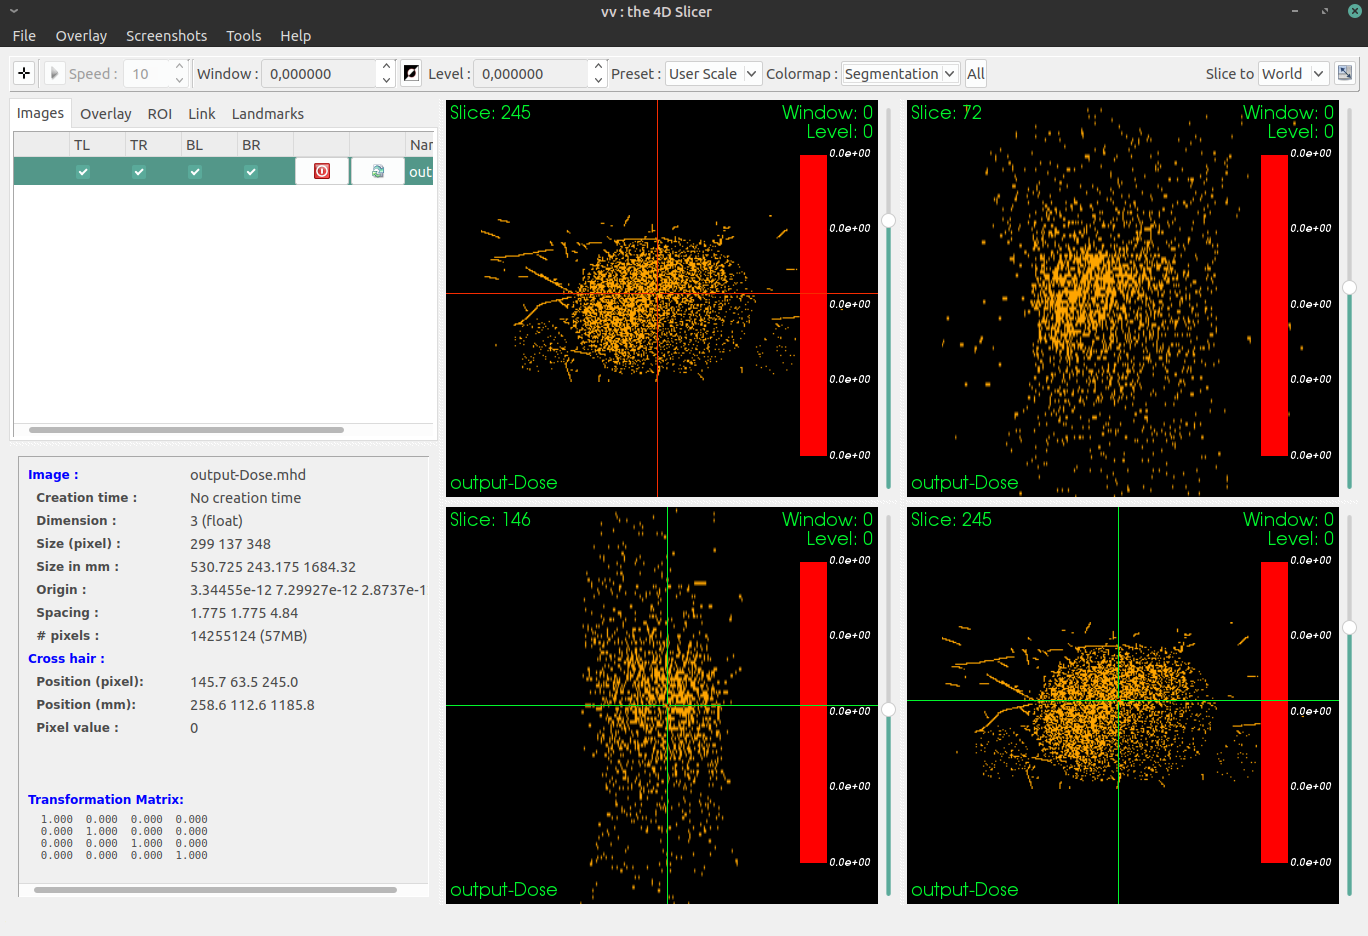
肝臓から1MeVのガンマ線が出ていますので、肝臓の吸収線量が最も大きいことが分かります。
Since 1 MeV gamma ray is emitted from the liver, it can be seen that the absorbed dose in the liver is the largest.
この人体模擬ファントムはいろいろな用途に使えそうですね。
This human body phantom can be used for various purposes.