GATEの使い方 13 ~実行の自動化~

How to use GATE 13

今回はGATEの実行方法の便利テクニックを紹介します。
This time I will introduce a convenient way to execute GATE.
これまで、計算条件を変更・実行するには「マクロファイルを変更」→「実行」という作業をしてきました。
Up to now, I have been editing the macro and executing it in order to change the calculation conditions.
しかし、放射線のエネルギーや粒子の種類、位置や入射方向など、いろいろ試行錯誤するのに、いちいちファイルを変更するのは面倒です。
However, it is troublesome to edit the macro file every time in order to calculate under various conditions (radiation energy, particle type, position and incident direction).
そのたびにマクロを変更・保存していては膨大な数のファイルになりますし、ミスする恐れがあります。
If you change and save the macro each time, it will be a huge number of files and you may make a mistake.
実はGATEは、コマンドオプションで値を変更することが可能です。
GATE can change simulation conditions by using command options.
これを読めば効率よくシミュレーションを進めることができます!
If you read this, you can proceed with the simulation efficiently!
今回はとても簡単で、短い記事です。なので、ついでにシェルスクリプトについても簡単に紹介します。
This time it’s a very simple and short article. I will also briefly introduce shell scripts.
GATEの使い方 13
How to use the GATE
マクロファイルの書き方と実行方法 How to write and execute a macro file
コマンドオプション(コマンドライン引数)でシミュレーション条件を変更するために、変数を使ってマクロファイルを書く必要があります。
In order to change the simulation conditions with command options (command line arguments), it is necessary to write a macro file with variables.
プログラムを書いた経験がない方のために説明しておきます。
This explanation is for those who have no experience writing programs.
プログラムでは
>1 + 1
と入力して、Enterを押すと
>2
と結果が返ってきます。
If you enter as bellow (and push the “Enter key”)
> 1 + 1
you will get the result
> 2
これを、変数を使って書きます
If you write using variables
>a = 1
>b = 1
>a + b
と入力し、Enterを押すと
push the “Enter key”
>2
というように結果が返ってきます。
you can get the result.
変数を使って式を作っておけば、その後変数の中に入れる値を変更して、いろいろな条件で同じ計算を行うことができ便利です。
It is convenient that you can make the same calculation under various conditions by changing the value to be put in the variable after creating the expression using the variable.
マクロファイルの中で変数を使うためには{ }を使います。以下に例を示します。
To use a variable in a macro file, use “{}”. An example is shown below.
PET装置(クリスタル)を構築するコマンドを以下のように書いたとします。
Write the command to build the PET device (crystal) using variables.
/gate/crystal/geometry/setXLength             {crystal_thickness} mm
/gate/crystal/geometry/setYLength             4.0 mm
/gate/crystal/geometry/setZLength             4.0 mm
/gate/crystal/setMaterial                     {crystal_material}
実行の際に以下のようにコマンドを打つことでクリスタルの厚さや材質を変更して、計算可能です。
At the time of execution, you can change the thickness and material of the crystal by typing the following command.
$Gate -a [crystal_thickness,30] [crystal_material,LSO] PET.mac他にも例えば
Other examples…
$Gate -a [crystal_thickness,25] [crystal_material,BGO] PET.macのような計算が可能です。
This kind of use is also possible.
この変数の使い道は他にもあります。読み込むファイル名や、出力ファイル名にも使うことができます。
There are other uses for this variable. It can also be used as a file name to read or an output file name.
/gate/geometry/setMaterialDatabase ./{material_filename}#=================
# D A T A O U T P U T
#=================
/gate/output/root/enable
/gate/output/root/setFileName ./result/{isotopename}_{no}
/gate/output/root/setRootHitFlag 0
/gate/output/root/setRootSinglesFlag 0
/gate/output/root/setRootCoincidencesFlag 1
#/gate/output/root/setRootdelayFlag 0以下のように実効します。
Execute as follows.
#Gate -a [material_filename,my_material.db] [isotopename,FDG] [no,1] PET.mac出力ファイル名など、後から間違いに気が付きにくいので、計算条件を出力ファイル名に含めるのがおすすめです。
Even if you make a mistake in the output file name, you will not notice the mistake later. It is recommended to include the calculation condition in the output file name.
以下のように施行回数にも使うことができます。
You can also use it for the number of event (Run) as follows.
#=====================
# APPLICATION
#=====================

/gate/application/setTotalNumberOfPrimaries                       {event_num}
/gate/application/start
#Gate -a [event_num,1e6] PET.mac #1e6 = 1000000他にも応用法があると思いますので、いろいろ試してみてください。
I think that there are other ways to apply it, so please try various things.
シェルスクリプト Shell script
上で紹介した変数を使った方法は、シェルスクリプトを使うともっと便利です。
The method using variables introduced above is more convenient when using shell scripts.
シェルスクリプトに関する説明は別の記事で行いますが、とりあえず簡単なスクリプトを書いてみます。
I’ll explain shell scripts in another article, but for now I’ll write a simple script.
ちなみに、シェルスクリプトを勉強するのであれば以下の書籍がおすすめです。これ以外ないほど分かりやすいです。
By the way, the following books are recommended if you study shell scripts.
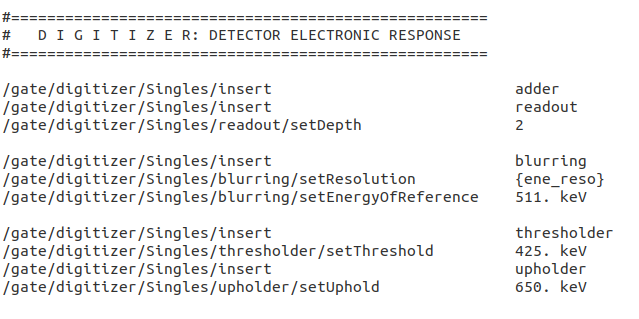
マクロファイルの中身(DIGITIZERの部分)を以下のようにします。
エネルギー分解能をene_resoという変数にします。
Set the contents of the macro file (DIGITIZER part) as follows.
Set the energy resolution to a variable called ene_reso.
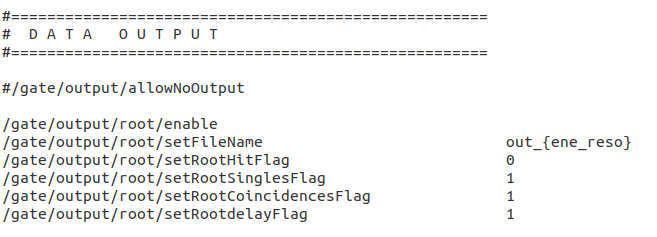
また、計算結果のファイルが上書きされると困るので以下のようにします。
Rename and save the calculation result file so that it is not overwritten.
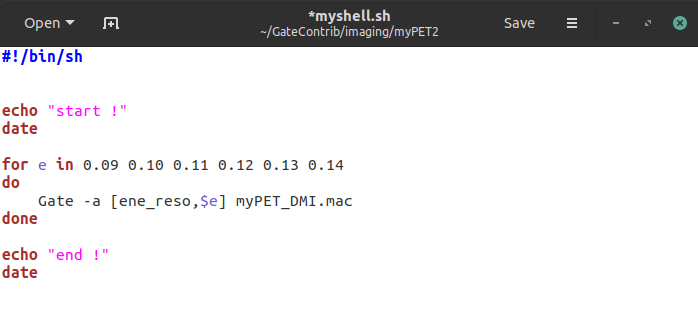
シェルスクリプトを書きます。
Let’s make a shell script.
$ gedit myshell.sh最初の”#!/bin/sh”は「シェルスクリプトですよ」という宣言ですので、必ず書いてください。
The first “#!/bin/sh” means that this file is a shell script. Please be sure to write.
ls -lコマンドで作成したファイルを確認します。
Check the file created by the ls -l command.
$ ls -l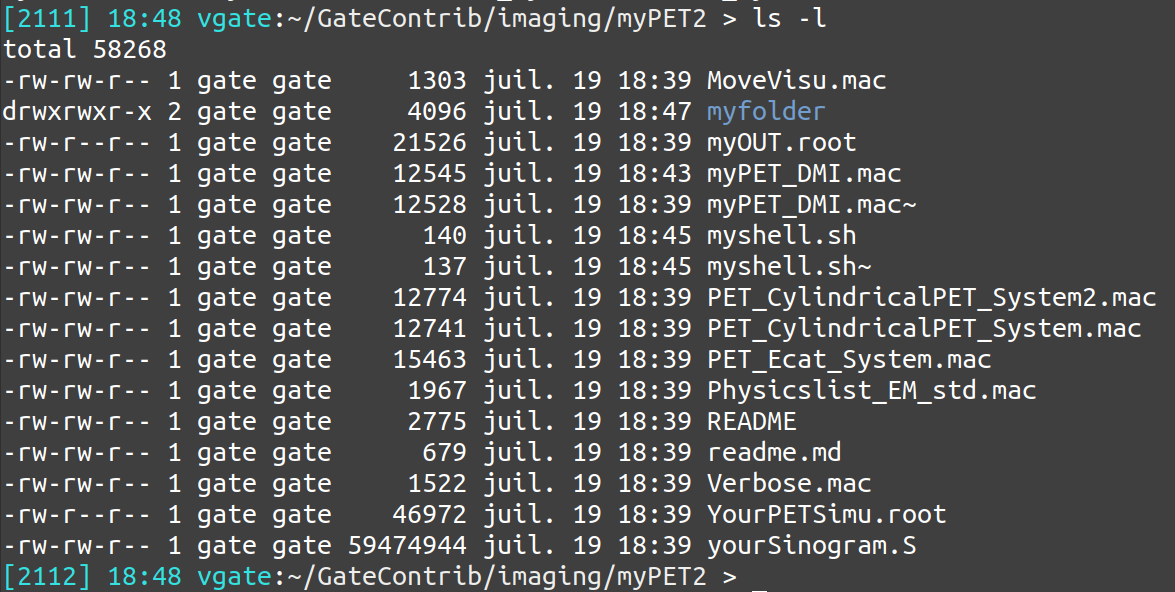
各ファイルの左端に-rw-rw-r–といった表記があります。
一番左のdはディレクトリ(フォルダ)かファイルか( d or – )を意味します。
At the left end of each line is -rw-rw-r–.
The leftmost d means a directory (folder) or a file (d or -).
残りの9文字(rw-rw-r–)はそれぞれ、所有者、グループ、その他のユーザの権限を示しています。
The remaining 9 characters (rw-rw-r–) indicate the permissions of the owner, group, and other users, respectively.
rがついていれば読み(read)可能、wがついていれば書き(write)可能、xがついていれば実行(execute)可能です。
“r” is readable, “w” is writable, and “x” is executable.
例えばrw-rw-r–の場合は、以下のような意味になります。
所有者:読み書き可能、実行不可
グループ:読み書き可能、実行不可
その他のユーザー:読むこと可能、書き込み・実行不可
For example, “rw-rw-r–” means;
Owner: readable, writable, not executable
Group: readable, writable, not executable
Other user: readable, not writable, not executable
Linuxは様々なユーザーの権限を切り替えて使用しますので、管理者(root)や所有者、一般ユーザー、グループなどによって許可される操作が異なります。
Linux switches and uses various users. It is necessary to be aware of the privileges given to the administrator (root), owner, general user, group, etc.
上の例では、どのファイルも” x “がついていませんでした。シェルスクリプトは実行して使用しますので、実行権限を追加します。
chmod (change mode)コマンドを使用します。
In the example above, none of the files had an “x”. The shell script is executed and used, so add the execute permission.
Use the chmod (change mode) command.
$ chmod +x myshell.shもう一度 ls -l コマンドを打ってみましょう。
Let’s put “ls -l” command again.
$ ls -l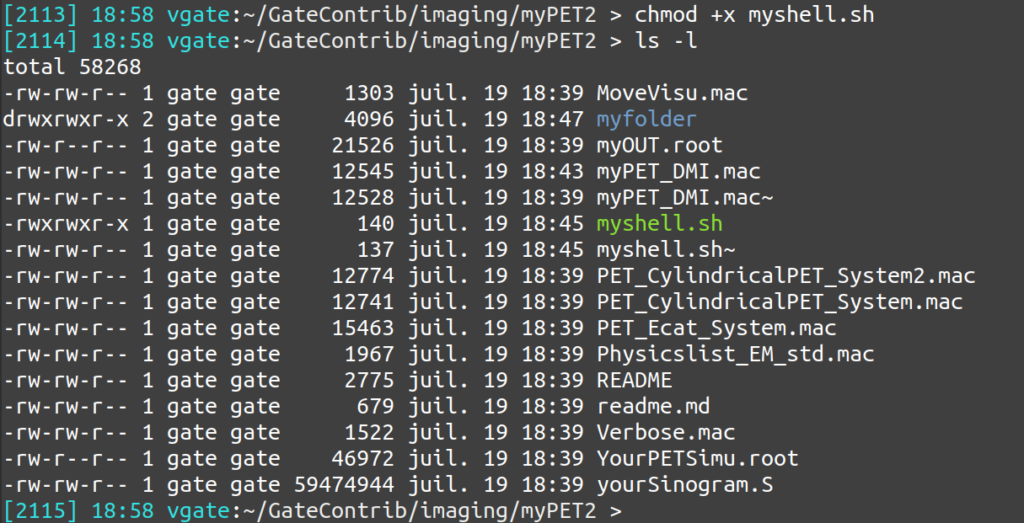
myshell.shの色が変わりました(また、実行権限のxがついています)。設定によりますが、実行可能ファイルは表示の色が変わります。ディレクトリは青色で表示されていますね。
The color of myshell.sh has changed (in addition, the execution permission x is attached). Depending on the setting, the display color of the executable file changes. The directory is displayed in blue.
これで実行可能となりました。では実行してみましょう。
Now you can execute. Let’s run it.
$ ./myshell.sh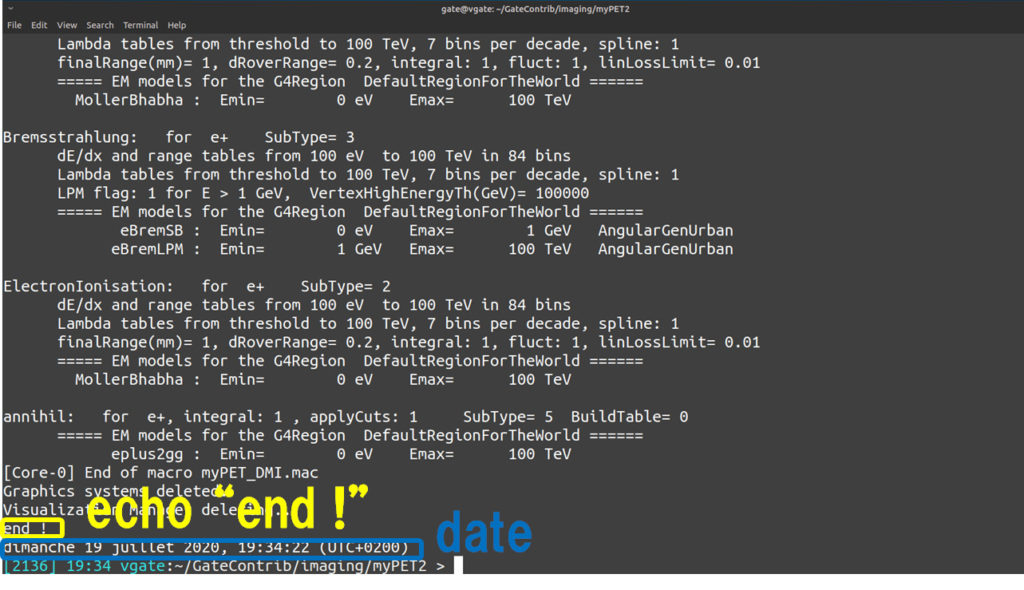
計算途中のログが、だーっと表示され、最後にend !と表示されて終わります。
A large number of logs under calculation are displayed. Finally, “end !” is displayed and the process ends.
先ほどのシェルスクリプトの最後には以下の2行を書いています。
I wrote the following two lines at the end of the shell script.
echo "end !"
date
シェルスクリプトは1行1行読んでいきます。今回作成したシェルスクリプトを使った場合、最後は「end !」と表示した後、時刻を表示して終わります。
Read the shell script line by line. When using the shell script created this time, after displaying “end !” at the end, it displays the time and ends.
このような感じで、シェルスクリプトを使うと様々な実行命令を送れますので便利です。
With such a feeling, it is convenient to use a shell script because you can send various execution commands.
手動で作業するよりも間違いが少なくなります。ファイル名を変えたっけ?という不安に駆られる心配もありません。間違いが起こり得ない仕組みを作ることが重要です。
Less mistakes than manual work. You don’t have to worry if the save filename is correct. It is important to create a mechanism that can prevent mistakes.